Laravel 5.8 Simple Ajax CRUD Application
In this tutorial, you will learn to create a simple ajax based CRUD (Create, Read, Update and Delete) application. In this step by step guide, we will be creating a simple blog application with post table and implement ajax based CRUD operations.
Install Laravel 5.8 Using Command
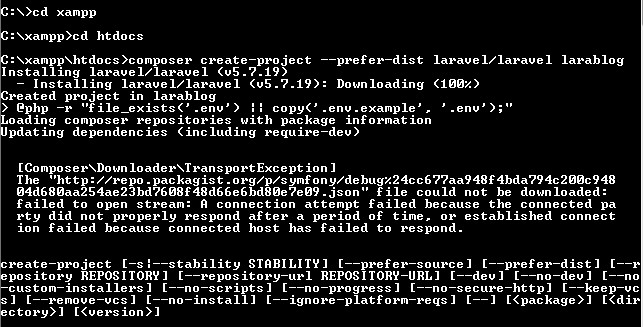
First of all we need to create a fresh laravel project, download and install Laravel 5.8 using the below command
|
1 |
composer create-project --prefer-dist laravel/laravel larablog |
Configure Database In .env file
Now, lets create a MySQL database and connect it with laravel application. After creating database we need to set database credential in application’s .env file.
.env
|
1 2 3 4 5 6 |
DB_CONNECTION=mysql DB_HOST=127.0.0.1 DB_PORT=3306 DB_DATABASE=larablog DB_USERNAME=root DB_PASSWORD= |
Generate Application Key
Open terminal and switch to the project directory and run the following command to generate application key and configure cache.
|
1 |
php artisan key:generate |
|
1 |
php artisan config:cache |
Set Default String Length
Locate the file “app/Providers/AppServiceProvider”, and add following line of code to the top of the file
|
1 |
use Illuminate\Support\Facades\Schema; |
and inside the boot method set a default string length as given below –
|
1 |
Schema::defaultStringLength(191); |
So this is how “app/Providers/AppServiceProvider” file looks like –
|
1 2 3 4 5 6 7 8 9 10 11 12 13 14 15 16 |
<?php namespace App\Providers; use Illuminate\Support\ServiceProvider; use Illuminate\Support\Facades\Schema; class AppServiceProvider extends ServiceProvider { public function boot() { // Schema::defaultStringLength(191); } public function register() { // } } |
Create Database Table and Migration
Now, we have to define table schema for posts table. Open terminal and let’s run the following command to generate a migration file to create posts table in our database.
|
1 |
php artisan make:migration create_posts_table --create=posts |
Once this command is executed you will find a migration file created under “database/migrations”. lets open migration file and put following code in it –
|
1 2 3 4 5 6 7 8 9 10 11 12 13 14 15 16 17 18 19 20 21 22 23 24 25 26 27 28 29 30 31 32 33 |
<?php use Illuminate\Support\Facades\Schema; use Illuminate\Database\Schema\Blueprint; use Illuminate\Database\Migrations\Migration; class CreatePostsTable extends Migration { /** * Run the migrations. * * @return void */ public function up() { Schema::create('posts', function (Blueprint $table) { $table->bigIncrements('id'); $table->string('title'); $table->string('body'); $table->timestamps(); }); } /** * Reverse the migrations. * * @return void */ public function down() { Schema::dropIfExists('posts'); } } |
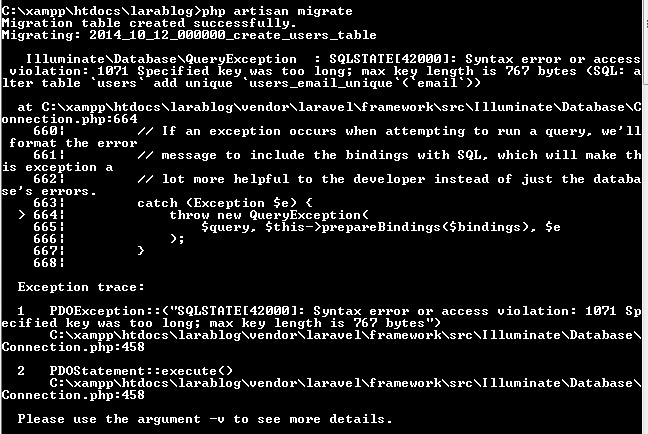
Run Migration
Now, run following command to migrate database schema.
|
1 |
php artisan migrate |
After, the migration executed successfully the posts table will be created in database along with migrations, password_resets and users table.
Create Model
Next, we need to create a model called Post using below command.
|
1 |
php artisan make:model Post |
Once, the above command is executed it will create a model file Post.php in app directory. Next, we have to assign fillable fields using fillable property inside Post.php file. Open app/Post.php file and put the following code in it –
app/Post.php
|
1 2 3 4 5 6 7 8 9 10 11 |
<?php namespace App; use Illuminate\Database\Eloquent\Model; class Post extends Model { // protected $fillable = [ 'title', 'body' ]; } |
Create Controller Using Command
Next, we have to create a controller to handle Ajax CRUD Operations. Create a controller named AjaxPostController using command given below –
|
1 |
php artisan make:controller ajaxcrud/AjaxPostController |
Once the above command executed, it will create a controller file AjaxPostController.php in app/Http/Controllers/ajaxcrud directory. Open the ajaxcrud/AjaxPostController.php file and put the following code in it.
app/Http/Controllers/dtable/AjaxPostController.php
|
1 2 3 4 5 6 7 8 9 10 11 12 13 14 15 16 17 18 19 20 21 22 23 24 25 26 27 28 29 30 31 32 33 34 35 36 37 38 39 40 41 42 43 44 45 46 47 48 49 50 51 52 53 54 55 56 57 58 59 60 61 62 63 64 65 66 67 68 69 70 71 |
<?php namespace App\Http\Controllers\ajaxcrud; use Illuminate\Http\Request; use App\Http\Controllers\Controller; use App\Post; use Redirect,Response; class AjaxPostController extends Controller { /** * Display a listing of the resource. * * @return \Illuminate\Http\Response */ public function index() { // $data['posts'] = Post::orderBy('id','desc')->paginate(8); return view('ajaxcrud.index',$data); } /** * Store a newly created resource in storage. * * @param \Illuminate\Http\Request $request * @return \Illuminate\Http\Response */ public function store(Request $request) { // $postID = $request->post_id; $post = Post::updateOrCreate(['id' => $postID], ['title' => $request->title, 'body' => $request->body]); return Response::json($post); } /** * Show the form for editing the specified resource. * * @param int $id * @return \Illuminate\Http\Response */ public function edit($id) { // $where = array('id' => $id); $post = Post::where($where)->first(); return Response::json($post); } /** * Remove the specified resource from storage. * * @param int $id * @return \Illuminate\Http\Response */ public function destroy($id) { // $post = Post::where('id',$id)->delete(); return Response::json($post); } } |
Create Blade / View Files
In this step, we will create view/blade file to perform CRUD Operations. Lets create a blade file “index.blade.php” in “resources/views/ajaxcrud/” directory and put the following code in it respectively.
resources/views/ajaxcrud/index.blade.php
|
1 2 3 4 5 6 7 8 9 10 11 12 13 14 15 16 17 18 19 20 21 22 23 24 25 26 27 28 29 30 31 32 33 34 35 36 37 38 39 40 41 42 43 44 45 46 47 48 49 50 51 52 53 54 55 56 57 58 59 60 61 62 63 64 65 66 67 68 69 70 71 72 73 74 75 76 77 78 79 80 81 82 83 84 85 86 87 88 89 90 91 92 93 94 95 96 97 98 99 100 101 102 103 104 105 106 107 108 109 110 111 112 113 114 115 116 117 118 119 120 121 122 123 124 125 126 127 128 129 130 131 132 133 134 135 136 137 138 139 140 141 142 143 144 145 146 147 148 149 150 151 152 153 154 155 156 157 158 159 160 161 162 163 164 165 166 167 168 169 170 171 172 173 174 175 176 |
<!DOCTYPE html> <html> <head> <meta charset="UTF-8"> <meta name="viewport" content="width=device-width, initial-scale=1.0"> <meta http-equiv="X-UA-Compatible" content="ie=edge"> <meta name="csrf-token" content="{{ csrf_token() }}"> <title>Laravel 5.8 Ajax CRUD Application - W3Adda.com</title> <link rel="stylesheet" href="https://cdnjs.cloudflare.com/ajax/libs/twitter-bootstrap/4.1.3/css/bootstrap.min.css" /> <script src="https://code.jquery.com/jquery-3.3.1.min.js"></script> <script src="https://cdnjs.cloudflare.com/ajax/libs/jquery-validate/1.19.0/jquery.validate.js"></script> <script src="https://cdnjs.cloudflare.com/ajax/libs/popper.js/1.14.3/umd/popper.min.js"></script> <script src="https://stackpath.bootstrapcdn.com/bootstrap/4.1.3/js/bootstrap.min.js"></script> <style> .container{ padding: 0.5%; } </style> </head> <body> <div class="container"> <h2 style="margin-top: 12px;" class="alert alert-success">Laravel 5.8 Ajax CRUD Application - W3Adda.com</h2><br> <div class="row"> <div class="col-12"> <a href="javascript:void(0)" class="btn btn-success mb-2" id="create-new-post">Add post</a> <table class="table table-bordered" id="laravel_crud"> <thead> <tr> <th>Id</th> <th>Name</th> <th>Email</th> <td colspan="2">Action</td> </tr> </thead> <tbody id="posts-crud"> @foreach($posts as $post) <tr id="post_id_{{ $post->id }}"> <td>{{ $post->id }}</td> <td>{{ $post->title }}</td> <td>{{ $post->body }}</td> <td><a href="javascript:void(0)" id="edit-post" data-id="{{ $post->id }}" class="btn btn-info">Edit</a></td> <td> <a href="javascript:void(0)" id="delete-post" data-id="{{ $post->id }}" class="btn btn-danger delete-post">Delete</a></td> </tr> @endforeach </tbody> </table> {{ $posts->links() }} </div> </div> </div> <div class="modal fade" id="ajax-crud-modal" aria-hidden="true"> <div class="modal-dialog"> <div class="modal-content"> <div class="modal-header"> <h4 class="modal-title" id="postCrudModal"></h4> </div> <div class="modal-body"> <form id="postForm" name="postForm" class="form-horizontal"> <input type="hidden" name="post_id" id="post_id"> <div class="form-group"> <label for="name" class="col-sm-2 control-label">Title</label> <div class="col-sm-12"> <input type="text" class="form-control" id="title" name="title" value="" required=""> </div> </div> <div class="form-group"> <label class="col-sm-2 control-label">Body</label> <div class="col-sm-12"> <input class="form-control" id="body" name="body" value="" required=""> </div> </div> <div class="col-sm-offset-2 col-sm-10"> <button type="submit" class="btn btn-primary" id="btn-save" value="create">Save </button> </div> </form> </div> <div class="modal-footer"> </div> </div> </div> </div> </body> </html> <script> $(document).ready(function () { $.ajaxSetup({ headers: { 'X-CSRF-TOKEN': $('meta[name="csrf-token"]').attr('content') } }); $('#create-new-post').click(function () { $('#btn-save').val("create-post"); $('#postForm').trigger("reset"); $('#postCrudModal').html("Add New post"); $('#ajax-crud-modal').modal('show'); }); $('body').on('click', '#edit-post', function () { var post_id = $(this).data('id'); $.get('ajax-posts/'+post_id+'/edit', function (data) { $('#postCrudModal').html("Edit post"); $('#btn-save').val("edit-post"); $('#ajax-crud-modal').modal('show'); $('#post_id').val(data.id); $('#title').val(data.title); $('#body').val(data.body); }) }); $('body').on('click', '.delete-post', function () { var post_id = $(this).data("id"); confirm("Are You sure want to delete !"); $.ajax({ type: "DELETE", url: "{{ url('ajax-posts')}}"+'/'+post_id, success: function (data) { $("#post_id_" + post_id).remove(); }, error: function (data) { console.log('Error:', data); } }); }); }); if ($("#postForm").length > 0) { $("#postForm").validate({ submitHandler: function(form) { var actionType = $('#btn-save').val(); $('#btn-save').html('Sending..'); $.ajax({ data: $('#postForm').serialize(), url: "{{ route('ajax-posts.store') }}", type: "POST", dataType: 'json', success: function (data) { var post = '<tr id="post_id_' + data.id + '"><td>' + data.id + '</td><td>' + data.title + '</td><td>' + data.body + '</td>'; post += '<td><a href="javascript:void(0)" id="edit-post" data-id="' + data.id + '" class="btn btn-info">Edit</a></td>'; post += '<td><a href="javascript:void(0)" id="delete-post" data-id="' + data.id + '" class="btn btn-danger delete-post">Delete</a></td></tr>'; if (actionType == "create-post") { $('#posts-crud').prepend(post); } else { $("#post_id_" + data.id).replaceWith(post); } $('#postForm').trigger("reset"); $('#ajax-crud-modal').modal('hide'); $('#btn-save').html('Save Changes'); }, error: function (data) { console.log('Error:', data); $('#btn-save').html('Save Changes'); } }); } }) } </script> |
Create Resource Routes
After this, we need to add a resource route in “routes/web.php“. Lets open “routes/web.php” file and add following route.
routes/web.php
|
1 |
Route::resource('ajax-posts', 'ajaxcrud\AjaxPostController'); |
Start Development Server
Now we are ready to run our example so lets start the development server using following artisan command –
|
1 |
php artisan serve |
Now, open the following URL in browser to see the output –
http://localhost:8000/ajax-posts
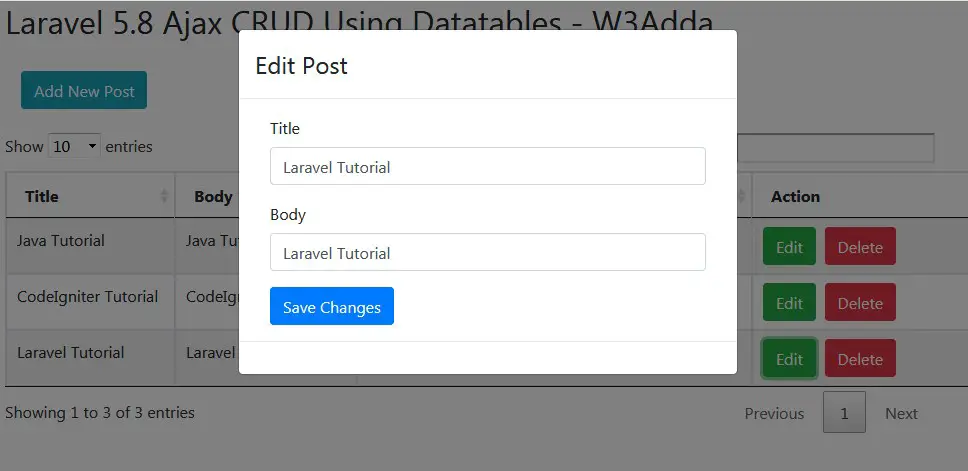
Output:-
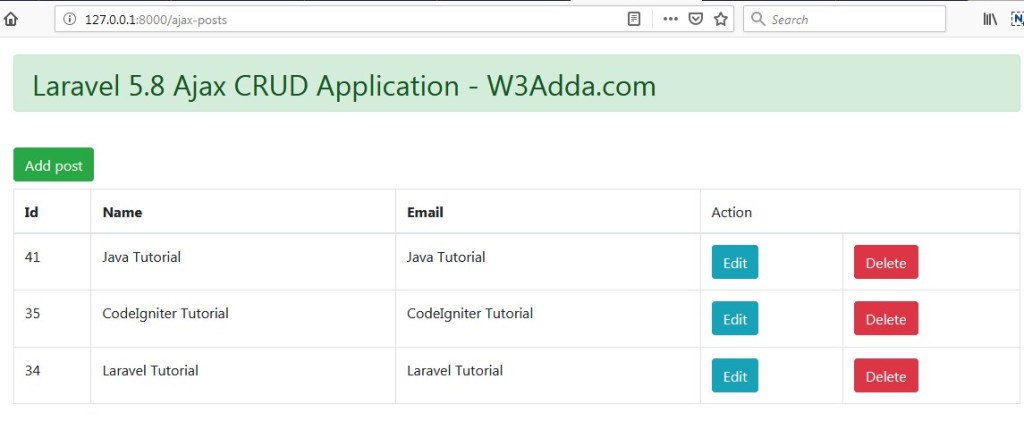
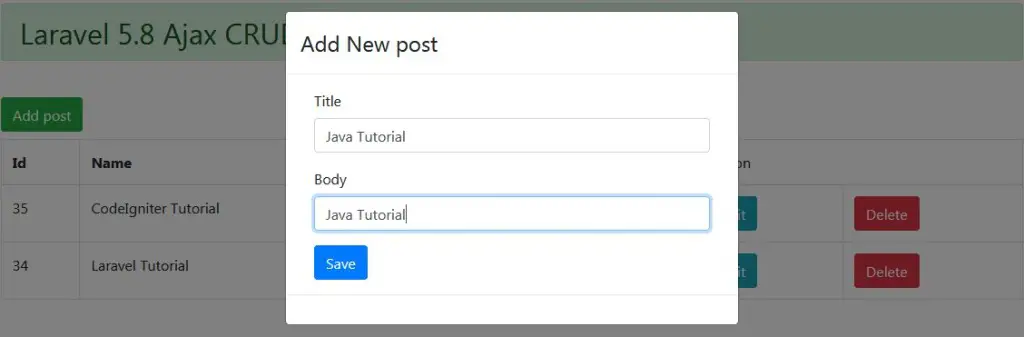
Click “Add New Post” to submit new post.
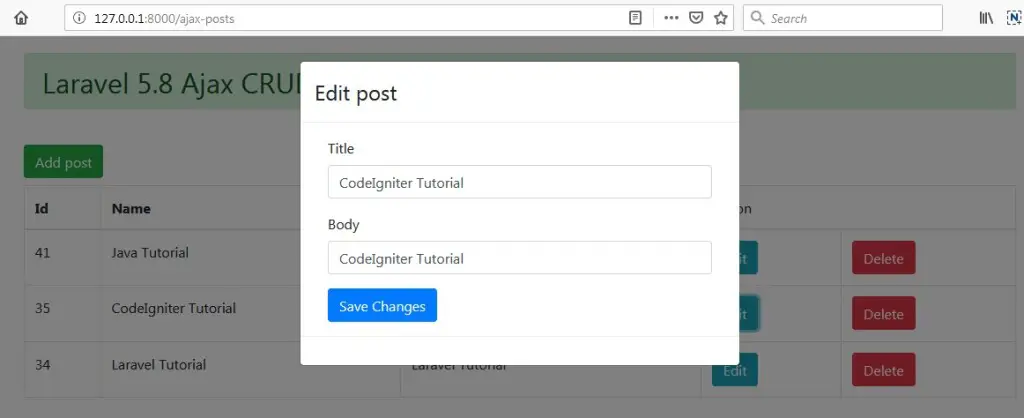
Click “Edit” button to edit corresponding post.
Click “Delete” button to delete corresponding post.
 Click “Add New Post” to submit new post.
 Click “Edit” button to edit corresponding post.