
In this tutorial you will learn about the Android Recycler View and its application with practical example.
Android Recycler View
Android RecyclerView is more advanced version of ListView and GridView with improved performance and more benefits. It extend ViewGroup and implement ScrollingView and NestedScrollingChlid2 Class. It is very flexible view which provide a limited window for large dataset.
For the use of RecylerView you need to create an Adapter which will extend the RecyclerView.Adapter class.
There are three built in Layout Manager which are provided by RecyclerView.
- LinearLayoutManager : It shows items in vertical or horizontal scrolling List.
- GridLayoutManager : It shows items in Grid.
- StaggeredGridLayoutManager : It shows items in a staggered grid.
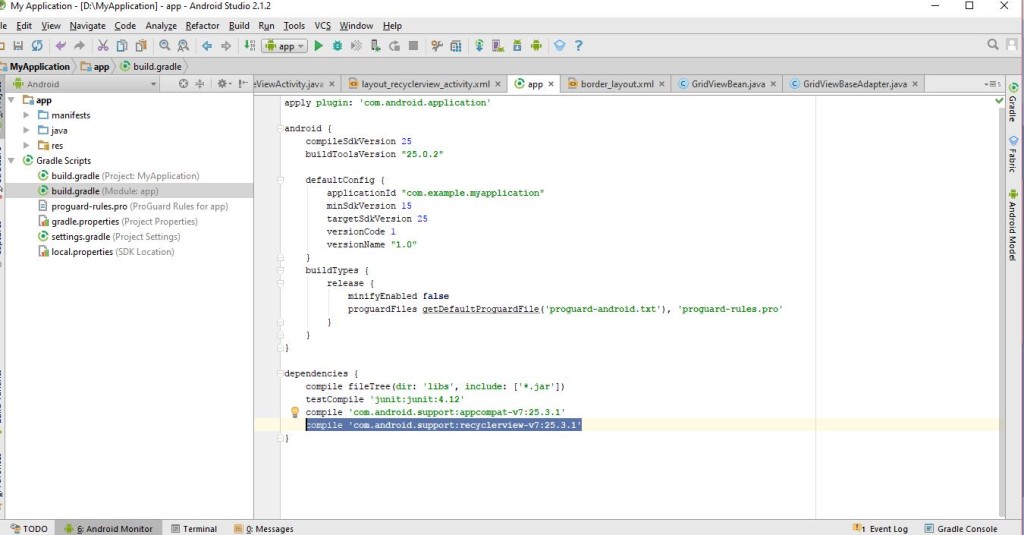
Lets understand by an example of RecyclerView. Before Start coding we need to add dependencies for RecyclerView in build.gradle file like below Image:
Now we have to create Layout for RecyclerView , Check below code:
|
1 2 3 4 5 6 7 8 9 10 11 12 |
<?xml version="1.0" encoding="utf-8"?> <RelativeLayout xmlns:android="http://schemas.android.com/apk/res/android" android:layout_width="match_parent" android:layout_height="match_parent"> <android.support.v7.widget.RecyclerView android:id="@+id/recycler_view" android:scrollbars="vertical" android:layout_width="match_parent" android:layout_height="match_parent"/> </RelativeLayout> |
Attributes :
ID: It is used to identify view uniquely
Scrollbars : It is used to provide scrolling .It can be vertical or Horizontal.
Width : It is used to provide Width of RecylerView.
Height : It is used to provide Height of RecyclerView.
So after declaration of RecyclerView in Xml let see how it looks in xml.

Now we have to follow same steps as like we did in GridView, We have to create Bean, Adapter and Activity for RecyclerView. Lets create Bean first .
|
1 2 3 4 5 6 7 8 9 10 11 12 13 14 15 16 17 18 19 20 21 22 23 24 25 26 27 28 29 30 31 32 |
package com.example.myapplication; public class DataBean { int image; String langName; public DataBean() { } public DataBean(int image, String langName) { super(); this.image = image; this.langName=langName; } public int getImage() { return image; } public void setImage(int image) { this.image = image; } public String getLangName() { return langName; } public void setLangName(String langName) { this.langName = langName; } } |
Now its time to create an Adapter for RecylerView. RecyclerView Adapter
As we know that Adapter is a bridge between UI and data source, It helps us to fill data in the UI components. It pulls data from database or an array. After pulling data from database or an array, it sends data to adapter view and adapter view send it to view. RecyclerView Adapter extends object class, It is used in RecyclerView.
RecyclerView.Adapter() is public constructors . It have some public methods
1. onCreateViewHolder(ViewGroup parent, int viewType): This method is used to initializes fields which is used for RecyclerView. This method calls to create new ViewHolder. Here you have to initialize your layout, Syntax is like below:
|
1 2 3 4 5 6 |
@Override public MyViewHolder onCreateViewHolder(ViewGroup parent, int viewType) { View itemView = LayoutInflater.from(parent.getContext()) .inflate(R.layout.layout_adapter, parent, false); return new MyViewHolder(itemView); } |
- onBindViewHolder(ViewHolder holder,int position) : By the name of this method clearly understood that it is used to binding. Now binding for what, It is used to bind content or data with Views of RecyclerView. Like in TextView, ImageView etc. From here we can set data to our Views by given position. Like below
|
1 2 3 4 5 6 |
@Override public void onBindViewHolder(final MyViewHolder holder, final int position) { holder.tv_title.setText(mListenerList.get(position).getLangName()); holder.im_image.setImageResource(mListenerList.get(position).getImage()); } |
- getItemCount() : It returns the total number of item count which held by adapter or size of arraylist. Like below code:
|
1 2 3 4 |
@Override public int getItemCount() { return mListenerList.size(); } |
There are many methods are provided by this adapter but these methods are important part of RecyclerView Adapter.
Check below code which is used for RecyclerView Adapter:
|
1 2 3 4 5 6 7 8 9 10 11 12 13 14 15 16 17 18 19 20 21 22 23 24 25 26 27 28 29 30 31 32 33 34 35 36 37 38 39 40 41 42 43 44 45 46 47 48 49 50 51 52 53 54 55 56 57 58 59 60 |
package com.example.myapplication; import android.content.Context; import android.support.v7.widget.RecyclerView; import android.view.LayoutInflater; import android.view.View; import android.view.ViewGroup; import android.widget.ImageView; import android.widget.TextView; import java.util.List; public class RecyclerAdapter extends RecyclerView.Adapter<RecyclerAdapter.MyViewHolder> { private List<DataBean> mListenerList; Context mContext; LayoutInflater inflater; public RecyclerAdapter(List<DataBean> mListenerList, Context mContext) { this.mListenerList = mListenerList; this.mContext = mContext; inflater = LayoutInflater.from(mContext); } public class MyViewHolder extends RecyclerView.ViewHolder { TextView tv_title; ImageView im_image; public MyViewHolder(View view) { super(view); tv_title = (TextView) view.findViewById(R.id.tv_langName); im_image = (ImageView) view.findViewById(R.id.im_test); } } @Override public MyViewHolder onCreateViewHolder(ViewGroup parent, int viewType) { View itemView = LayoutInflater.from(parent.getContext()) .inflate(R.layout.layout_adapter, parent, false); return new MyViewHolder(itemView); } @Override public void onBindViewHolder(final MyViewHolder holder, final int position) { holder.tv_title.setText(mListenerList.get(position).getLangName()); holder.im_image.setImageResource(mListenerList.get(position).getImage()); } @Override public int getItemCount() { return mListenerList.size(); } } |
Now We are going to do our final stage that is Activity Part, Here we have to fetch RecyclerView by its id and need to use LayoutManager Like in which LayoutManager you are going to View your RecyclerView.
|
1 2 3 4 5 6 7 8 9 10 11 12 13 14 15 16 17 18 19 20 21 22 23 24 25 26 27 28 29 30 31 32 33 34 35 36 37 38 39 40 41 42 43 44 |
package com.example.myapplication; import android.os.Bundle; import android.support.v7.app.AppCompatActivity; import android.support.v7.widget.DefaultItemAnimator; import android.support.v7.widget.LinearLayoutManager; import android.support.v7.widget.RecyclerView; import java.util.ArrayList; public class RecyclerViewActivity extends AppCompatActivity { RecyclerView rv; RecyclerAdapter adapter; ArrayList<DataBean> arr_bean; @Override protected void onCreate(Bundle savedInstanceState) { super.onCreate(savedInstanceState); setContentView(R.layout.layout_recyclerview_activity); rv = (RecyclerView) findViewById(R.id.my_recycler_view); RecyclerView.LayoutManager mLayoutManager = new LinearLayoutManager(RecyclerViewActivity.this); rv.setLayoutManager(mLayoutManager); rv.setItemAnimator(new DefaultItemAnimator()); rv.setNestedScrollingEnabled(false); rv.setHasFixedSize(false); arr_bean = new ArrayList<DataBean>(); arr_bean.add(new DataBean(R.drawable.android, "Android")); arr_bean.add(new DataBean(R.drawable.java, "Java")); arr_bean.add(new DataBean(R.drawable.python, "Python")); arr_bean.add(new DataBean(R.drawable.mysql, "MySQL")); arr_bean.add(new DataBean(R.drawable.php, "PHP")); adapter = new RecyclerAdapter(arr_bean, this); rv.setAdapter(adapter); } } |
Final Output of this code will look like below image:

