In this tutorial you will learn about the Laravel 5.8 Razorpay Payment Gateway Integration and its application with practical example.
Laravel 5.8 Razorpay Payment Gateway Integration
In this tutorial, you will learn to integrate Razorpay payment gateway in your laravel 5.8 project. Before starting with this tutorial you would require a Razorpay developer account, from there you will get the api key and secret key require for the integration. After the successful integration you will be able to collect payment via simple payment form which allow customer to provide card information like card number, expiry date and a CVC code. Follow this step by step tutorial to learn Razorpay payment gateway integration in laravel 5.8.
Install Laravel 5.8
First of all we need to create a fresh laravel project, download and install Laravel 5.8 using the below command
|
1 |
composer create-project --prefer-dist laravel/laravel RazorDemo |
Configure Database In .env file
Now, lets create a MySQL database and connect it with laravel application. After creating database we need to set database credential in application’s .env file.
.env
|
1 2 3 4 5 6 |
DB_CONNECTION=mysql DB_HOST=127.0.0.1 DB_PORT=3306 DB_DATABASE=razorpay DB_USERNAME=root DB_PASSWORD= |
Generate Application Key
Open terminal and switch to the project directory and run the following command to generate application key and configure cache.
|
1 |
php artisan key:generate |
|
1 |
php artisan config:cache |
Set Default String Length
Locate the file “app/Providers/AppServiceProvider”, and add following line of code to the top of the file
|
1 |
use Illuminate\Support\Facades\Schema; |
and inside the boot method set a default string length as given below –
|
1 |
Schema::defaultStringLength(191); |
So this is how “app/Providers/AppServiceProvider” file looks like –
|
1 2 3 4 5 6 7 8 9 10 11 12 13 14 15 16 |
<?php namespace App\Providers; use Illuminate\Support\ServiceProvider; use Illuminate\Support\Facades\Schema; class AppServiceProvider extends ServiceProvider { public function boot() { // Schema::defaultStringLength(191); } public function register() { // } } |
Create Model and Migration
Now, we require to create a Payment tables to keep the payment records. so let’s run the following command to generate Payment model along with a migration file to create Payment table in our database.
|
1 |
php artisan make:model Payment -m |
Once the above command is executed a migration file Payments.php file is created, open the database/migrations/Payments.php file and put the following code in it.
|
1 2 3 4 5 6 7 8 9 10 |
public function up() { Schema::create('payments', function (Blueprint $table) { $table->increments('id'); $table->string('payment_id'); $table->string('user_id'); $table->string('amount'); $table->timestamps(); }); } |
Now, use the command to run migration –
|
1 |
php artisan migrate |
Create Routes
After this, we need to add following routes in “routes/web.php” to display product listing, to store payment form and to payment acknowledgement. Lets open “routes/web.php” file and add following route.
routes/web.php
|
1 2 3 |
Route::get('my-store', 'razorpay\PaymentController@show_products'); Route::post('pay-success', 'razorpay\PaymentController@pay_success'); Route::post('thank-you', 'razorpay\PaymentController@thank_you'); |
Here, first route is for product listing, second is to store payments_id and users information provided by razorpay payment gateway.
Create Controller
Next, we have to create a controller to handle payments. Create a controller named RazorpayController using command given below –
|
1 |
php artisan make:controller razorpay/PaymentController |
Once the above command executed, it will create a controller file PaymentController.php in app/Http/Controllers/razorpay directory. Open the razorpay/PaymentController.php file and put the following code in it.
app/Http/Controllers/razorpay/PaymentController.php
|
1 2 3 4 5 6 7 8 9 10 11 12 13 14 15 16 17 18 19 20 21 22 23 24 25 26 27 28 29 30 31 32 |
<?php namespace App\Http\Controllers\razorpay; use Illuminate\Http\Request; use App\Http\Controllers\Controller; use App\Payment; use Redirect,Response; class PaymentController extends Controller { // public function show_products() { return view('razorpay.payment'); } public function pay_success(Request $Request){ $data = [ 'user_id' => '1', 'payment_id' => $request->payment_id, 'amount' => $request->amount, ]; $getId = Payment::insertGetId($data); $arr = array('msg' => 'Payment successful.', 'status' => true); return Response()->json($arr); } public function thank_you() { return view('razorpay.thankyou'); } } |
In this controller, we have following methods –
show_products() :- It lists Store Items
pay_success() :- To handle payment
thank_you() :- Payment Acknowledgement
Create Blade / View Files
In this step, we will create view/blade file to accept razorpay payment. Lets create two blade files “payment.blade.php” and “thankyou.blade.php” in “resources/views/razorpay/” directory and put the following code in it respectively.
resources/views/razorpay/payment.blade.php
|
1 2 3 4 5 6 7 8 9 10 11 12 13 14 15 16 17 18 19 20 21 22 23 24 25 26 27 28 29 30 31 32 33 34 35 36 37 38 39 40 41 42 43 44 45 46 47 48 49 50 51 52 53 54 55 56 57 58 59 60 61 62 63 64 65 66 67 68 69 70 71 72 73 74 75 76 77 78 79 80 81 82 83 84 85 86 87 88 89 90 91 92 93 94 95 96 97 98 99 100 101 102 103 104 105 106 107 108 109 110 111 112 113 114 115 116 117 118 119 120 121 122 123 124 125 126 127 128 129 130 131 132 133 134 135 136 137 138 139 140 141 142 143 144 145 146 147 148 149 150 151 152 153 154 155 156 157 158 159 160 161 162 163 164 165 166 167 168 169 170 171 172 173 174 175 |
<!doctype html> <html lang="en"> <head> <meta charset="utf-8"> <meta name="viewport" content="width=device-width, initial-scale=1, shrink-to-fit=no"> <meta name="csrf-token" content="{{ csrf_token() }}"> <title>W3Adda - Laravel 5.8 Razorpay Payment </title> <link rel="stylesheet" href="https://cdnjs.cloudflare.com/ajax/libs/twitter-bootstrap/4.1.3/css/bootstrap.min.css" /> <script src="http://ajax.googleapis.com/ajax/libs/jquery/1.9.1/jquery.js"></script> <style> .card-product .img-wrap { border-radius: 3px 3px 0 0; overflow: hidden; position: relative; height: 220px; text-align: center; } .card-product .img-wrap img { max-height: 100%; max-width: 100%; object-fit: cover; } .card-product .info-wrap { overflow: hidden; padding: 15px; border-top: 1px solid #eee; } .card-product .bottom-wrap { padding: 15px; border-top: 1px solid #eee; } .label-rating { margin-right:10px; color: #333; display: inline-block; vertical-align: middle; } .card-product .price-old { color: #999; } </style> </head> <body> <div class="container"> <article class="bg-secondary mb-3"> <div class="card-body text-center"> <h4 class="text-white">Welcome to W3Adda.com<br> </h4> </div> </article> <hr> <div class="row"> <div class="col-md-4"> <figure class="card card-product"> <div class="img-wrap"><img src="http://w3adda.com/wp-content/uploads/2019/07/51TdkJSqeQL._AC_UL436_.jpg"></div> <figcaption class="info-wrap"> <h4 class="title">MacBook Air</h4> <p class="desc">some product description comes here</p> <div class="rating-wrap"> <div class="label-rating">123 reviews</div> <div class="label-rating">123 orders </div> </div> <!-- rating-wrap.// --> </figcaption> <div class="bottom-wrap"> <a href="javascript:void(0)" class="btn btn-sm btn-primary float-right buy_now" data-amount="100000" data-id="1">Order Now</a> <div class="price-wrap h5"> <span class="price-new">₹100000</span> <del class="price-old">₹120000</del> </div> <!-- price-wrap.// --> </div> <!-- bottom-wrap.// --> </figure> </div> <!-- col // --> <div class="col-md-4"> <figure class="card card-product"> <div class="img-wrap"><img src="http://w3adda.com/wp-content/uploads/2019/07/61TMYERLL._AC_UL436_.jpg"> </div> <figcaption class="info-wrap"> <h4 class="title">Canon 1300d</h4> <p class="desc">some product description comes here</p> <div class="rating-wrap"> <div class="label-rating">123 reviews</div> <div class="label-rating">123 orders </div> </div> <!-- rating-wrap.// --> </figcaption> <div class="bottom-wrap"> <a href="javascript:void(0)" class="btn btn-sm btn-primary float-right buy_now" data-amount="22000" data-id="2">Order Now</a> <div class="price-wrap h5"> <span class="price-new">₹22000</span> <del class="price-old">₹24500</del> </div> <!-- price-wrap.// --> </div> <!-- bottom-wrap.// --> </figure> </div> <!-- col // --> <div class="col-md-4"> <figure class="card card-product"> <div class="img-wrap"><img src="http://w3adda.com/wp-content/uploads/2019/07/31vga2yygfL._AC_US160_.jpg"> </div> <figcaption class="info-wrap"> <h4 class="title">HeadPhone</h4> <p class="desc">some product description comes here</p> <div class="rating-wrap"> <div class="label-rating">123 reviews</div> <div class="label-rating">123 orders </div> </div> <!-- rating-wrap.// --> </figcaption> <div class="bottom-wrap"> <a href="javascript:void(0)" class="btn btn-sm btn-primary float-right buy_now" data-amount="1500" data-id="3">Order Now</a> <div class="price-wrap h5"> <span class="price-new">₹1500</span> <del class="price-old">₹1900</del> </div> <!-- price-wrap.// --> </div> <!-- bottom-wrap.// --> </figure> </div> <!-- col // --> </div> <!-- row.// --> </div> <!--container.//--> <br><br><br> <script src="https://checkout.razorpay.com/v1/checkout.js"></script> <script> var SITEURL = '{{URL::to('')}}'; $.ajaxSetup({ headers: { 'X-CSRF-TOKEN': $('meta[name="csrf-token"]').attr('content') } }); $('body').on('click', '.buy_now', function(e){ var totalAmount = $(this).attr("data-amount"); var product_id = $(this).attr("data-id"); var options = { "key": "your_razorpay_test_key", "amount": (totalAmount*100), // 2000 paise = INR 20 "name": "W3Adda", "description": "Payment", "image": "http://w3adda.com/wp-content/uploads/2019/07/w3a-fb-dp.png", "handler": function (response){ $.ajax({ url: SITEURL + 'pay-success', type: 'post', dataType: 'json', data: { razorpay_payment_id: response.razorpay_payment_id , totalAmount : totalAmount ,product_id : product_id, }, success: function (msg) { window.location.href = SITEURL + 'thank-you'; } }); }, "prefill": { "contact": '1234567890', "email": 'xxxxxxxxx@gmail.com', }, "theme": { "color": "#528FF0" } }; var rzp1 = new Razorpay(options); rzp1.open(); e.preventDefault(); }); </script> </body> </html> |
You must replace secret key that you get from razorpay payment gateway here –
|
1 |
"key": "your_razorpay_test_secret_key", |
resources/views/razorpay/thankyou.blade.php
|
1 2 3 4 5 6 7 8 9 10 11 12 13 14 15 16 17 18 19 20 |
<!DOCTYPE html> <html> <head> <title>W3Adda - Thank You</title> <link rel="stylesheet" href="https://cdnjs.cloudflare.com/ajax/libs/twitter-bootstrap/4.1.3/css/bootstrap.min.css" /> </head> <body class=""> <br><br><br><br> <article class="bg-secondary mb-3"> <div class="card-body text-center"> <h4 class="text-white">Thank you for payment<br></h4> <br> <p><a class="btn btn-warning" target="_blank" href="http://w3adda.com/"> W3Adda.com <i class="fa fa-window-restore "></i></a></p> </div> <br><br><br> </article> </body> </html> |
Now we are ready to run our example so lets start the development server using following artisan command –
|
1 |
php artisan serve |
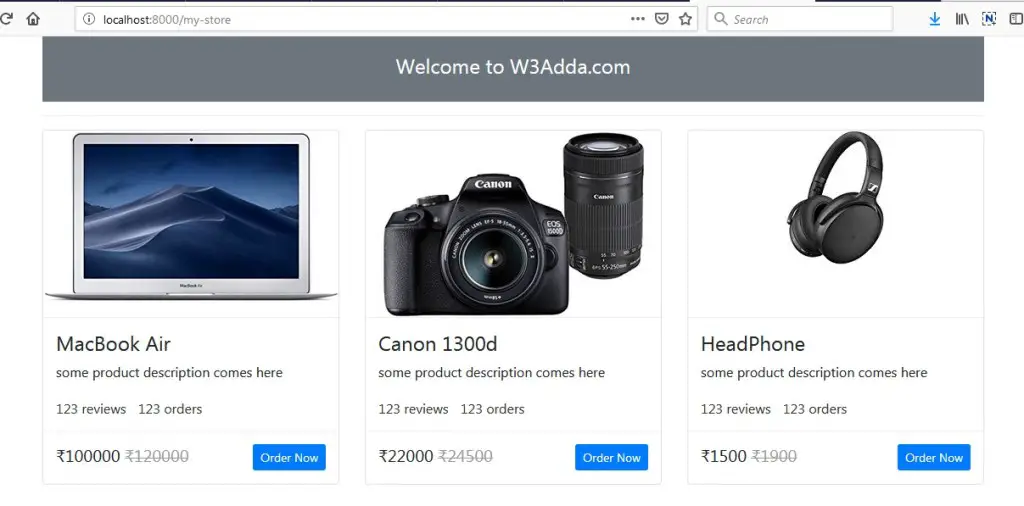
Now, open the following URL in browser to see the output –
http://localhost:8000/my-store
Output:-

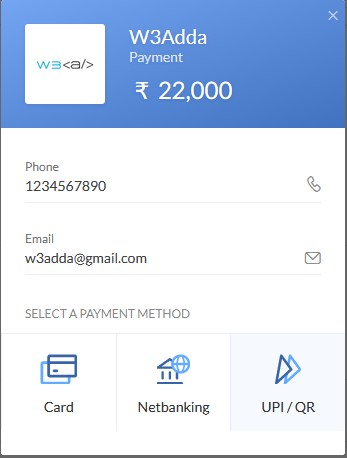
Click “Order Now” for any product of your choice


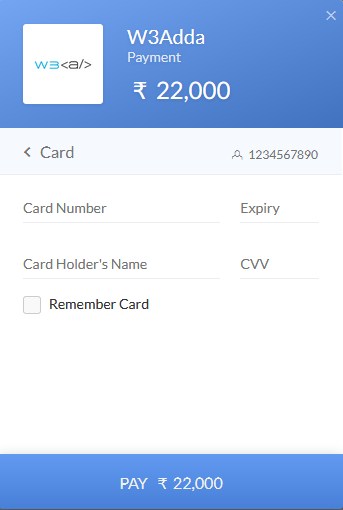
Use the following test card details to test the payment.
Test Credit Card Info :-
Card No :- 4242424242424242 / 4012888888881881
Month :- Any future month
Year :- Any future Year
CVV :- Any 3 digit Number

