In this tutorial you will learn about the Laravel 5.8 Passport Authentication | Create REST API with Passport authentication and its application with practical example.
Laravel 5.8 Create REST API with Passport Authentication
In one of my previous articles, we have learn How to Create REST API With JWT Authentication In Laravel using Laravel JWT package for REST authentication API. In this article, we will learn to create fully functional restful API with Passport Authentication in Laravel. In this tutorial, we will be creating fully functional CRUD APIs for Blog Posts along with Passport Authentication In laravel.
- Laravel 5.8 Create REST API with Passport Authentication
- What is Passport Authentication?
- Install Laravel 5.8
- Install Laravel Passport Package
- Run Migration and Install Laravel Passport
- Laravel Passport Configuration
- Building the Post CRUD API
- Create Model
- Create Controller
- Create Resource Route
- Start Application Server
- Testing the REST API
What is Passport Authentication?
Laravel comes with default login authentication, but when we want to create APIs we have to use tokens instead of sessions for authenticating users, as APIs does not support session variables. After login via API, user must be assigned a token and sent back to the user which is further used for authenticating API requests. Authentication token is used to securely transmit data between third-parties. Laravel provides Passport authentication which makes it easy creating REST APIs in laravel.
Install Laravel 5.8
First of all we need to create a fresh laravel project, download and install Laravel 5.8 using the below command
|
1 |
composer create-project --prefer-dist laravel/laravel passportauth |
Install Laravel Passport Package
In this step, we need to install Laravel Passport package via the composer dependency manager. Use the following command to install passport package.
|
1 |
composer require laravel/passport |
After Installing ‘laravel/passport’ package, we need to add Passport service provider in config/app.php file as following.
config/app.php
|
1 2 3 4 |
'providers' => [ .... Laravel\Passport\PassportServiceProvider::class, ] |
Run Migration and Install Laravel Passport
After successfully installing ‘laravel/passport’ package, we require to create default passport tables in our database. so let’s run the following command to migrate Laravel Passport tables to your database.
|
1 |
php artisan migrate |
Now, it is mandatory to install passport using the command below. This command will generate encryption keys required to generate secret access tokens.
|
1 |
php artisan passport:install |
Laravel Passport Configuration
Now, we need to make following changes in our model, service provider and auth config file to complete passport configuration. Open App/User.php model file and add ‘Laravel\Passport\HasApiTokens’ trait in it.
app/User.php
|
1 2 3 4 5 6 7 8 9 10 11 12 13 14 15 16 17 18 19 20 21 22 23 24 25 26 27 28 29 30 |
<?php namespace App; use Illuminate\Notifications\Notifiable; use Illuminate\Foundation\Auth\User as Authenticatable; use Laravel\Passport\HasApiTokens; class User extends Authenticatable { use HasApiTokens, Notifiable; /** * The attributes that are mass assignable. * * @var array */ protected $fillable = [ 'name', 'email', 'password', ]; /** * The attributes that should be hidden for arrays. * * @var array */ protected $hidden = [ 'password', 'remember_token', ]; } |
Next Register passport routes in App/Providers/AuthServiceProvider.php, open App/Providers/AuthServiceProvider.php and add Passport::routes method in the boot method of your AuthServiceProvider. It will generate necessary routes. This is how the app/Providers/AuthServiceProvider.php will look like after changes.
|
1 2 3 4 5 6 7 8 9 10 11 12 13 14 15 16 17 18 19 20 21 22 23 24 25 26 27 28 29 30 31 |
<?php namespace App\Providers; use Laravel\Passport\Passport; use Illuminate\Support\Facades\Gate; use Illuminate\Foundation\Support\Providers\AuthServiceProvider as ServiceProvider; class AuthServiceProvider extends ServiceProvider { /** * The policy mappings for the application. * * @var array */ protected $policies = [ // 'App\Model' => 'App\Policies\ModelPolicy', ]; /** * Register any authentication / authorization services. * * @return void */ public function boot() { $this->registerPolicies(); // Passport::routes(); } } |
Now open config/auth.php file and set api driver to passport instead of session.
config/auth.php
|
1 2 3 4 5 6 7 8 9 10 11 12 13 14 15 16 17 |
return [ .... 'guards' => [ 'web' => [ 'driver' => 'session', 'provider' => 'users', ], 'api' => [ 'driver' => 'passport', 'provider' => 'users', ], ], .... ] |
Create API Routes
Let’s create API routes. Open routes/api.php file create api routes as below –
|
1 2 3 4 5 6 |
Route::post('login', 'PassportController@login'); Route::post('register', 'PassportController@register'); Route::middleware('auth:api')->group(function () { Route::get('user', 'PassportController@details'); }); |
Create Authentication Controller
Now, create a Authentication Controller name PassportController. Use the below command to create controller.
|
1 |
php artisan make:controller PassportController |
Once the above command executed, it will create a resource controller file “AuthController.php” in “app/Http/Controllers/” directory. Go to “PassportController.php” and put the following code in it.
|
1 2 3 4 5 6 7 8 9 10 11 12 13 14 15 16 17 18 19 20 21 22 23 24 25 26 27 28 29 30 31 32 33 34 35 36 37 38 39 40 41 42 43 44 45 46 47 48 49 50 51 52 53 54 55 56 57 58 59 60 61 62 63 64 65 |
<?php namespace App\Http\Controllers; use App\User; use Illuminate\Http\Request; class PassportController extends Controller { /** * Handles Registration Request * * @param Request $request * @return \Illuminate\Http\JsonResponse */ public function register(Request $request) { $this->validate($request, [ 'name' => 'required|min:3', 'email' => 'required|email|unique:users', 'password' => 'required|min:6', ]); $user = User::create([ 'name' => $request->name, 'email' => $request->email, 'password' => bcrypt($request->password) ]); $token = $user->createToken('TutsForWeb')->accessToken; return response()->json(['token' => $token], 200); } /** * Handles Login Request * * @param Request $request * @return \Illuminate\Http\JsonResponse */ public function login(Request $request) { $credentials = [ 'email' => $request->email, 'password' => $request->password ]; if (auth()->attempt($credentials)) { $token = auth()->user()->createToken('TutsForWeb')->accessToken; return response()->json(['token' => $token], 200); } else { return response()->json(['error' => 'UnAuthorised'], 401); } } /** * Returns Authenticated User Details * * @return \Illuminate\Http\JsonResponse */ public function details() { return response()->json(['user' => auth()->user()], 200); } } |
Building the Post CRUD API
Next, we will be creating a simple blog application with post table and implement CRUD (Create, Read, Update and Delete) APIs. To create the blog posts APIs we have to define table schema for posts table. Open terminal and use the following artisan command to generate <timestamp>create_posts_table.php migration.
|
1 |
php artisan make:migration create_posts_table |
Once this command is executed you will find a migration file created under “database/migrations”. Lets open migration file and put following code in it –
|
1 2 3 4 5 6 7 8 9 10 11 12 13 14 15 16 17 18 19 20 21 22 23 24 25 26 27 28 29 30 31 32 33 34 35 |
<?php use Illuminate\Support\Facades\Schema; use Illuminate\Database\Schema\Blueprint; use Illuminate\Database\Migrations\Migration; class CreatePostsTable extends Migration { /** * Run the migrations. * * @return void */ public function up() { Schema::create('posts', function (Blueprint $table) { $table->bigIncrements('id'); $table->unsignedBigInteger('user_id'); $table->string('title'); $table->string('body'); $table->timestamps(); $table->foreign('user_id')->references('id')->on('users'); }); } /** * Reverse the migrations. * * @return void */ public function down() { Schema::dropIfExists('posts'); } } |
Create Model
In this step, we will use the following command to create post model –
|
1 |
php artisan make:model Post |
Once, the above command executed it will create a model file Post.php in app directory. Next, we have to assign fillable fields using fillable property inside Post.php file. Open app/Post.php file and put the following code in it –
app/Post.php
|
1 2 3 4 5 6 7 8 9 10 11 |
<?php namespace App; use Illuminate\Database\Eloquent\Model; class Post extends Model { // protected $fillable = ['title','body']; } |
Now, run following command to migrate database schema.
|
1 |
php artisan migrate |
After, the migration executed successfully the posts table will be created in database.
Now, we have to add a relationship in the User model to retrieve the related posts. In app/User.php add the following method.
|
1 2 3 4 |
public function posts() { return $this->hasMany(Post::class); } |
Create Controller
In this step, we will use the following command to create post controller.
|
1 |
php artisan make:controller PostController |
Once the above command executed, it will create a controller file “PostController.php” in “app/Http/Controllers/” directory. Open the PostController.php file and put the following code in it.
app/Http/Controllers/PostController.php
|
1 2 3 4 5 6 7 8 9 10 11 12 13 14 15 16 17 18 19 20 21 22 23 24 25 26 27 28 29 30 31 32 33 34 35 36 37 38 39 40 41 42 43 44 45 46 47 48 49 50 51 52 53 54 55 56 57 58 59 60 61 62 63 64 65 66 67 68 69 70 71 72 73 74 75 76 77 78 79 80 81 82 83 84 85 86 87 88 89 90 91 92 93 94 95 96 97 98 99 100 101 102 103 104 105 106 |
<?php namespace App\Http\Controllers; use App\Post; use Illuminate\Http\Request; class PostController extends Controller { public function index() { $posts = auth()->user()->posts; return response()->json([ 'success' => true, 'data' => $posts ]); } public function show($id) { $post = auth()->user()->posts()->find($id); if (!$post) { return response()->json([ 'success' => false, 'message' => 'Post with id ' . $id . ' not found' ], 400); } return response()->json([ 'success' => true, 'data' => $post->toArray() ], 400); } public function store(Request $request) { $this->validate($request, [ 'title' => 'required', 'body' => 'required' ]); $post = new Post(); $post->title = $request->title; $post->body = $request->body; if (auth()->user()->posts()->save($post)) return response()->json([ 'success' => true, 'data' => $post->toArray() ]); else return response()->json([ 'success' => false, 'message' => 'Post could not be added' ], 500); } public function update(Request $request, $id) { $post = auth()->user()->posts()->find($id); if (!$post) { return response()->json([ 'success' => false, 'message' => 'Post with id ' . $id . ' not found' ], 400); } $updated = $post->fill($request->all())->save(); if ($updated) return response()->json([ 'success' => true ]); else return response()->json([ 'success' => false, 'message' => 'Post could not be updated' ], 500); } public function destroy($id) { $post = auth()->user()->posts()->find($id); if (!$post) { return response()->json([ 'success' => false, 'message' => 'Post with id ' . $id . ' not found' ], 400); } if ($post->delete()) { return response()->json([ 'success' => true ]); } else { return response()->json([ 'success' => false, 'message' => 'Post could not be deleted' ], 500); } } } |
Create Resource Route
After this, we need to add resource route for post controller. Lets open “routes/api.php” file and add following route in it.
|
1 |
Route::resource('posts', 'PostController'); |
our final route file looks as following –
routes/api.php
|
1 2 3 4 5 6 7 |
Route::post('login', 'PassportController@login'); Route::post('register', 'PassportController@register'); Route::middleware('auth:api')->group(function () { Route::get('user', 'PassportController@details'); Route::resource('posts', 'PostController'); }); |
Start Application Server
Lets start the development server using following artisan command –
|
1 |
php artisan serve |
Testing the REST API
Our Authentication API is ready to test. I will use Postman to test the API.
Register Api :-
Verb: POST
URL :http://localhost:8000/api/register

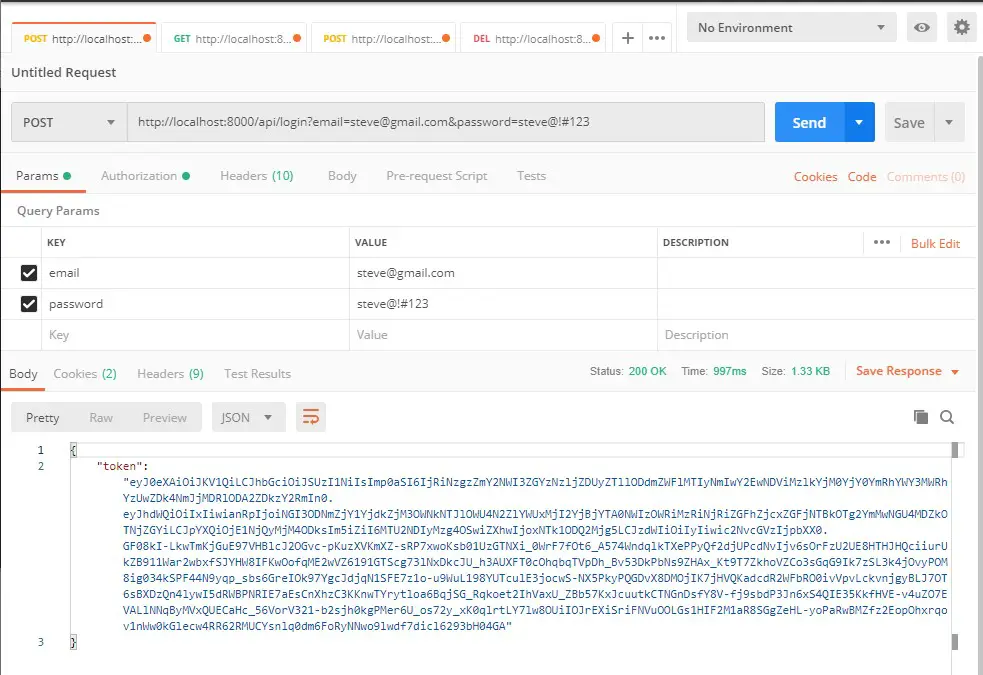
Login Api :-
Verb: POST
URL :http://localhost:8000/api/login
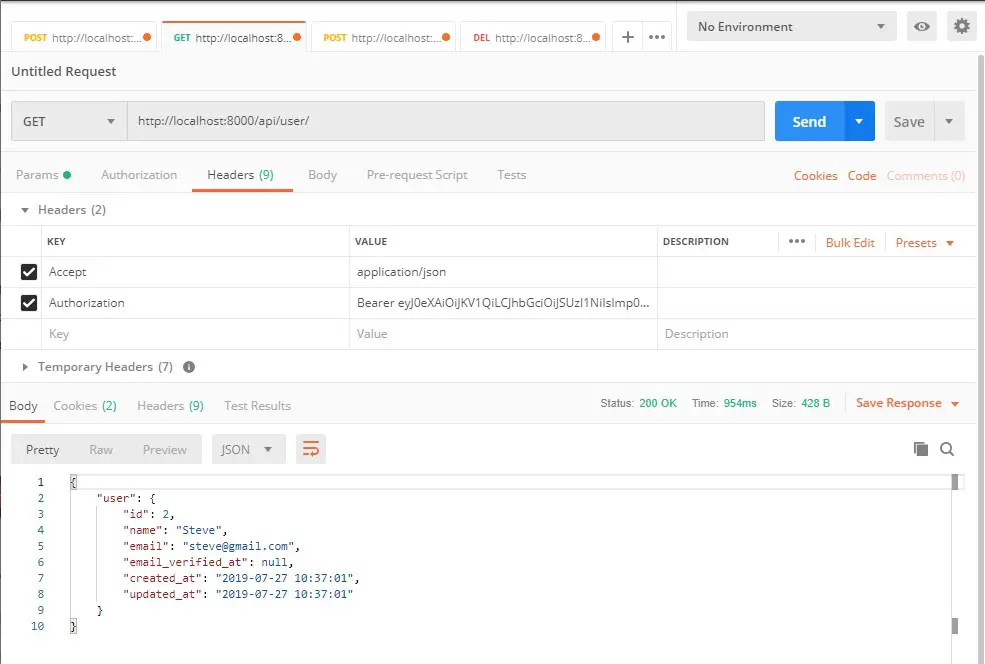
User Api :-
Verb: GET
URL: http://localhost:8000/api/user
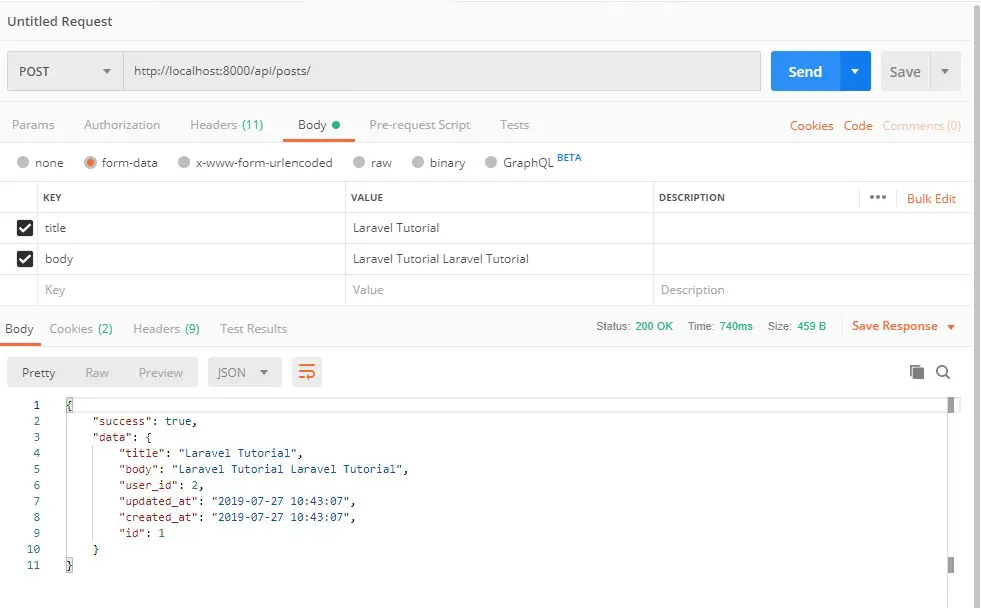
Add Post Api :-
Verb: POST
URL: http://localhost:8000/api/posts
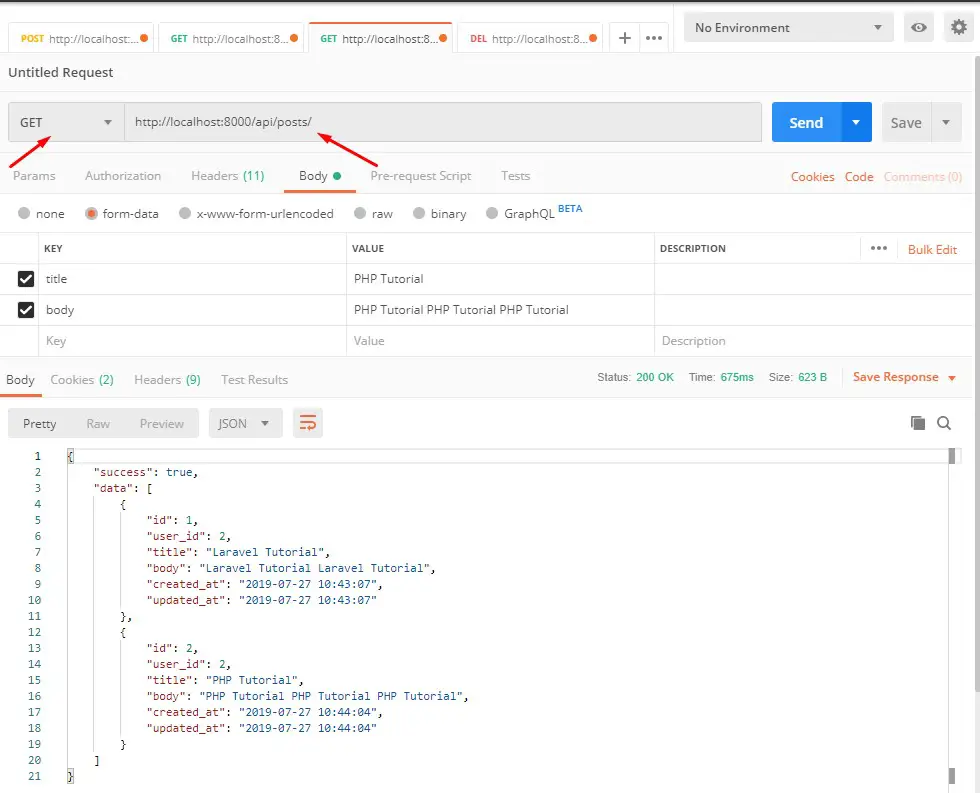
List User Post Api :-
Verb: GET
URL: http://localhost:8000/api/posts
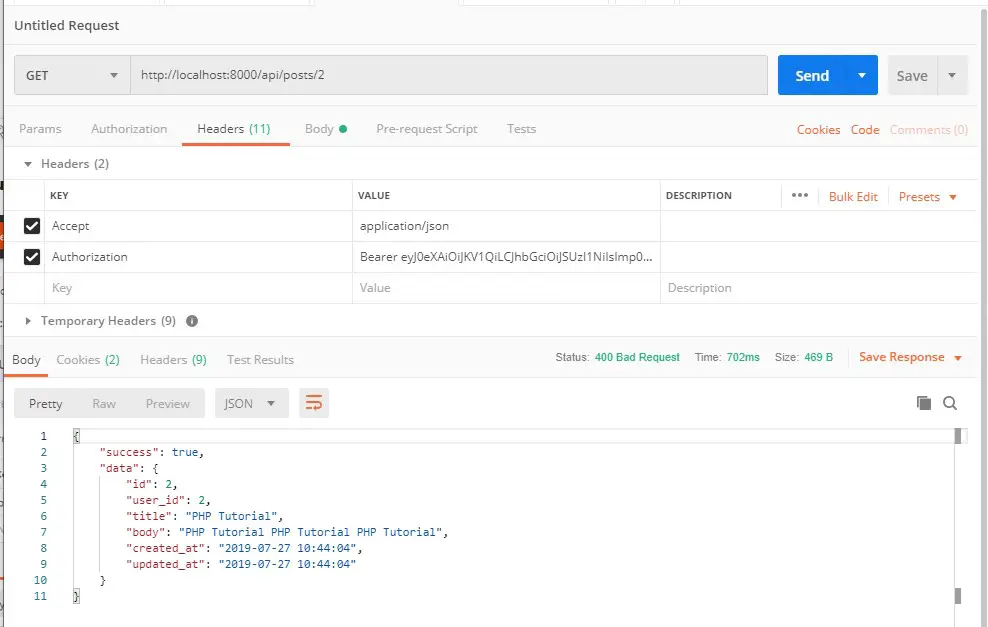
Single Post Api :-
Verb: GET
URL: http://localhost:8000/api/posts/{ID}
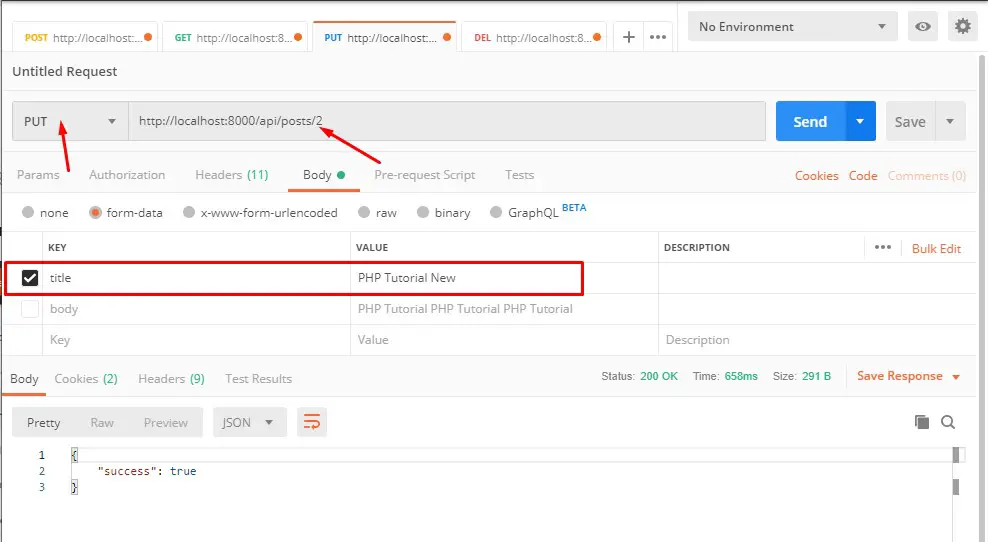
Update Post Api :-
Verb: PUT
URL: http://localhost:8000/api/posts/{ID}
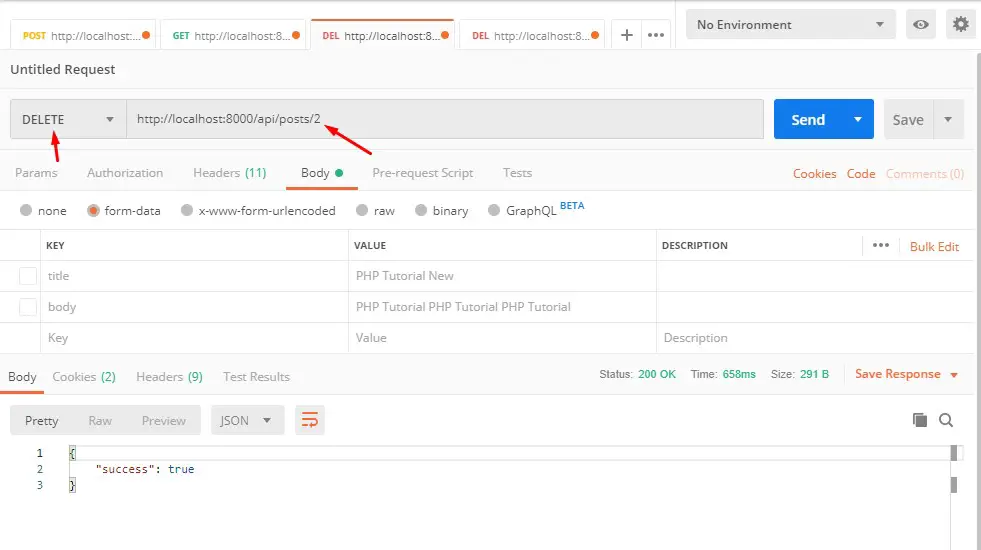
Delete Post Api :-
Verb: DELETE
URL: http://localhost:8000/api/posts/{ID}