
In this tutorial you will learn about the JSP CRUD Example and its application with practical example.
JSP CRUD With Pagination
Here we will make an project of CRUD (Create, Read, Update and Delete) with JSP and also we are going to use Pagination in this project. If records are too many so on single page it takes time so it is better to break the page into parts so that loading time of page become reduce, The Pagination do work for this theory.
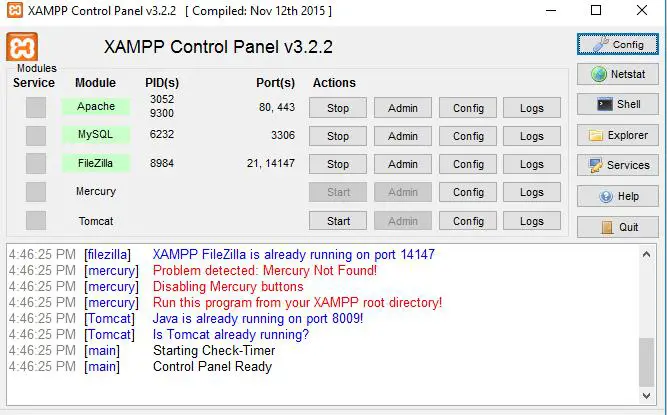
First we need to create a database for CRUD and Pagination. I have XAMPP in my system if you do not have please download it, Also you can use Oracle Database. Follow the steps for creation database.
1.step: After starting your XAMPP server open this link in browser http://localhost/phpmyadmin/
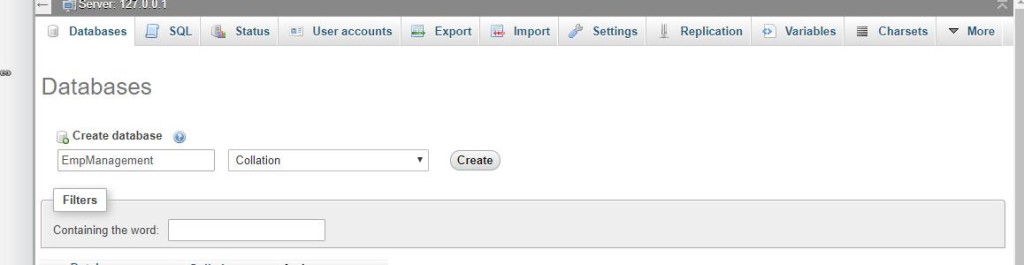
- Create an Database on click of “New”. I have created with name of “EmpManagement”.
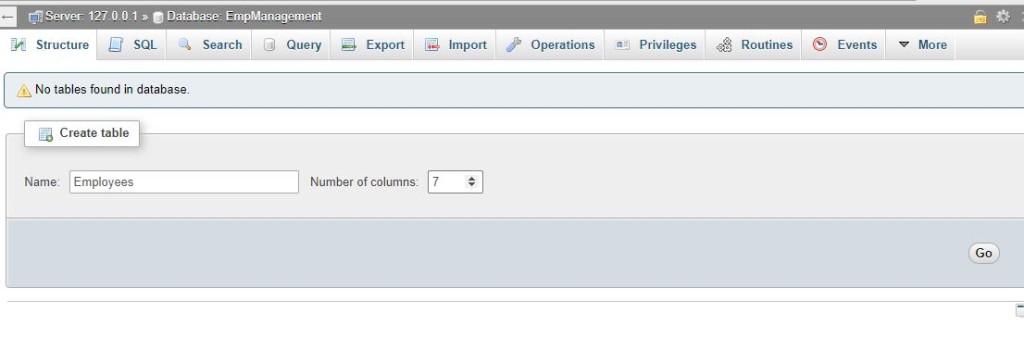
- After successful creation of database now we need to create table, As per my requirement I have created a table with name of “Employees” and number of column is “7”. Check below image.
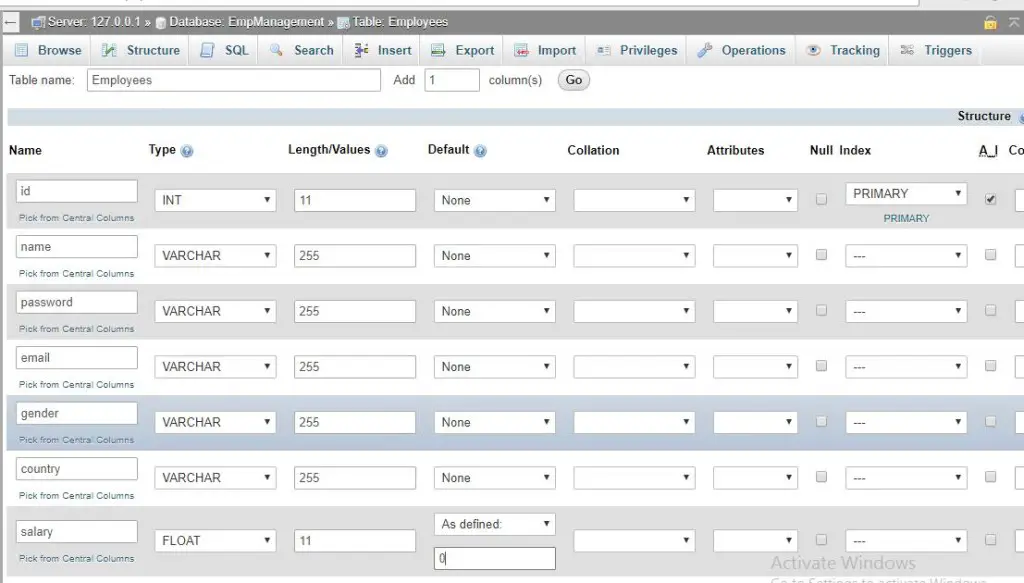
- Now we need to enter our columns name and also need to set data type like below image.
Now we are all set with database creation. Now we have to create Java Web Project in which we are going to use this Database. Check below steps for this.
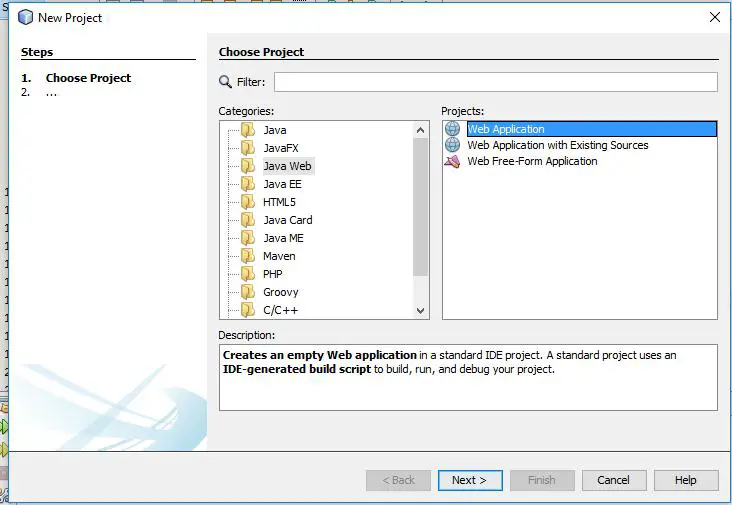
#Create Project: In this step we will create new project with netbeans, click on “File>New Project” You will get screen like below image.
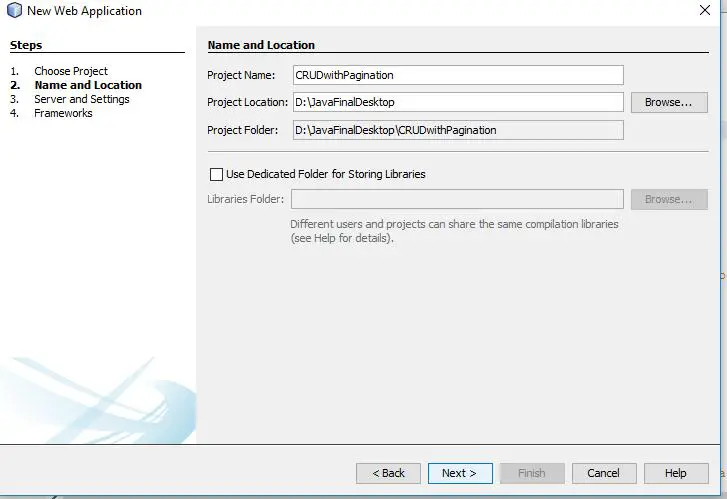
#click on “Next” button and then enter your project details like below image.
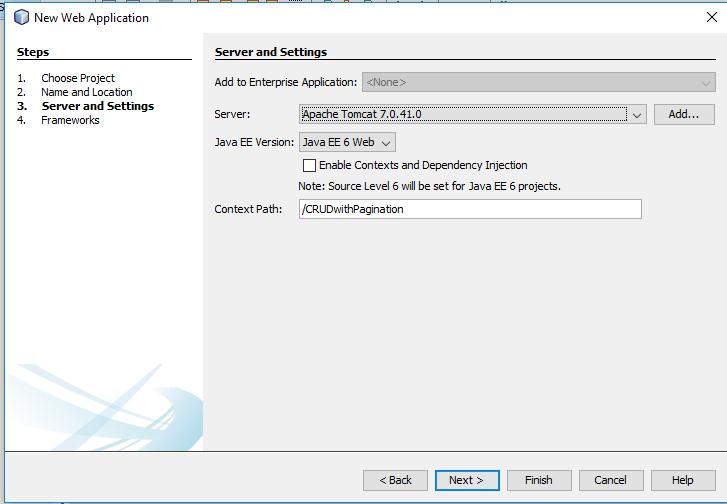
#Again we need to click on “Next” and then we will “Finish”.
#iAdd Library: so we are all set with project creation now let’s add some important library in our project ,which we are going to use in our project.
#jstl-1.2.jar: Let’s include JSTL(JSP Standard Tag Library) in your project
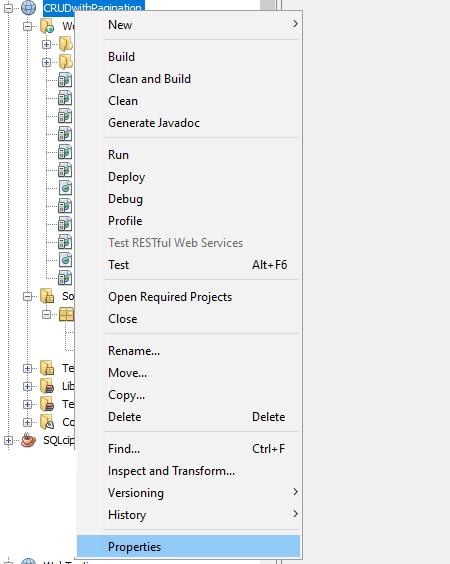
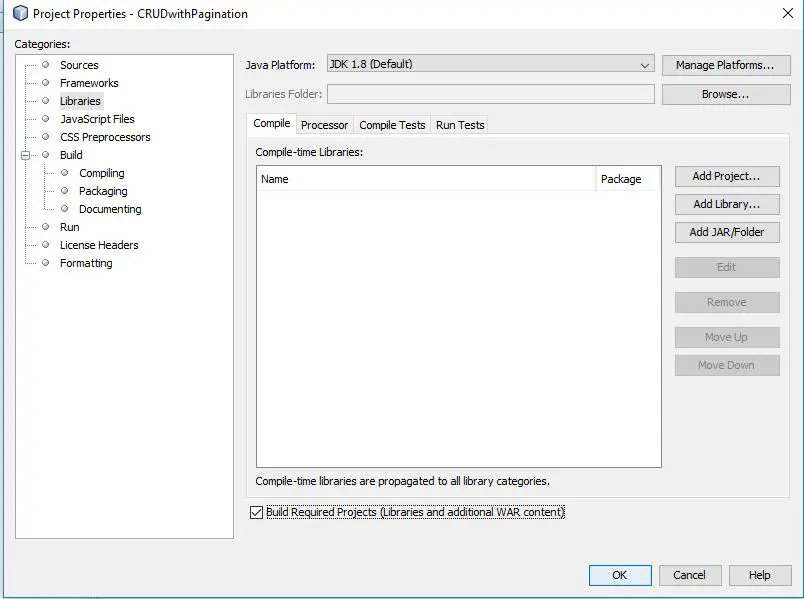
After downloading jar file, do right click on your project and then go to properties. Like below image.
Now go to libraries and then click on Add JAR/Folder Option.
#Select your jstl-1.2.jar from your directory and after including jar file you will get image like below.

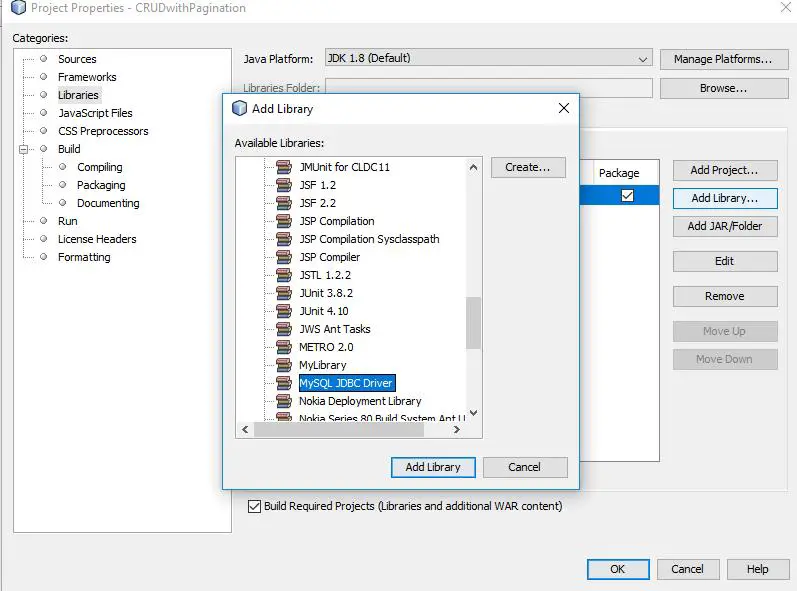
#now click on Add Library… option and select MySQL JDBC Driver library and then click on Add Library as i did like below image.
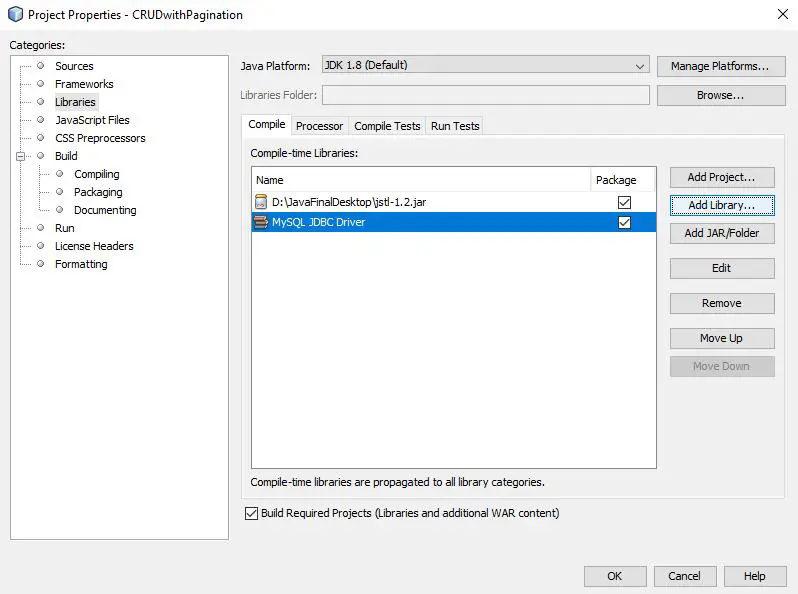
#Now you will get screen like below image, simple click on “OK” button and these libraries will be added in your project.
Now we are done with including libraries in our project, let’s move to coding side.
Project Structure: Let’s create one by one some jsp and java classes for this project.The project structure will look like below image so please make classes according to this structure.

#UserBean.java:Java Bean are classes that encapsulate many objects into a single object. It contains constructor, Getter, Setter Methods. With the help of Setter and Getter method user can set and get data. Check below code.
|
1 2 3 4 5 6 7 8 9 10 11 12 13 14 15 16 17 18 19 20 21 22 23 24 25 26 27 28 29 30 31 32 33 34 35 36 37 38 39 40 41 42 43 44 45 46 47 48 49 50 51 52 53 54 55 56 57 58 59 60 61 62 63 64 65 66 67 68 |
package w3adda; public class UserBean { private int id; private String name, password, email, sex, country; private float salary; public int getId() { return id; } public void setId(int id) { this.id = id; } public String getName() { return name; } public void setName(String name) { this.name = name; } public String getPassword() { return password; } public void setPassword(String password) { this.password = password; } public String getEmail() { return email; } public void setEmail(String email) { this.email = email; } public String getSex() { return sex; } public void setSex(String sex) { this.sex = sex; } public String getCountry() { return country; } public void setCountry(String country) { this.country = country; } public float getSalary() { return salary; } public void setSalary(float salary) { this.salary = salary; } } |
#UserDAO.java: So this is User Data Access Object, here we will write queries of connection, Creation, Reading, Updating and Deletion and also for Pagination. Check below code.
|
1 2 3 4 5 6 7 8 9 10 11 12 13 14 15 16 17 18 19 20 21 22 23 24 25 26 27 28 29 30 31 32 33 34 35 36 37 38 39 40 41 42 43 44 45 46 47 48 49 50 51 52 53 54 55 56 57 58 59 60 61 62 63 64 65 66 67 68 69 70 71 72 73 74 75 76 77 78 79 80 81 82 83 84 85 86 87 88 89 90 91 92 93 94 95 96 97 98 99 100 101 102 103 104 105 106 107 108 109 110 111 112 113 114 115 116 117 118 119 120 121 122 123 124 125 126 127 128 129 130 131 132 133 134 135 136 137 138 139 140 141 142 143 |
package w3adda; import java.sql.Connection; import java.sql.DriverManager; import java.sql.PreparedStatement; import java.sql.ResultSet; import java.util.ArrayList; import java.util.List; public class UserDAO { public static Connection getConnection() { Connection con = null; try { Class.forName("com.mysql.jdbc.Driver"); con = DriverManager.getConnection("jdbc:mysql://localhost:3306/empmanagement", "root", ""); } catch (Exception e) { System.out.println(e); } return con; } public static int save(UserBean u) { int status = 0; try { Connection con = getConnection(); PreparedStatement ps = con.prepareStatement("insert into Employees(name,password,email,gender,country,salary) values(?,?,?,?,?,?)"); ps.setString(1, u.getName()); ps.setString(2, u.getPassword()); ps.setString(3, u.getEmail()); ps.setString(4, u.getSex()); ps.setString(5, u.getCountry()); ps.setFloat(6, u.getSalary()); status = ps.executeUpdate(); } catch (Exception e) { System.out.println(e); } return status; } public static int update(UserBean u) { int status = 0; try { Connection con = getConnection(); PreparedStatement ps = con.prepareStatement("update Employees set name=?,password=?,email=?,gender=?,country=?,salary=? where id=?"); ps.setString(1, u.getName()); ps.setString(2, u.getPassword()); ps.setString(3, u.getEmail()); ps.setString(4, u.getSex()); ps.setString(5, u.getCountry()); ps.setFloat(6, u.getSalary()); ps.setInt(7, u.getId()); status = ps.executeUpdate(); } catch (Exception e) { System.out.println(e); } return status; } public static int delete(UserBean u) { int status = 0; try { Connection con = getConnection(); PreparedStatement ps = con.prepareStatement("delete from Employees where id=?"); ps.setInt(1, u.getId()); status = ps.executeUpdate(); } catch (Exception e) { System.out.println(e); } return status; } public static List<UserBean> getAllRecords() { List<UserBean> list = new ArrayList<UserBean>(); try { Connection con = getConnection(); PreparedStatement ps = con.prepareStatement("select * from Employees"); ResultSet rs = ps.executeQuery(); while (rs.next()) { UserBean u = new UserBean(); u.setId(rs.getInt("id")); u.setName(rs.getString("name")); u.setPassword(rs.getString("password")); u.setEmail(rs.getString("email")); u.setSex(rs.getString("gender")); u.setCountry(rs.getString("country")); u.setSalary(rs.getFloat("salary")); list.add(u); } } catch (Exception e) { System.out.println(e); } return list; } public static UserBean getRecordById(int id) { UserBean u = null; try { Connection con = getConnection(); PreparedStatement ps = con.prepareStatement("select * from Employees where id=?"); ps.setInt(1, id); ResultSet rs = ps.executeQuery(); while (rs.next()) { u = new UserBean(); u.setId(rs.getInt("id")); u.setName(rs.getString("name")); u.setPassword(rs.getString("password")); u.setEmail(rs.getString("email")); u.setSex(rs.getString("gender")); u.setCountry(rs.getString("country")); u.setSalary(rs.getFloat("salary")); } } catch (Exception e) { System.out.println(e); } return u; } public static List<UserBean> getRecords(int start, int total) { List<UserBean> list = new ArrayList<UserBean>(); try { Connection con = getConnection(); PreparedStatement ps = con.prepareStatement( "select * from Employees limit " + (start - 1) + "," + total); ResultSet rs = ps.executeQuery(); while (rs.next()) { UserBean e = new UserBean(); e.setId(rs.getInt(1)); e.setName(rs.getString(2)); e.setSalary(rs.getFloat(7)); list.add(e); } con.close(); } catch (Exception e) { System.out.println(e); } return list; } } |
#header.html: This will be our header which we will include in our jsp pages.
|
1 2 3 4 5 6 7 8 9 10 11 12 13 14 15 16 17 18 19 20 21 22 23 24 25 26 27 28 29 30 31 32 33 34 35 36 37 |
<html> <head> <meta http-equiv="Content-Type" content="text/html; charset=utf-8" /> <style> #navigation ul li{ display: inline-block; padding: 0px 5px; } #navigation ul li a{ color:#fff; text-decoration: none; } #navigation { background: #4062b7; padding: 3px } </style> </head> <body bgcolor="grey"> <div id="header"> <div class="shell"> <div id="navigation"> <ul> <li><a href="index.jsp" class="active">Home</a></li> <li><a href="paginationPage.jsp?page=1">Pagination</a></li> <li><a href="viewUsers.jsp">View Employees</a></li> <li><a href="addUserForm.jsp">Add Employees</a></li> </ul> </div> </div> </div> </body> </html> |
#index.jsp: This will be our launching page, do coding of this as I did, check below code.
|
1 2 3 4 5 6 7 8 9 10 11 12 13 |
<%@page language="java" contentType="text/html" pageEncoding="UTF-8"%> <!DOCTYPE html> <html> <head> <meta http-equiv="Content-Type" content="text/html; charset=UTF-8"> <title>W3Adda Welcome Page</title> </head> <body> <%@ include file="header.html" %> <br> <a href="addUserForm.jsp">Add User</a> <a href="viewUsers.jsp">View Users</a> </body> </html> |
#adduserForm.jsp: Here we have included userForm.html file , which will redirect to addUser.jsp page after submitting all details.Check below code.
|
1 2 3 4 5 6 7 8 9 10 11 12 13 14 15 |
<%@ page language="java" contentType="text/html; charset=ISO-8859-1" pageEncoding="ISO-8859-1"%> <!DOCTYPE html> <html> <head> <meta http-equiv="Content-Type" content="text/html; charset=ISO-8859-1"> <title>W3Adda Registration</title> </head> <body> <%@ include file="header.html" %> <br> <jsp:include page="userForm.html"></jsp:include> </body> </html> |
#userForm.html: This is the html file in which we create a form for registration and then it redirect to addUser.jsp. Check below code.
|
1 2 3 4 5 6 7 8 9 10 11 12 13 14 15 16 17 18 19 |
<h1>Add New Employee</h1> <form action="addUser.jsp" method="post"> <table> <tr><td>Name:</td><td><input type="text" name="name"/></td></tr> <tr><td>Password:</td><td><input type="password" name="password"/></td></tr> <tr><td>Email:</td><td><input type="email" name="email"/></td></tr> <tr><td>Salary:</td><td><input type="number" step="0.01" name="salary"/></td></tr> <tr><td>Sex:</td><td><input type="radio" name="sex" value="male"/>Male <input type="radio" name="sex" value="female"/>Female </td></tr> <tr><td>Country:</td><td> <select name="country" style="width:155px"> <option>India</option> <option>New Zealand</option> <option>Srilanka</option> <option>Other</option> </select> </td></tr> <tr><td colspan="2"><input type="submit" value="Add User"/></td></tr> </table> </form> |
#addUser.jsp: So from here we will add user. From this we have called save method of UserDAO class.
|
1 2 3 4 5 6 7 8 9 10 11 12 |
<%@page import="w3adda.UserDAO"%> <jsp:useBean id="u" class="w3adda.UserBean"></jsp:useBean> <jsp:setProperty property="*" name="u"/> <% int i=UserDAO.save(u); if(i>0){ response.sendRedirect("AddUserSuccess.jsp"); }else{ response.sendRedirect("errorPage.jsp"); } %> |
#AddUserSuccess.jsp: After successful registration this code will run.
|
1 2 3 4 5 6 7 8 9 10 11 12 13 14 |
<!DOCTYPE html> <html> <head> <meta http-equiv="Content-Type" content="text/html; charset=ISO-8859-1"> <title>Add User Success</title> </head> <body> <%@ include file="header.html" %> <p>Record successfully saved!</p> <jsp:include page="userForm.html"></jsp:include> </body> </html> |
#errorPage.jsp: If any exception or error occurred so this code will give error message.
|
1 2 3 4 5 6 7 8 9 10 11 12 13 14 |
<!DOCTYPE html> <html> <head> <meta http-equiv="Content-Type" content="text/html; charset=ISO-8859-1"> <title>Add User Success</title> </head> <body bgcolor> <%@ include file="header.html" %> <p>Sorry, an error occurred!</p> <jsp:include page="userForm.html"></jsp:include> </body> </html> |
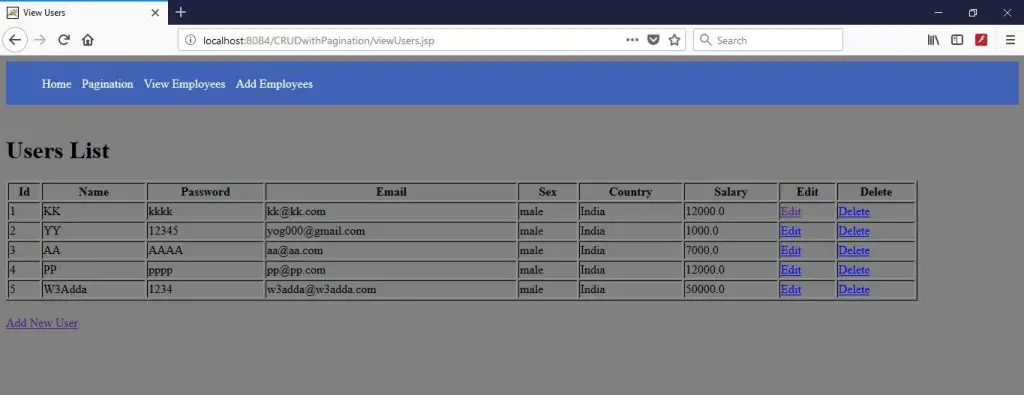
#viewUsers.jsp: With the help of this code you can view all data of employees.
|
1 2 3 4 5 6 7 8 9 10 11 12 13 14 15 16 17 18 19 20 21 22 23 24 25 26 27 28 29 30 31 |
<%@page import="w3adda.UserBean"%> <!DOCTYPE html> <html> <head> <meta http-equiv="Content-Type" content="text/html; charset=ISO-8859-1"> <title>View Users</title> </head> <body bgcolor="grey"> <%@ include file="header.html" %> <br> <%@page import="w3adda.UserDAO, w3adda.UserBean.*,java.util.*"%> <%@ taglib uri="http://java.sun.com/jsp/jstl/core" prefix="c"%> <h1>Users List</h1> <% List<UserBean> list = UserDAO.getAllRecords(); request.setAttribute("list", list); %> <table border="1" width="90%"> <tr><th>Id</th><th>Name</th><th>Password</th><th>Email</th><th>Sex</th><th>Country</th><th>Salary</th><th>Edit</th><th>Delete</th></tr> <c:forEach items="${list}" var="u"> <tr><td>${u.getId()}</td><td>${u.getName()}</td><td>${u.getPassword()}</td><td>${u.getEmail()}</td><td>${u.getSex()}</td><td>${u.getCountry()}</td><td>${u.getSalary()}</td><td><a href="updateForm.jsp?id=${u.getId()}">Edit</a></td><td><a href="DeleteUser.jsp?id=${u.getId()}">Delete</a></td></tr> </c:forEach> </table> <br/><a href="addUserForm.jsp">Add New User</a> </body> </html> |
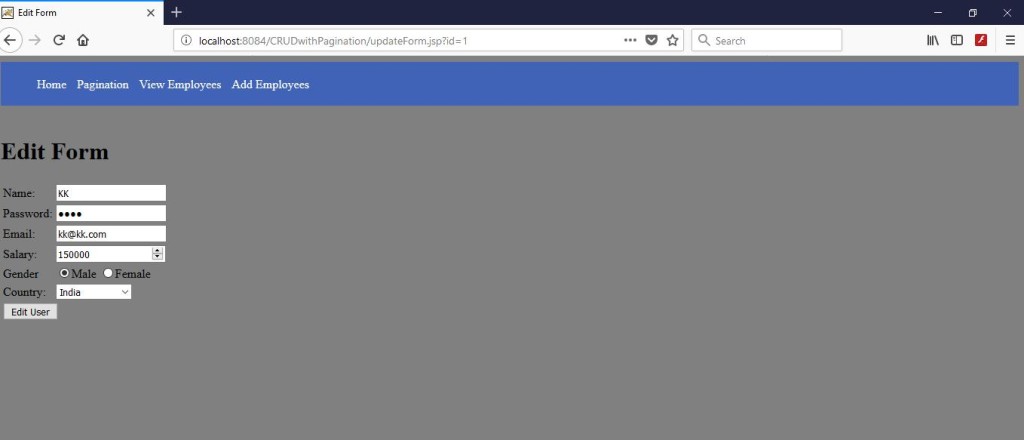
#updateForm.jsp: This will be our Update form, here you can update your details.
|
1 2 3 4 5 6 7 8 9 10 11 12 13 14 15 16 17 18 19 20 21 22 23 24 25 26 27 28 29 30 31 32 33 34 35 36 37 38 |
<!DOCTYPE html> <html> <head> <meta http-equiv="Content-Type" content="text/html; charset=ISO-8859-1"> <title>Edit Form</title> </head> <body> <%@ include file="header.html" %> <br> <%@page import="w3adda.*"%> <% String id = request.getParameter("id"); UserBean u = UserDAO.getRecordById(Integer.parseInt(id)); %> <h1>Edit Form</h1> <form action="UpdateUser.jsp" method="post"> <input type="hidden" name="id" value="<%=u.getId()%>"/> <table> <tr><td>Name:</td><td><input type="text" name="name" value="<%= u.getName()%>"/></td></tr> <tr><td>Password:</td><td><input type="password" name="password" value="<%= u.getPassword()%>"/></td></tr> <tr><td>Email:</td><td><input type="email" name="email" value="<%= u.getEmail()%>"/></td></tr> <tr><td>Salary:</td><td><input type="number" step="0.01" name="salary" value="<%= u.getSalary()%>"/></td></tr> <tr><td>Gender</td><td><input type="radio" name="sex" value="male"/>Male <input type="radio" name="sex" value="female"/>Female </td></tr> <tr><td>Country:</td><td> <select name="country"> <option>India</option> <option>New Zealand</option> <option>Srilanka</option> <option>Other</option> </select> </td></tr> <tr><td colspan="2"><input type="submit" value="Edit User"/></td></tr> </table> </form> </body> </html> |
#UpdateUser.jsp: This code will run when you were done with updation.
|
1 2 3 4 5 6 7 8 |
<%@page import="w3adda.UserDAO"%> <jsp:useBean id="u" class="w3adda.UserBean"></jsp:useBean> <jsp:setProperty property="*" name="u"/> <% int i=UserDAO.update(u); response.sendRedirect("viewUsers.jsp"); %> |
#DeleteUser.jsp: If you want to delete any employee so you can delete with this code.
|
1 2 3 4 5 6 7 8 |
<%@page import="w3adda.UserDAO"%> <jsp:useBean id="u" class="w3adda.UserBean"></jsp:useBean> <jsp:setProperty property="*" name="u"/> <% UserDAO.delete(u); response.sendRedirect("viewUsers.jsp"); %> |
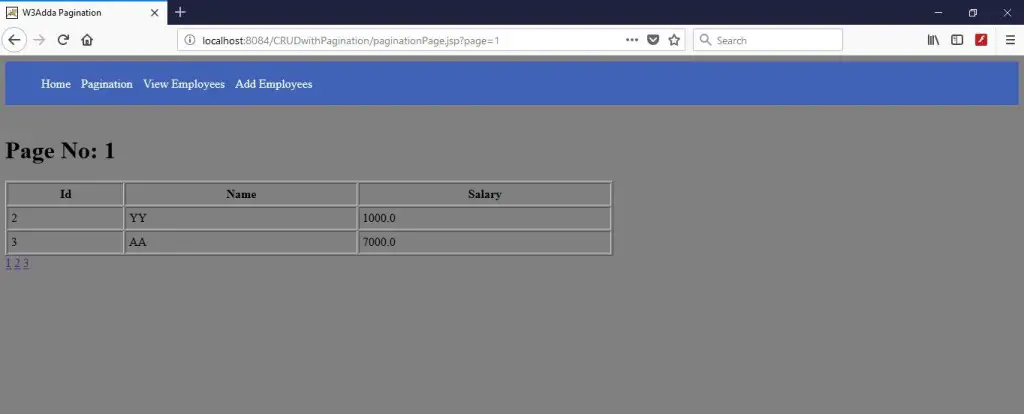
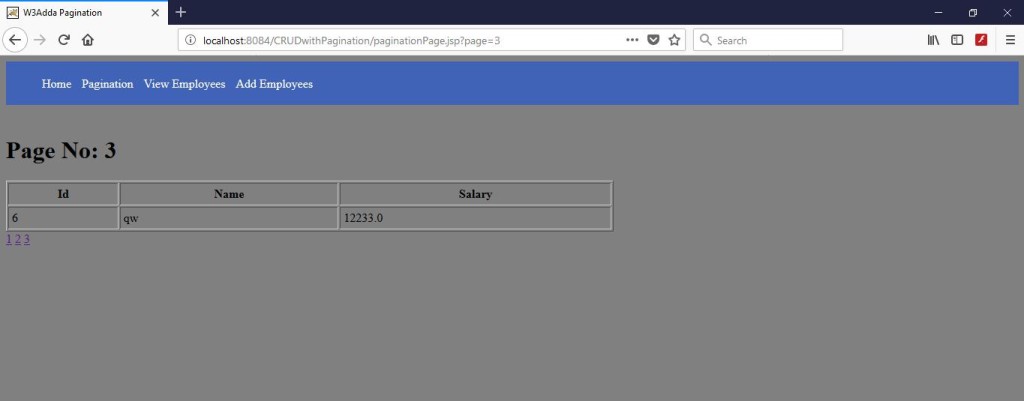
#paginationPage.jsp: So this code will work for pagination.
|
1 2 3 4 5 6 7 8 9 10 11 12 13 14 15 16 17 18 19 20 21 22 23 24 25 |
<%@ page import="java.util.*,w3adda.*"%> <%@ include file="header.html" %> <br> <% String spageid = request.getParameter("page"); int pageid = Integer.parseInt(spageid); int total = 2; if (pageid == 1) { } else { pageid = pageid - 1; pageid = pageid * total + 1; } List<UserBean> list = UserDAO.getRecords(pageid, total); out.print("<h1>Page No: " + spageid + "</h1>"); out.print("<table border='1' cellpadding='4' width='60%'>"); out.print("<tr><th>Id</th><th>Name</th><th>Salary</th>"); for (UserBean e : list) { out.print("<tr><td>"+e.getId()+"</td><td>"+e.getName() +"</td><td>"+e.getSalary ()+"</td></tr> "); } out.print("</table>"); %> <a href="paginationPage.jsp?page=1">1</a> <a href="paginationPage.jsp?page=2">2</a> <a href="paginationPage.jsp?page=3">3</a> |
Download: You can simply download this project by below link.
#Output: Let’s run this project you will get output like below images.
#Home: This will be our Home Screen.

#Add Employee: This screen will appear when you click on “Add Employees” or “Add User”.

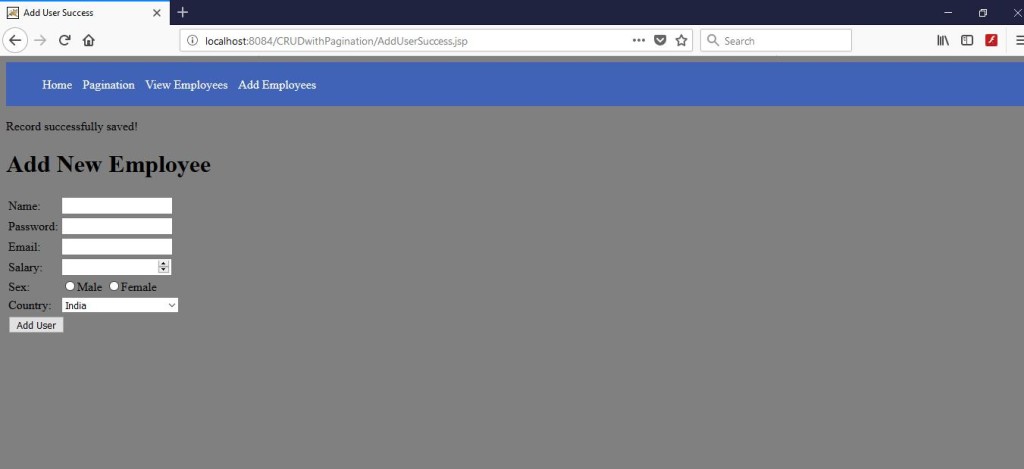
#AddUserSuccess: After successful registration this screen will appear.
#ViewUser: In this screen we can see all employees list.
#Edit: When you click on edit the below screen will appear. I have edit salary 12000 to 150000.
#After Update: After updation it will look like below image.

#Delete: When you click on delete so data will be removed from table, I have deleted user “KK”, So below screen will appear after deletion.

#Pagination: see pagination in below images.

So this was a simple example of CRUD with Pagination hopefully this will help you.
