In this tutorial you will learn about the JSP Sending Email and its application with practical example.
JSP Sending Email
In this article we are going to send mail using JSP page. I have used simple format for creation your own mail API, which will based on two protocols SMTP and MIME. Follow the simple steps and you will get reach to your goal.
- Create Project: Simply create a project , I hope you are aware for creation of project with netbeans which is already discussed in our “Hello World” Web Application. So I am not going to explain here.
- Download Jar file: Before starting coding of this project we need to download jar files that are mail.jar and activation.jar files. By below link you can download jar files.
mail.jar:
activation.jar:
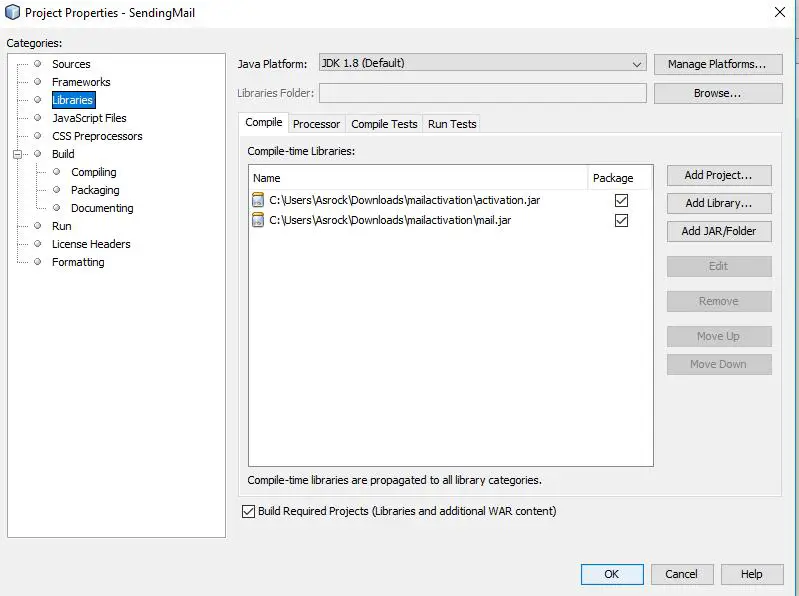
Simply add this jar files in your project library, If you do not how to add it just do right click on project and then go to Properties>Libraries, you will get screen like below image. Simply click on Add JAR/Folder Then click on “OK”, Your jar will be added to your project.
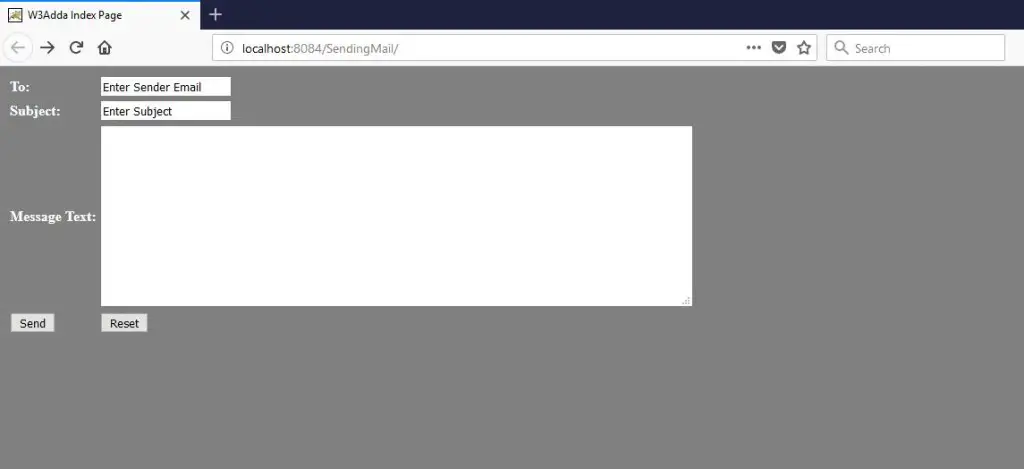
3.index.jsp: Now let’s do coding for our mail composer page. From here we will send details to mailProcess.jsp page through a form, check below code.
|
1 2 3 4 5 6 7 8 9 10 11 12 13 14 15 16 17 18 19 20 21 22 23 24 25 26 27 28 29 30 31 32 33 34 35 36 37 38 39 40 41 42 43 |
<!DOCTYPE html> <html> <head> <title>W3Adda Index Page</title> <meta http-equiv="Content-Type" content="text/html; charset=UTF-8"> <meta name="viewport" content="width=device-width"> </head> <body bgcolor="grey"> <form action="mailProcess.jsp"> <table> <tr><td><b><font color="White">To: </td> <td><b><b><input type="text" name="mail" value="Enter Sender Email"/><br/> </td> </tr> <tr> <td> <b><font color="white">Subject: </td> <td> <input type="text" name="sub" value="Enter Subject"><br/> </td> </tr> <tr> <td> <b><font color="white">Message Text: </td> <td> <textarea rows="12" cols="80" name="mess"></textarea><br/> </td> </tr> <tr> <td> <input type="submit" value="Send"> </td> <td> <input type="reset" value="Reset"> </td> </tr> </table> </form> </body> </html> |
Output: The below screen will be the output of above code.here you need to enter email id of sender, subject of your mail and content of mail.
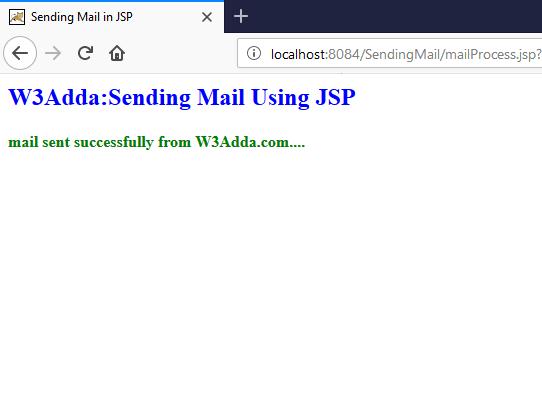
4.mailProcess.jsp: When you will click on “Send” button of above image after filling all details , so this page will do process of mail and will send to sender. Check below code.
|
1 2 3 4 5 6 7 8 9 10 11 12 13 14 15 16 17 18 19 20 21 22 23 24 25 26 27 28 29 30 31 32 33 34 35 36 37 38 39 40 41 42 43 44 45 46 47 48 49 50 51 52 53 54 55 56 57 58 59 60 61 |
<%@ page import="java.util.*,javax.mail.*"%> <%@ page import="javax.mail.internet.*" %> <% //Creating a result for getting status that messsage is delivered or not! String result; // Get recipient's email-ID, message & subject-line from index.html page final String to = request.getParameter("mail"); final String subject = request.getParameter("sub"); final String messg = request.getParameter("mess"); // Sender's email ID and password needs to be mentioned final String from = "Enter Your Emaild"; final String pass = "Enter Your Password"; // Defining the gmail host String host = "smtp.gmail.com"; // Creating Properties object Properties props = new Properties(); // Defining properties props.put("mail.smtp.host", host); props.put("mail.transport.protocol", "smtp"); props.put("mail.smtp.auth", "true"); props.put("mail.smtp.starttls.enable", "true"); props.put("mail.user", from); props.put("mail.password", pass); props.put("mail.port", "465"); // Authorized the Session object. Session mailSession = Session.getInstance(props, new javax.mail.Authenticator() { @Override protected PasswordAuthentication getPasswordAuthentication() { return new PasswordAuthentication(from, pass); } }); try { // Create a default MimeMessage object. MimeMessage message = new MimeMessage(mailSession); // Set From: header field of the header. message.setFrom(new InternetAddress(from)); // Set To: header field of the header. message.addRecipient(Message.RecipientType.TO, new InternetAddress(to)); // Set Subject: header field message.setSubject(subject); // Now set the actual message message.setText(messg); // Send message Transport.send(message); result = "mail sent successfully from W3Adda.com...."; } catch (MessagingException mex) { mex.printStackTrace(); result = "Error: unable to send mail...."; } %> <title>Sending Mail in JSP</title> <h2><font color="blue">W3Adda:Sending Mail Using JSP</font></h2> <b><font color="green"><% out.println(result);%></b> |
Output: After entering correct email id of sende, click on Send button and wait for while, the below screen will appear.