
In this tutorial you will learn about the JSP Directives Elements and its application with practical example.
JSP Directives Elements
Directives are elements that relay message to the JSP container and affect how it compiles the JSP page. The JSP directives gives direction to server that how to do process of a page.
#Syntax:
|
1 |
<%@ directive attribute=”value” %> |
There are three types of directives in JSP:
There are three types of directives in JSP:
- Page Directive: This directive is used to defines page-dependent attributes.
Syntax:
1<jsp:directive.page page-directive-attr-list /> - Include Directive: This directive is used to insert the text contained in another file, it may be static content or another jsp page.
Syntax:
1<jsp:directive.include file="relativeURLspec" /> - Taglib Directive: This directive is used to declare custom tag in jsp page.
Syntax:
1<%@ taglib uri="http://java.sun.com/jsp/jstl/core" prefix="c" %>
Let’s get more understand about these directives.
- Page Directives: The jsp:directive.page element defines a number of page-dependent properties and communicates these to the JSP container.You can use page directives anywhere in your JSP page. Some attributes are listed below which are used in Page directives tag.
# buffer
#import
#contentType
# errorPage
#isErrorPage
#extends
#info
#language
#isELIgnored
#isThreadSafe
#autoFlush
#session
#pageEncoding
1.buffer: This attributes is used to specify the buffer size in KB so that we can handle output generated by JSP page. The default value of buffer attribute is 8kb, we can change it according to our requirement.
Syntax is:
|
1 |
<%@ page buffer="value"%> |
if you want to change the value of buffer so just replace “value” as you want.
|
1 |
<%@ page buffer="16kb"%> |
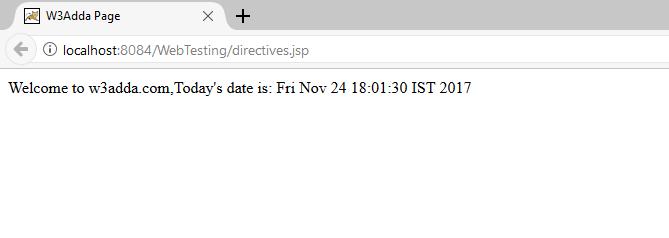
Example: Let’s do it in JSP page, like below code.
|
1 2 3 4 5 6 7 8 9 10 11 12 |
<%@page contentType="text/html" pageEncoding="UTF-8"%> <!DOCTYPE html> <html> <head> <meta http-equiv="Content-Type" content="text/html; charset=UTF-8"> <title>W3Adda Page</title> </head> <body> <%@ page buffer="16kb" %> Welcome to w3adda.com,Today's date is: <%= new java.util.Date()%> </body> </html> |
Output: The output will be look like below image.
2.import: This attribute is most useful attributes in Page Directives. By the name it can be understand that with the help of this attribute we can import other java classes, interface , packages etc.
Syntax:
|
1 |
<%@page import="value"%> |
So on place of value you can use anything which is valid and you want to important. Like if you want to import java.util.Date class so you can do it like below code.
|
1 |
<%@page import="java.util.Date"%> |
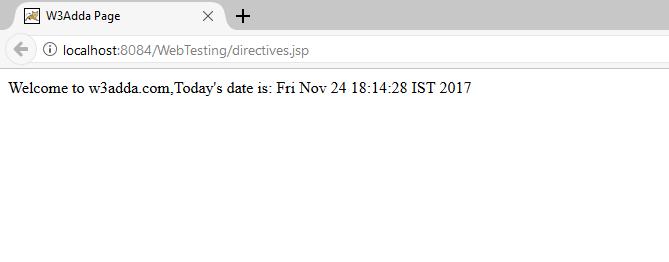
Example: Let’s understand it by an simple example like I did in jsp, check below code.
|
1 2 3 4 5 6 7 8 9 10 11 12 |
<%@page contentType="text/html" pageEncoding="UTF-8"%> <!DOCTYPE html> <html> <head> <meta http-equiv="Content-Type" content="text/html; charset=UTF-8"> <title>W3Adda Page</title> </head> <body> <%@ page import="java.util.Date" %> <!--here we import java.util.Date class--> Welcome to w3adda.com,Today's date is: <%= new Date()%> </body> </html> |
Output: The output of this attribute of page directive will look like below image.
3.contentType: This attribute is used to define contentType of JSP page, the default contentType is text/html.
Syntax:
|
1 |
<%@page contentType="value"%> |
Default value:
|
1 |
<%@page contentType="text/html"%> |
You can change it according to you like if you want to change it in xml so just enter the value like below code
|
1 |
<%@page contentType="text/xml"%> |
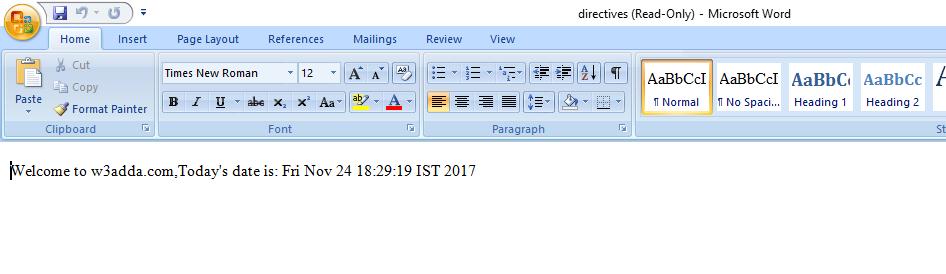
Example: In below example we have used contentType as “msword”, checkout how it will respond.
|
1 2 3 4 5 6 7 8 9 10 11 |
<%@page contentType="text/msword" pageEncoding="UTF-8"%> <!DOCTYPE html> <html> <head> <meta http-equiv="Content-Type" content="text/msword; charset=UTF-8"> <title>W3Adda Page</title> </head> <body> Welcome to w3adda.com,Today's date is: <%= new java.util.Date()%> </body> </html> |
Output: Simply run this code and the output will instruct you to download the ms word file and then you can open it. Check out below image.
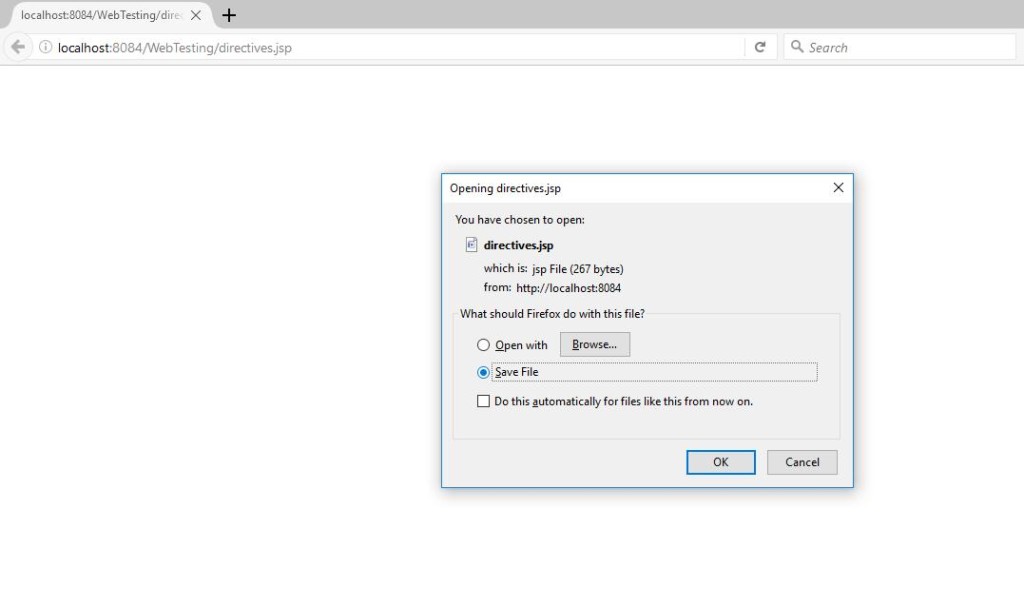
Simply “Save file” or “Open with” and you will get output like below image.
4.errorPage: The errorPage attribute is used to handle exception, if any error is occurred so we can simply use errorPage for this, the brief example of errorPage is briefly described in exception implicit object, here i have used an simple example so that we did not use to go back for it.
Example: You need to create an exception.jsp page, which will shown when an error occurred.
#exception.jsp:
|
1 2 3 4 5 6 7 8 9 10 11 12 13 14 15 |
<%@page contentType="text/html" pageEncoding="UTF-8"%> <%@ page isErrorPage="true" %> <!DOCTYPE html> <html> <head> <meta http-equiv="Content-Type" content="text/html; charset=UTF-8"> <title>W3Adda Exception Page</title> </head> <body> <h3>Sorry an exception occurred!</h3> Exception is: <%= exception%> </body> </html> |
#directive.jsp: Include exception.jsp page in this jsp , which is called when an error occurred.
|
1 2 3 4 5 6 7 8 9 10 11 12 |
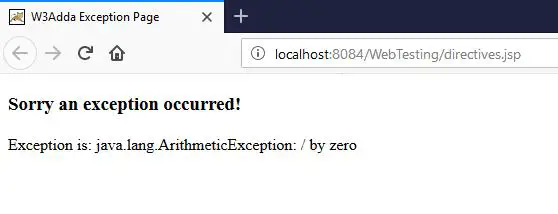
<%@page contentType="text/msword" pageEncoding="UTF-8"%> <!DOCTYPE html> <html> <head> <meta http-equiv="Content-Type" content="text/msword; charset=UTF-8"> <title>W3Adda Page</title> </head> <body> <%@ page errorPage="exception.jsp" %> <%= 1/0 %> </body> |
#Output: This two jsp files will give result like below image to us. Because 1 can not be divided by 0 so an exception will occurred.
5.isErrorPage: This attribute of page directive is used to specify that current page is used as an error page for other jsp page or not. The default value is “false”, If it is “true” means it will use when an exception will occurred else it will not use. As you can see I have used it in above attribute that is “errorPage” the line is
|
1 |
<%@ page isErrorPage="true" %> |
If I did it “false” so this will no more in use.
Syntax:
|
1 |
<%@ page isErrorPage="value"%> //value will be boolean true or false. |
Example: Check above example, that is related to this attribute also.
6.extends: The extends means you are inheriting parent class , means using inheritance in JSP page. This is rarely used and we can use it if we have extended HttpServlet and overridden some of it’s implementation.
Syntax:
|
1 |
<%@ page extends="w3adda.sampleclass"%> |
7.info : We can use this attribute to sets the information of the JSP page and later on we can retrieve it by using getServletInfo() method of servlet interface.
Syntax:
|
1 |
<%@ page info="value"%> |
Value can be your message like:
|
1 |
<%@ page info="Code written by W3Adda.com"%> |
Example: Need to do
8.language: This attribute specify the scripting language which is used in the page. The default value is “Java” and this is only language is supported by it.
Syntax:
|
1 |
<%@ page language="java"%> |
- isELIgnored: With the help of this attribute we can Ignore Expression Language(EL) in jsp. Expression Language is enabled by default, it means the default value is “false”. We can ignore it by doing it “true”.
Syntax:
|
1 |
<%@ page isELIgnored="true"%> //It will Ignore EL. |
10.isThreadSafe: The Servlet and JSP page both are support multithreaded means more than one thread can execute simultaneously. This attribute is allows you to handle multithreading concept, If you do not want to use multithreading so just change the value as “false” and if you want to allow multithreading in your jsp page just do it “true”.
Syntax:
|
1 2 3 |
<%@ page isThreadSafe="true"%> //Allow multithreading. <%@ page isThreadSafe="false"%> //Not Allow multithreading. |
- autoFlush: This attribute is used to handle buffer , if it is “true” means buffer should be flushed whenever it is full and if it is false so it will throw an exception whenever buffer overflows.
Syntax:
|
1 |
<%@ page autoFlush="true"%> //It will flush the buffer. |
12.session: By default JSP page creates a session, The default value for session is “True” , If we do not want that it creates default session so just do it “false”. Sometimes we do not need session in JSP page so in that case this attribute will use.
Syntax:
|
1 |
<%@ page session="false"%> //This will disable default session creation |
13.pageEncoding:This attribute is used to sets the response encoding type of our JSP page. The default value of this attribute is “ISO-8859-1”.
Syntax:
|
1 |
<%@ page pageEncoding="US-ASCII"%> |
