In this tutorial you will learn about the Stripe Payment Gateway Integration In Laravel 5.8 and its application with practical example.
Stripe Payment Gateway Integration In Laravel 5.8
Stripe is one of the most popular payment gateway, that allows us to accept payment worldwide. Stripe is very simple, hassle free and easy to integrate payment gateway. Integrating stripe payment gateway with laravel is a breeze.
In this tutorial, you will learn to integrate stripe payment gateway in your laravel 5.8 project. Before starting with this tutorial you would require a stripe developer account, from there you will get the api key and secret key require for the integration. After the successful integration you will be able to collect payment via simple payment form which allow customer to provide card information like card number, expiry date and a CVC code. Follow this step by step tutorial to learn stripe payment gateway integration in laravel 5.8.
Install Laravel 5.8
First of all we need to create a fresh laravel project, download and install Laravel 5.8 using the below command
|
1 |
composer create-project --prefer-dist laravel/laravel larablog |
Make sure you have composer installed.
Create Stripe account and generate key and secret
Go to the official Stripe website and signup with basic details.
Set Stripe API Key and SECRET In .env file
Now, we need to set stripe key and secret key in our project’s .env file. In stripe dashboard switch to the test mode as per screenshot, and get the stripe key and secret.
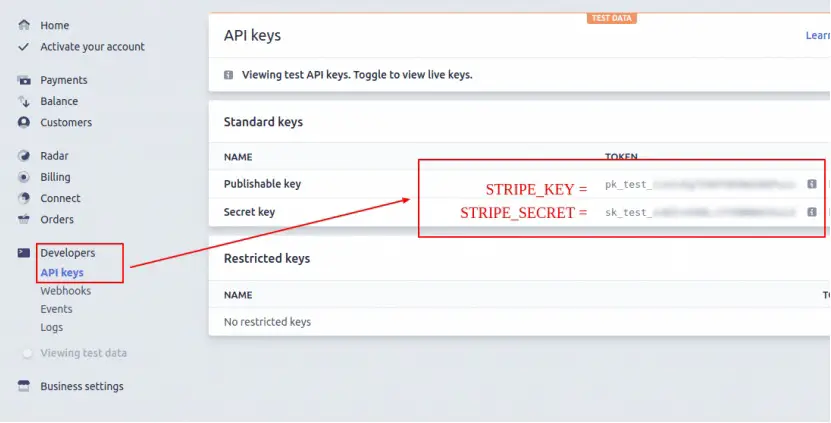
Now, open .env file located in project’s root folder and set the stripe key and secret as following –
.env file
|
1 2 |
STRIPE_KEY=test_publishable_key STRIPE_SECRET=test_secret_key |
Install stripe-php Package via composer
Now, we need to install stripe-php package in our project. Open your terminal and switch to project directory and use the following composer command to install stripe-php package.
|
1 |
composer require stripe/stripe-php |
Create Controller and Methods
Now, lets create a payment controller using following command
|
1 |
php artisan make:controller PaymentController |
Once the above command executed, it will create a controller file PaymentController.php in app/Http/Controllers/ directory. Open the PaymentController.php file and put the following code in it.
Controllers/PaymentController.php
|
1 2 3 4 5 6 7 8 9 10 11 12 13 14 15 16 17 18 19 20 21 22 23 24 25 26 27 28 29 30 31 32 33 34 35 36 37 38 39 40 41 42 |
namespace App\Http\Controllers; use Illuminate\Http\Request; use Session; use Stripe; class PaymentController extends Controller { public function stripe() { return view('stripe/stripe'); } public function stripePost(Request $request) { Stripe\Stripe::setApiKey(env('STRIPE_SECRET')); Stripe\Charge::create ([ "amount" => 100 * 100, "currency" => "usd", "source" => $request->stripeToken, "description" => "Test Payment" ]); Session::flash('success', 'Payment successful!'); return back(); } } |
Create View/Blade File
In this step, we will create view/blade file to accept stripe payment. Lets create a “stripe.blade.php” file in “resources/views/stripe/” directory and put the following code in it.
resources/views/stripe/stripe.blade.php
|
1 2 3 4 5 6 7 8 9 10 11 12 13 14 15 16 17 18 19 20 21 22 23 24 25 26 27 28 29 30 31 32 33 34 35 36 37 38 39 40 41 42 43 44 45 46 47 48 49 50 51 52 53 54 55 56 57 58 59 60 61 62 63 64 65 66 67 68 69 70 71 72 73 74 75 76 77 78 79 80 81 82 83 84 85 86 87 88 89 90 91 92 93 94 95 96 97 98 99 100 101 102 103 104 105 106 107 108 109 110 111 112 113 114 115 116 117 118 119 120 121 122 123 124 125 126 127 128 129 130 131 132 133 134 135 136 137 138 139 140 141 142 143 144 145 146 147 148 149 150 151 152 153 154 155 156 157 158 159 160 161 162 163 164 165 166 167 168 169 170 171 172 173 174 175 176 177 178 179 180 181 182 183 184 185 186 187 188 189 190 191 192 193 194 195 196 197 198 199 200 201 202 203 204 205 206 207 208 209 210 211 212 213 214 215 216 217 218 219 220 221 222 223 224 225 226 227 228 229 230 231 232 233 234 235 236 237 238 239 240 241 242 243 244 245 246 247 248 249 250 251 252 253 254 255 256 257 258 259 260 261 262 263 264 265 266 267 268 269 270 271 272 273 274 275 276 277 278 279 280 281 282 283 284 285 286 287 288 289 290 291 292 293 294 295 296 297 298 299 300 301 302 303 304 305 306 307 308 309 310 311 312 313 314 315 316 317 318 319 320 321 322 323 324 325 |
<!DOCTYPE html> <html> <head> <title>W3Adda - Laravel 5.8 Stripe Payment Gateway Integration</title> <link rel="stylesheet" href="https://cdnjs.cloudflare.com/ajax/libs/twitter-bootstrap/3.3.7/css/bootstrap.min.css" /> <script src="https://cdnjs.cloudflare.com/ajax/libs/jquery/3.3.1/jquery.min.js"></script> <style type="text/css"> .panel-title { display: inline; font-weight: bold; } .display-table { display: table; } .display-tr { display: table-row; } .display-td { display: table-cell; vertical-align: middle; width: 61%; } </style> </head> <body> <div class="container"> <h1 style="text-align: center;">W3Adda - Laravel 5.8 Stripe Payment Gateway Integration</h1> <div class="row"> <div class="col-md-6 col-md-offset-3"> <div class="panel panel-default credit-card-box"> <div class="panel-heading display-table" > <div class="row display-tr" > <h3 class="panel-title display-td" >Payment Details</h3> <div class="display-td" > <img class="img-responsive pull-right" src="http://i76.imgup.net/accepted_c22e0.png"> </div> </div> </div> <div class="panel-body"> @if (Session::has('success')) <div class="alert alert-success text-center"> <a href="#" class="close" data-dismiss="alert" aria-label="close">×</a> <p>{{ Session::get('success') }}</p> </div> @endif <form role="form" action="{{ route('stripe.post') }}" method="post" class="require-validation" data-cc-on-file="false" data-stripe-publishable-key="{{ env('STRIPE_KEY') }}" id="payment-form"> @csrf <div class='form-row row'> <div class='col-xs-12 form-group required'> <label class='control-label'>Name on Card</label> <input class='form-control' size='4' type='text'> </div> </div> <div class='form-row row'> <div class='col-xs-12 form-group card required'> <label class='control-label'>Card Number</label> <input autocomplete='off' class='form-control card-number' size='20' type='text'> </div> </div> <div class='form-row row'> <div class='col-xs-12 col-md-4 form-group cvc required'> <label class='control-label'>CVC</label> <input autocomplete='off' class='form-control card-cvc' placeholder='ex. 311' size='4' type='text'> </div> <div class='col-xs-12 col-md-4 form-group expiration required'> <label class='control-label'>Expiration Month</label> <input class='form-control card-expiry-month' placeholder='MM' size='2' type='text'> </div> <div class='col-xs-12 col-md-4 form-group expiration required'> <label class='control-label'>Expiration Year</label> <input class='form-control card-expiry-year' placeholder='YYYY' size='4' type='text'> </div> </div> <div class='form-row row'> <div class='col-md-12 error form-group hide'> <div class='alert-danger alert'>Please correct the errors and try again.</div> </div> </div> <div class="row"> <div class="col-xs-12"> <button class="btn btn-primary btn-lg btn-block" type="submit">Pay Now ($100)</button> </div> </div> </form> </div> </div> </div> </div> </div> </body> <script type="text/javascript" src="https://js.stripe.com/v2/"></script> <script type="text/javascript"> $(function() { var $form = $(".require-validation"); $('form.require-validation').bind('submit', function(e) { var $form = $(".require-validation"), inputSelector = ['input[type=email]', 'input[type=password]', 'input[type=text]', 'input[type=file]', 'textarea'].join(', '), $inputs = $form.find('.required').find(inputSelector), $errorMessage = $form.find('div.error'), valid = true; $errorMessage.addClass('hide'); $('.has-error').removeClass('has-error'); $inputs.each(function(i, el) { var $input = $(el); if ($input.val() === '') { $input.parent().addClass('has-error'); $errorMessage.removeClass('hide'); e.preventDefault(); } }); if (!$form.data('cc-on-file')) { e.preventDefault(); Stripe.setPublishableKey($form.data('stripe-publishable-key')); Stripe.createToken({ number: $('.card-number').val(), cvc: $('.card-cvc').val(), exp_month: $('.card-expiry-month').val(), exp_year: $('.card-expiry-year').val() }, stripeResponseHandler); } }); function stripeResponseHandler(status, response) { if (response.error) { $('.error') .removeClass('hide') .find('.alert') .text(response.error.message); } else { var token = response['id']; $form.find('input[type=text]').empty(); $form.append("<input type='hidden' name='stripeToken' value='" + token + "'/>"); $form.get(0).submit(); } } }); </script> </html> |
Set Routes
After this, we need to add following two routes in “routes/web.php” to display stripe payment form and to post the form data. Lets open “routes/web.php” file and add following route.
routes/web.php
|
1 2 |
Route::get('stripe', 'PaymentController@stripe'); Route::post('stripe', 'PaymentController@stripePost')->name('stripe.post'); |
Now we are ready to run our example so lets start the development server using following artisan command –
|
1 |
php artisan serve |
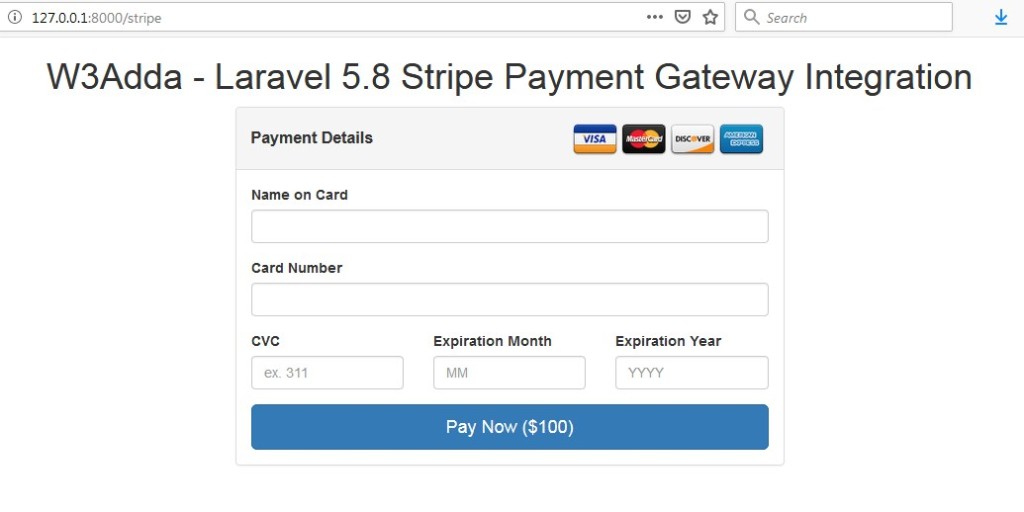
Now, open the following URL in browser to see the output –
http://localhost:8000/larablog/stripe
Output:-
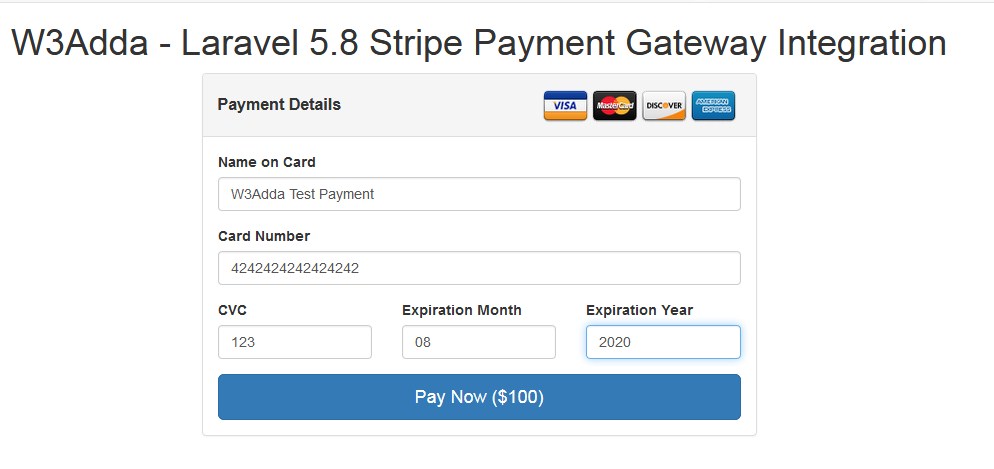
Use the following test card details to test the payment.
Test Credit Card Info :-
Card No :- 4242424242424242 / 4012888888881881
Month :- Any future month
Year :- Any future Year
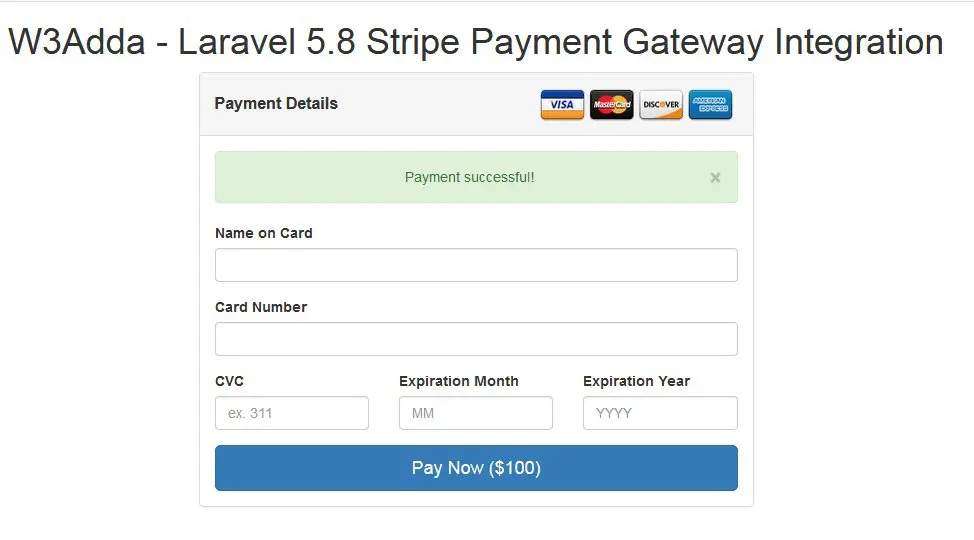
CVV :- Any 3 digit Number
On successful payment, you will get the “Payment Successful” message as per the screenshot –