
In this tutorial you will learn about the Laravel 9 Google Recaptcha V3 Tutorial with Example and its application with practical example.
In this Laravel 9 Google Recaptcha V3 Tutorial with Example I will show you how to integrate google recaptcha v3 in laravel 9 application. I’ll guide you through step by step for integration of google recaptcha v3 in a laravel 9 application. We will be using ‘josiasmontag/laravel-recaptchav3’ package for laravel 9 google recaptcha v3 integration in laravel 9 application. In this tutorial, we will be creating a simple form with some basic fields along with the google recaptcha v3.
Laravel 9 Google Recaptcha V3 Integration
Google ReCaptcha is a one of the most popular captcha system that defends your site from bots to spam and abuse. The Google ReCaptcha is an open service that assures a computer user is a human. In order to integrate the reCaptcha, you must sign up for the Google API key & secret for your website.
Laravel 9 Google Recaptcha V3 Tutorial with Example
- Install Laravel 8
- Setup Database Credentials
- Install Laravel Google Recaptcha V3 Package
- Set Google Site Key and Secret Key
- Define Route
- Create Controller
- Create Blade View
- Start Development Server
- Conclusion
Install Laravel 9
First of all we need to create a fresh laravel project, download and install Laravel 9 using the below command
|
1 |
composer create-project --prefer-dist laravel/laravel larablog |
Make sure you have composer installed.
Setup Database Credentials
Now, lets create a MySQL database and connect it with laravel application. After creating database we need to set database credential in application’s .env file.
|
1 2 3 4 5 6 |
DB_CONNECTION=mysql DB_HOST=127.0.0.1 DB_PORT=3306 DB_DATABASE=larablog DB_USERNAME=root DB_PASSWORD= |
Install Laravel Google Recaptcha V3 Package
We will be using ‘josiasmontag/laravel-recaptchav3’ package for google recaptcha v3 integration in laravel 9 application. In this step we will be installing “josiasmontag/laravel-recaptchav3” via following composer command, lets open your terminal and switch to the project directory and enter the following command –
|
1 |
composer require josiasmontag/laravel-recaptchav3 |
After successfully installing package, we need to publish config file with bellow command:
|
1 |
php artisan vendor:publish --provider="Lunaweb\RecaptchaV3\Providers\RecaptchaV3ServiceProvider" |
Use the above command
Set Google Site Key and Secret Key
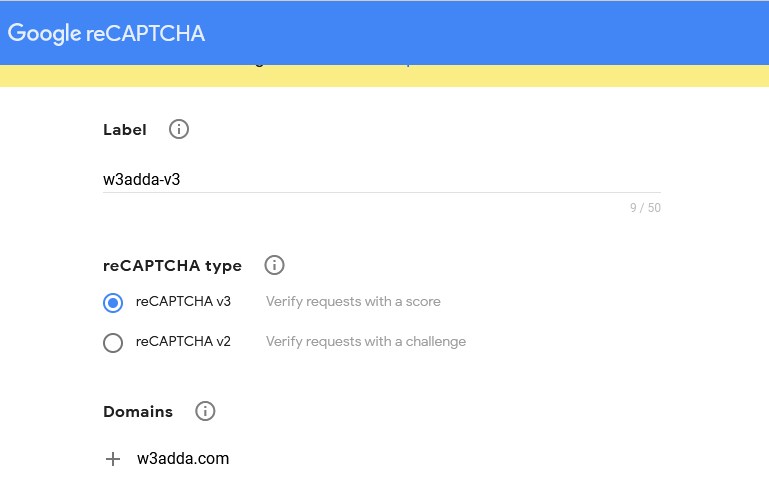
Now, we need to set Google Site Key and Secret Key in .env file. Let’s start by getting Google key & secret required to make ReCaptcha authorize with the Google servers. Visit the following link to register your site –
|
1 |
https://www.google.com/recaptcha/admin/create |
Here, you need to provide label to identify the site. Now choose the type of reCAPTCHA as reCAPTCHA V3. Now you need to add the list of domains, this captcha would work on.
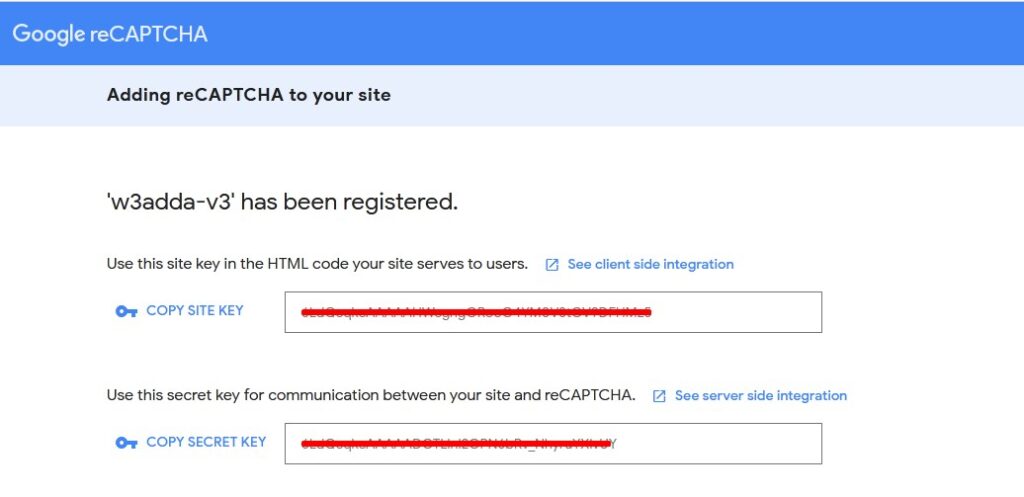
Let’s open .env file and add this credential as following –
.env
|
1 2 |
RECAPTCHAV3_SITEKEY=[site-key] RECAPTCHAV3_SECRET=[secret-key] |
Set the details as above
Create Controller
Now, lets create Recaptcha Controller using following command
|
1 |
php artisan make:controller RecaptchaController |
Once the above command executed, it will create a controller file RecaptchaController.php in app/Http/Controllers/ directory. Open the RecaptchaController.php file and put the following code in it.
Controllers/RecaptchaController.php
|
1 2 3 4 5 6 7 8 9 10 11 12 13 14 15 16 17 18 19 20 21 22 23 24 25 26 |
<?php namespace App\Http\Controllers; use Illuminate\Http\Request; class RecaptchaController extends Controller { // public function index() { return view('recaptcha/index'); } public function store(Request $request) { $request->validate([ 'name' => 'required', 'email' => 'required|email', 'password' => 'required|min:6', 'g-recaptcha-response' => 'required|recaptchav3:register,0.5' ]); return "success"; } } |
Create View/Blade File
In this step, we will create view/blade file to render a register form with recaptcha field. Lets create a “index.blade.php” file in “resources/views/recaptcha/” directory and put the following code in it.
resources/views/recaptcha/index.blade.php
|
1 2 3 4 5 6 7 8 9 10 11 12 13 14 15 16 17 18 19 20 21 22 23 24 25 26 27 28 29 30 31 32 33 34 35 36 37 38 39 40 41 42 43 44 45 46 47 48 49 50 51 52 53 54 55 56 57 58 59 60 61 62 63 64 65 66 67 68 69 70 71 72 73 74 75 76 77 78 79 80 81 82 83 84 85 86 87 88 89 90 91 92 93 94 95 96 97 98 99 100 101 102 103 104 105 106 107 108 109 110 111 112 113 114 115 116 117 118 119 120 121 122 123 124 125 126 127 128 129 130 131 132 133 134 135 136 137 138 139 140 141 142 143 144 145 146 147 148 149 150 151 152 153 154 155 156 157 158 159 160 161 162 163 164 165 166 167 168 169 170 171 172 173 174 175 176 177 178 179 180 181 182 183 184 185 186 187 188 |
<!DOCTYPE html> <html> <head> <title>Laravel 9 Google Recaptcha V3 Integration</title> <link rel="stylesheet" href="https://cdnjs.cloudflare.com/ajax/libs/twitter-bootstrap/4.1.3/css/bootstrap.min.css" /> <script src="https://cdnjs.cloudflare.com/ajax/libs/jquery/3.3.1/jquery.min.js"></script> {!! RecaptchaV3::initJs() !!} </head> <body> <div class="container"> <div class="row"> <div class="col-md-6 col-md-offset-3"> <div class="panel panel-primary"> <h3 style="text-align: center;">Laravel 9 Google Recaptcha V3 Integration</h3> <div class="panel-body"> <form class="form-horizontal" role="form" method="POST" action="{{ url('/store') }}"> {!! csrf_field() !!} <div class="form-group{{ $errors->has('name') ? ' has-error' : '' }}"> <label class="col-md-4 control-label">Name</label> <div class="col-md-6"> <input type="text" class="form-control" name="name" value="{{ old('name') }}"> @if ($errors->has('name')) <span class="help-block"> <strong>{{ $errors->first('name') }}</strong> </span> @endif </div> </div> <div class="form-group{{ $errors->has('email') ? ' has-error' : '' }}"> <label class="col-md-4 control-label">E-Mail Address</label> <div class="col-md-6"> <input type="email" class="form-control" name="email" value="{{ old('email') }}"> @if ($errors->has('email')) <span class="help-block"> <strong>{{ $errors->first('email') }}</strong> </span> @endif </div> </div> <div class="form-group{{ $errors->has('password') ? ' has-error' : '' }}"> <label class="col-md-4 control-label">Password</label> <div class="col-md-6"> <input type="password" class="form-control" name="password"> @if ($errors->has('password')) <span class="help-block"> <strong>{{ $errors->first('password') }}</strong> </span> @endif </div> </div> <div class="form-group{{ $errors->has('password_confirmation') ? ' has-error' : '' }}"> <label class="col-md-4 control-label">Confirm Password</label> <div class="col-md-6"> <input type="password" class="form-control" name="password_confirmation"> @if ($errors->has('password_confirmation')) <span class="help-block"> <strong>{{ $errors->first('password_confirmation') }}</strong> </span> @endif </div> </div> <div class="form-group{{ $errors->has('g-recaptcha-response') ? ' has-error' : '' }}"> <div class="col-md-6"> {!! RecaptchaV3::field('register') !!} @if ($errors->has('g-recaptcha-response')) <span class="help-block"> <strong>{{ $errors->first('g-recaptcha-response') }}</strong> </span> @endif </div> </div> <div class="form-group"> <div class="col-md-6 col-md-offset-4"> <br/> <button type="submit" class="btn btn-primary"> <i class="fa fa-btn fa-user"></i>Register </button> </div> </div> </form> </div> </div> </div> </div> </div> </body> </html> |
Set Routes
After this, we need to add following two routes in “routes/web.php” to display register form and to post the form data. Lets open “routes/web.php” file and add following route.
routes/web.php
|
1 2 3 4 |
use App\Http\Controllers\RecaptchaController; Route::get('recaptchacreate', [RecaptchaController::class, 'index']); Route::post('store', [RecaptchaController::class, 'store']); |
Start Development Server
Now we are ready to run our example so lets start the development server using following artisan command –
|
1 |
php artisan serve |
Now, open the following URL in browser to see the output –
|
1 |
http://localhost:8000/recaptchacreate |
