In this tutorial you will learn about the Kotlin ListView and its application with practical example.
ListView with Kotlin
ListView is a view from which we can display group of items in vertical scrollable list. List items are automatically inserted with the help of adapter.
Adapter is a bridge UI component and data source, It pulls data from database or an array.
It is briefly discussed in Android ListView Article . Please check that article.
Here we are going to discuss ListView with Kotlin in Android.
Example: Let’s create new project and do not forget check “Include Kotlin Support”. Used classes and Xml are listed below.
- MainActivity
- LangListAdapter
- Langauge(Model)
- activity_main.xml
- layout_adapter.xml
- header.xml
- colors.xml
Let’s understand each class one by one.
#Langauge(Model): In Kotlin we do not need to write getter and setter method in model. It is very simple to create model in Kotlin support. Just check below model, you will get understand what I am trying to say.
|
1 2 3 4 5 6 7 |
package com.w3adda.listviewwithkot class Langauge { var name: String = "" } |
so it is pretty simple to create model just need to declare our variable.
#LangListAdapter: Below is the Adapter Code, code is reduced by Kotlin and it is very easy to get understand, methods are same as we already discussed in ListAdapter in Android Article. So Let’s write code of it. Here It extends Base Adapter which is clearly explained in Android Tutorial. BaseAdapter is very generic adapter which allows you to do pretty much whatever you want . Its custom Adapter from which you can do whatever you want to do with grid and list, But you need to do some coding for it.
|
1 2 3 4 5 6 7 8 9 10 11 12 13 14 15 16 17 18 19 20 21 22 23 24 25 26 27 28 29 30 31 32 33 34 35 36 37 |
package com.w3adda.listviewwithkot import android.app.Activity import android.view.View import android.view.ViewGroup import android.widget.BaseAdapter import android.widget.TextView data class LangListAdapter(var langaugeList:List<Langauge>, var activity: Activity) : BaseAdapter(){ override fun getItem(position: Int): Any { return langaugeList.get(position) } override fun getItemId(position: Int): Long { return position.toLong() } override fun getCount(): Int { return langaugeList.size } override fun getView(position: Int, convertView: View?, parent: ViewGroup?): View { val view: View = View.inflate(activity,R.layout.layout_adapter,null) val tv_num = view.findViewById<TextView>(R.id.tv_number) as TextView val tv_lang = view.findViewById<TextView>(R.id.tv_lang) as TextView tv_num.text = (position+1).toString()+"." tv_lang.text = langaugeList.get(position).name return view } } |
# layout_adapter.xml : The below layout is associated with Above adapter class. Just check it.
|
1 2 3 4 5 6 7 8 9 10 11 12 13 14 15 16 17 18 19 20 21 22 23 24 25 26 27 28 29 |
<RelativeLayout xmlns:android="http://schemas.android.com/apk/res/android" android:layout_width="match_parent" android:layout_height="wrap_content" android:orientation="horizontal"> <TextView android:id="@+id/tv_number" android:layout_width="wrap_content" android:layout_height="wrap_content" android:padding="5dp" android:text="1." android:gravity="end|top" android:textColor="@color/colorText" android:textSize="18sp" /> <TextView android:id="@+id/tv_lang" android:layout_width="match_parent" android:layout_height="wrap_content" android:minHeight="40dp" android:text="Kotlin" android:padding="5dp" android:layout_marginLeft="10dp" android:layout_toRightOf="@+id/tv_number" android:textColor="@color/colorText" android:textSize="18sp" /> </RelativeLayout> |
#MainActivity: Now it is time to finish our last stage that is Activity which is associated with Model and Adapter. We have added data from here. The adding process is about same Like we used to use before, but some changes are there, Kotlin also reduced code here and did simple work for us. Checkout below code.
|
1 2 3 4 5 6 7 8 9 10 11 12 13 14 15 16 17 18 19 20 21 22 23 24 25 26 27 28 29 30 31 32 33 34 35 36 37 38 39 40 41 42 43 44 45 46 47 48 49 50 51 52 53 54 55 56 57 58 59 60 61 |
package com.w3adda.listviewwithkot import android.support.v7.app.AppCompatActivity import android.os.Bundle import android.widget.ListView class MainActivity : AppCompatActivity() { var list_lang: ListView? = null var langaugeList: ArrayList<Langauge> = ArrayList<Langauge>() var adapter: LangListAdapter? = null override fun onCreate(savedInstanceState: Bundle?) { super.onCreate(savedInstanceState) setContentView(R.layout.activity_main) list_lang = findViewById<ListView>(R.id.list_lang) as ListView addLangData() adapter = LangListAdapter(langaugeList, this) list_lang?.adapter = adapter } private fun addLangData() { val lang1 = Langauge() lang1.name = "Android" langaugeList.add(lang1) val lang2 = Langauge() lang2.name = "Kotlin" langaugeList.add(lang2) val lang3 = Langauge() lang3.name = "Java" langaugeList.add(lang3) val lang4 = Langauge() lang4.name = "Python" langaugeList.add(lang4) val lang5 = Langauge() lang5.name = "PHP" langaugeList.add(lang5) val lang6 = Langauge() lang6.name = "Swift" langaugeList.add(lang6) val lang7 = Langauge() lang7.name = "Html" langaugeList.add(lang7) val lang8 = Langauge() lang8.name = "MySql" langaugeList.add(lang8) val lang9 = Langauge() lang9.name = "Ruby" langaugeList.add(lang9) } } |
#activity_main.xml: The Associated XML file with Above activity is below you can simply use it.
|
1 2 3 4 5 6 7 8 9 10 11 12 13 14 15 16 17 18 19 20 21 |
<?xml version="1.0" encoding="utf-8"?> <RelativeLayout xmlns:android="http://schemas.android.com/apk/res/android" xmlns:app="http://schemas.android.com/apk/res-auto" xmlns:tools="http://schemas.android.com/tools" android:layout_width="match_parent" android:layout_height="match_parent" tools:context="com.example.listviewwithkot.MainActivity"> <include layout="@layout/header" android:id="@+id/header"/> <ListView android:layout_width="match_parent" android:layout_height="match_parent" android:id="@+id/list_lang" android:layout_below="@+id/header" android:padding="5dp" android:divider="@color/colorDivider" android:dividerHeight="1dp"/> </RelativeLayout> |
#Header.xml: The Header file which I have used in activity_main.xml is below, you can modified it according to you.
|
1 2 3 4 5 6 7 8 9 10 11 12 13 14 15 16 17 |
<?xml version="1.0" encoding="utf-8"?> <RelativeLayout xmlns:android="http://schemas.android.com/apk/res/android" android:layout_width="match_parent" android:background="@color/header" android:layout_height="50dp"> <TextView android:layout_width="wrap_content" android:layout_height="wrap_content" android:layout_margin="12dp" android:text="W3Adda ListView" android:textSize="18sp" android:textStyle="bold" /> </RelativeLayout> |
#colors.xml: Some colors I have used so that it look good, you can use it.
|
1 2 3 4 5 6 7 8 9 10 11 12 |
<?xml version="1.0" encoding="utf-8"?> <resources> <color name="colorPrimary">#9e4e11</color> <color name="colorPrimaryDark">#a96028</color> <color name="colorAccent">#FF4081</color> <color name="header">#9e4e11</color> <color name="colorDivider">#795548</color> <color name="colorText">#ffffff</color> <color name="colorSecondaryText">#fafafa</color> </resources> |
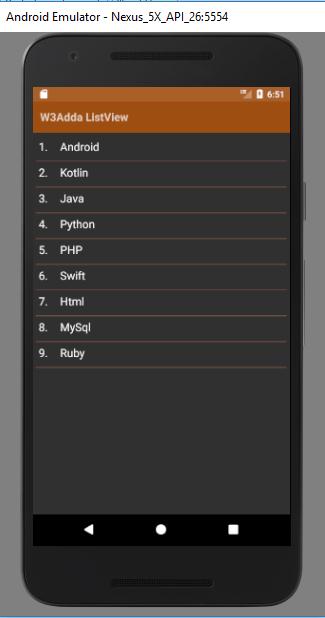
Run: We are all set from coding site. So its time to run this project on your device or Emulator. I have used Emulator. The result of above project will look like below image.