Category Archives: Android Tutorial

Android Tutorial

Android Services

Android Services

As we discussed in Core Building Block of Android that Service is long running Background Process which perform operation in background. Service does not provide User Interface. For Creation of Service we need to create Subclass of Service or we can also use existing Subclasses of Services. Let’s Briefly Discuss Service

Service can handle network transaction , interact with content provider, play music, perform I/O etc.

Three different types of service listed below :

Foreground, Background, Bound.

Foreground: Foreground service continue running even when user is not interacting with the app, It must display a status bar icon.

Background: It simply means running service in background, It is not directly noticed by the user

Bound : When an application component bound with service by calling bindService() , It called Bound Service. Bound service allows components to interact with the service, send request , receive result. It offers client-server interface.


Lifecycle of Service

A service has lifecycle callback methods, Let’s understand these callback methods one by one

by below diagram.

1

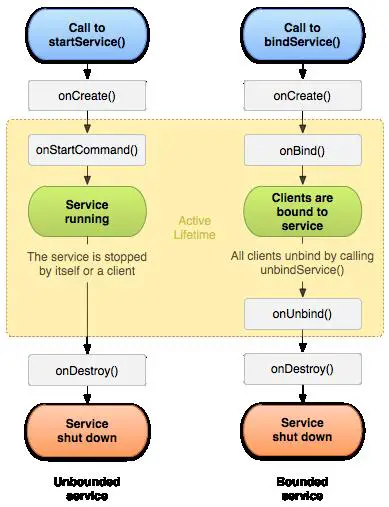
1. onStartCommand() : A service is started when calls startService() method, It runs in background indefinitely. It is stopped by stopService() method and stopSelf() method.
2. onBind() : The system calls this method when bindService() is called.
3. onUnbind() : All clients unbind or disconnected by calling this method.
4. onRebind() : This method is called by system when new clients are connected to the service.
5. onCreate() : This is one time setup procedure when the service is initially created. If the service already running so this method won’t be called.
6. onDestroy() : System calls this method when it is not in used or destroyed. This method should be implemented by the services for cleaning threads, receivers, registered listener etc.
The following code will guide you that how it use.


Android Recycler View

Android Recycler View

Android RecyclerView is more advanced version of ListView and GridView with improved performance and more benefits. It extend ViewGroup and implement ScrollingView and NestedScrollingChlid2 Class. It is very flexible view which provide a limited window for large dataset.
For the use of RecylerView you need to create an Adapter which will extend the RecyclerView.Adapter class.

There are three built in Layout Manager which are provided by RecyclerView.

  1. LinearLayoutManager : It shows items in vertical or horizontal scrolling List.
  2. GridLayoutManager : It shows items in Grid.
  3. StaggeredGridLayoutManager : It shows items in a staggered grid.

Lets understand by an example of RecyclerView. Before Start coding we need to add dependencies for RecyclerView in build.gradle file like below Image:

1

Now we have to create Layout for RecyclerView , Check below code:

Attributes :

ID: It is used to identify view uniquely

Scrollbars : It is used to provide scrolling .It can be vertical or Horizontal.

Width : It is used to provide Width of RecylerView.

Height : It is used to provide Height of RecyclerView.

So after declaration of RecyclerView in Xml let see how it looks in xml.

2

Now we have to follow same steps as like we did in GridView, We have to create Bean, Adapter and Activity for RecyclerView. Lets create Bean first .

Now its time to create an Adapter for RecylerView. RecyclerView Adapter

As we know that Adapter is a bridge between UI and data source, It helps us to fill data in the UI components. It pulls data from database or an array. After pulling data from database or an array, it sends data to adapter view and adapter view send it to view. RecyclerView Adapter extends object class, It is used in RecyclerView.

RecyclerView.Adapter() is public constructors . It have some public methods

1. onCreateViewHolder(ViewGroup parent, int viewType): This method is used to initializes fields which is used for RecyclerView. This method calls to create new ViewHolder. Here you have to initialize your layout, Syntax is like below:

  1. onBindViewHolder(ViewHolder holder,int position) : By the name of this method clearly understood that it is used to binding. Now binding for what, It is used to bind content or data with Views of RecyclerView. Like in TextView, ImageView etc. From here we can set data to our Views by given position. Like below

  1. getItemCount() : It returns the total number of item count which held by adapter or size of arraylist. Like below code:

There are many methods are provided by this adapter but these methods are important part of RecyclerView Adapter.

Check below code which is used for RecyclerView Adapter:

Now We are going to do our final stage that is Activity Part, Here we have to fetch RecyclerView by its id and need to use LayoutManager Like in which LayoutManager you are going to View your RecyclerView.

Final Output of this code will look like below image:

3

Android Grid View

Android Grid View

It displays items in a two-dimensional , scrollable grid. The ListView and GridView are subclass of AdapterView . As we discussed in ListView that Adapter is a bridge between UI and Data source and it retrieves data from data source.

Lets understand it by an example , Create GridView in Xml Layout like below code

GridView Attributes

android:id : it used to identify GridView Uniquely.

android:numColumns : It used to define that how many columns will be shown on display. It may be integer value like “2” or auto_fit. auto_fit means as many as column possible to fit on display.

android:verticalSpacing : It defines vertical spacing between rows, It can be dp,px,sp,in or mm.

android:horizontalSpacing : It defines horizontal spacing between columns.

android:strechMode : It defines how columns should stretched to fill display.

Now lets see how your gridview will look in xml files.

gv

Now it’s time to do some coding part, You have to create Activity, Bean and an Adapter for display your GridView. Do not you worry about that all things are ready, you can try below code and run your code, you will get your gridview screen, just follow all steps.


Beans : JavaBeans are classes that encapsulate many objects into a single object. It contains constructor, Getter, Setter Methods. With the help of Setter and Getter method user can set and get data. It also have zero argument constructor. Check out below code:

Base Adapter: BaseAdapter which extends object and implements ListAdapter and Spinner Adapter. It can be used in ListView, GridView and Spinner. BaseAdapter is very generic adapter which allows you to do pretty much whatever you want . Its custom Adapter from which you can do whatever you want to do with grid and list, But you need to do some coding for it. Check below coding for Base Adapter.

Also design xml for Adapter view, Like I did check xml code:

At final Stage you have to do bind your GridView with Adapter. Lets finish this. Checkout below code :

Now the output of this code will look like below image.

finalgv

Android Custom List View

Android Custom List View

In our last module we have discussed List View already. Here we are going to discuss about custom List View using Base Adapter. For Custom ListView we have to create Bean class, Adapter class And an Activity.

We have discussed ListView attributes in our last module so we need to do create layout here:

Bind this layout with your Activity as like I did at last.

Beans : JavaBeans are classes that encapsulate many objects into a single object. It contains constructor, Getter, Setter Methods. With the help of Setter and Getter method user can set and get data. It also have zero argument constructor. Check out below code for more details.

Base Adapter: BaseAdapter which extends object and implements ListAdapter and Spinner Adapter. It can be used in ListView, GridView and Spinner. BaseAdapter is very generic adapter which allows you to do pretty much whatever you want . Its custom Adapter from which you can do whatever you want to do with grid and list, But you need to do some coding for it. Check below coding for Base Adapter.

Use below xml for the Adapter:

Now We have to do coding for activity, Firstly you have to define global variable for List View, After declaration we need fetch it from xml by unique id. Also declare Array List of Bean and Adapter class as like I did. Now Add data in Array List and bind it with Adapter. At final stage you have to bind ListView with Adapter. Now you can run your code.

So here is the output :

customListView

Android ListView

Android ListView

ListView is a view from which we can display group of items in vertical scrollable list. List items are automatically inserted with the help of adapter.
Adapter is a bridge UI component and data source, It pulls data from database or an array.

Lets understand ListView by an example, Create an project for ListView and define ListView in xml like below code:

ListView Attributes:

Width : Used for giving Width of ListView.

Height : Used for giving Height of ListView.

ID : It uniquely identify the View.

Divider : It can be drawable or color which drawn between listview item.

Divider Height : This is the height of divider.

Let see how your layout will look after draw ListView .

1

Now Its time to move on Activity Coding Part :

So here is the code for ListView , I have used String Array which is bind with an ArrayAdapter, As we discussed above that Adapter is used to pull data from Database or an Array, So here is the example of ArrayAdapter which is pulling data from String array and then set into ListView.
ArrayAdapter is used when your data source is in array format.

Screenshot_20170826-234147

In above image you can see your created list. So its simple ListView in which we used an ArrayAdapter . In next module we will learn Custom ListView using BaseAdapter.

Android Base Adapter

Android Base Adapter

Adapter is a bridge between UI and data source, It helps us to fill data in the UI components. It pulls data from database or an array. After pulling data from database or an array, it sends data to adapter view and adapter view send it to view. In final stage view shows data on different Views Like ListView, GridView, Spinner , RecyclerView etc. An Adapter provide us simple view, If we need to customize it so we have to use Base Adapter.

BaseAdapter is very generic adapter which allows you to do pretty much whatever you want. Base Adapter is common base class of a general implementation of an Adapter. It generally used in ListView, GridView, Spinner etc. Base Adapter extends an object class and implement ListAdapter and SpinnerAdapter.

Lets understand it by Coding, how it works and which methods are overrided by it.

Firstly we need to create a class Like I did CustomAdapter is a class and then you have to extends BaseAdapter class.

Lets discuss all the functions briefly :

  1. getCount() : This function is used to returns total number count of items which are going to display in list. It counts the number from List Size like “list.size();”. Here I have used array list so like below code you can return count of total items.

  1. getView(int I, View view, ViewGroup parent) : This function is called when items are going to display in ListView or GridView or Spinner. In this function we bind the Layout for items using LayoutInflater class and then fetch the views like TextView, EditText, ImageView etc.
    In below code you will get that how it will work:

  1. getItem(int i) : This is used to get the data items associated with the specified position in the data set. Below is code for this, It returns the arraylist’s item according to position.

  1. getItemId(int i) : It returns the corresponding to the position item id. It returns long value of item position like below code:

So that was the Overview of Base Adapter Class. You can use it in Grid View , List View, Spinner etc.

Android UI Layouts

Layout is a basic building block of an Application, It is a visual structure for UI, It is associate with activity,fragment, dialogs etc.
There are two ways to declare a layout:
1. Declare UI element in XML: Android provides XML vocabulary, you can quickly design UI Layouts with the help of XML, in the same way you create web pages in HTML.

Lets create a XML layout which uses a vertical LinearLayout

After declare layout in XML, Lets know the way from which you can associate this xml layout with your activity:

The onCreate() callback method is called when your activity is launched.


Types of Layouts

1.Linear Layout : This layout align all children in single direction , vertically or horizontally.

2.Relative Layout : Relative Layout is a view group that display child views in relative position.


3.Table Layout : It displays its child views in row and columns.

4.Absolute Layout : It gives you feature to specify exact location of its children.

5.Frame Layout : It is a placeholder on screen for using display a single view.

6.ListView : ListView is a view group which displays a list of scrollable items.The list items are auto inserted into list using adapter.

7.GridView : GridView is a ViewGroup that display large amount of items in two-dimensional , scrollable grid.

8.RecycleView : An advance version of ListView is RecycleView. Just like ListView ,it is used to display large amount of similar items on screen.


Attributes

Attributes define visual properties of layout and each layout has set of attributes. Some of the common attributes are listed below which are used in all types of Layouts:

1.ID : It uniquely identify the View, Any View may have an integer Id which associate with it. Syntax of id is:

  1. Width : This is the width of layout , the syntax for using this attribute is

android: layout_width=”match_parent”

3.Height : This is the height of layout, the syntax for using this attribute is :


android:layout_height=”match_parent”

4.Margin Top : It is used to give extra space from top side , syntax for using this attribute is:

android:layout_marginTop=”5dp”

5.Margin Bottom : It is used to give extra space from bottom side , syntax for using this attribute is:

android:layout_marginBottom=”5dp”


6..Margin Left : It is used to give extra space from left side , syntax for using this attribute is:

android:layout_marginLeft=”5dp”


7.Margin Right : It is used to give extra space from right side , syntax for using this attribute is:

android:layout_marginRight=”5dp”

8.Padding Left : It is used to give padding from left side for the layout , syntax for using this attributes is:
android:paddingLeft=”5dp”

9..Padding Right : It is used to give padding from right side for the layout , syntax for using this attributes is:
android:paddingRight=”5dp”

10.Padding Top : It is used to give padding from top side for the layout , syntax for using this attributes is:
android:paddingTop=”5dp”

11.Padding Bottom : It is used to give padding from bottom side for the layout , syntax for using this attributes is:
android:paddingBottom=”5dp”

Android Intents

It Facilitate communication between components, It is Used to invoke components. Uses of Intent are: Starting an Activity, Starting a Service ,Delivering a Broadcast etc.
Types of Intent : Explicit Intents, Implicit Intents .

Intent Objects

An intent objects is collection or bundle of information which used by Android System and also by the component which receives intent object. The following component are listed below which are contained by the intent object:
1.Action : Its an important of the Intent Objects and Action is a string that specifies the generic action to perform. The general action to be performed, such as ACTION_EDIT, ACTION_MAIN, ACTION_VIEW, ACTION_SEND etc.

2.Data : It is used to operate data, like person record in database ,It is expressed as a Uri.
Some of the example action/data pairs are listed below –

ACTION_VIEW content://contacts/people/1
Display information about the person whose identifier is “1”.

ACTION_DIAL content://contacts/people/1
Display the phone dialer with the person filled in.

ACTION_VIEW tel:123
Display the phone dialer with the given number filled in. Note how the VIEW action does what is considered the most reasonable thing for a particular URI.

ACTION_DIAL tel:123
Display the phone dialer with the given number filled in.

ACTION_EDIT content://contacts/people/1
Edit information about the person whose identifier is “1”.

ACTION_VIEW content://contacts/people/
Display a list of people, which the user can browse through.

3.Category: Its an optional part of Intent Objects which gives additional information about the action to execute.CATEGORY_LAUNCHER,CATEGORY_BROWSABLE are the common categories.

4.Extras : It transfer additional information in Key-value pairs from one class to another class. Using putExtra() methods and Bundle object we can transfer information.

5.Flags :Flags may instruct Android System to launch an activity. Its an optional part of Intent Objects.

Types of Intent

1.Implicit Intent :It can invoke any application from device which is able to perform action. In this case your app does not perform any action but others app does perform action.

For example you have content and you want to share that content so just create an intent with ACTION_SEND like below code:

2.Explicit Intent :Explicit intent is used to launch particular Activity or Service in App. In simple word Calling an activity from another activity is an Explicit Intent. We can also send data using putExtra() method using Explicit Intent. See below code :

* Calling an Activity from another activity :

* Passing Data using Intent :

* Getting Data from Intent :


Android Resources

Apart from coding there are many items which are used to develop a good Android Application, That all items are Resources like bitmaps, colors, strings , animation and many more. These resources are maintained in various sub-directories under res/ directory of the project.

res01

Resource Types

Animation Resources : It define pre-define animations. Tween animations are saved in res/anim/ and accessed from the R.anim class, where Frame Animation are saved in res/drawable/ and accessed from the R.drawable class.

anim1

Color State List Resources : It define color resources that changes based on the View state. It contains list of colors. Colors are saved in res/color/ and accessed from the R.color class.

colors

Drawable Resources : It defines various graphics with bitmap , It contains Image files like .png, .jpg , .gif and XML files. That all are saved in res/drawable/ and accessed from the R.drawable class.

drawable

Layout Resources : It define a user interface layout. It is saved in res/layout and accessed from R.layout class.

xml

Menu Resources : It define contents of your application menus, like Options Menu, Context Menu etc. All menu XML files saved into res/menu/ and accessed from the R.menu class.

menures

String Resources : It define string , string array and plurals. All are saved in res/values/ and accessed from R.string, R.array and R.plurals.

stringsres


Style Resource : It defines look and format for UI elements. It is saved in res/style/ and accessed from the R.style class.

styleres

Values Resources: It contains values such as Booleans,integers, strings, dimensions , colors .That all are saved in res/values/ but accessed in different ways like R.bool for Booleans, R.dimen for dimensions etc.

valuesres

Android Fragments

Fragment is a part of Activity or also we can say sub activity. It represent multiple screen inside an activity.

The fragment’s lifecycle is affected by the host activity’s lifecycle, For example if host activity is in pause status so all fragment will be in pause status and if activity is destroyed so all fragment will be destroyed.

For creating an Fragment you need to extend through Fragment class or in other words you need to create subclass of Fragment. As I told you before that fragment is a part of activity or sub activity so Fragment class has code that looks like an Activity. It contains callback methods like an activity, like onCreate(), onStart(), onPause() and onStop(). You can understand lifecycle of Fragment from below Image.

fragment_lifecycle


  1. onAttach() : It calls when Fragment attach with an Activity, onAttach() method is called only once.
  2. onCreate() : It calls when creating Fragment. It is used to initialize essential components of fragment.

3.onCreateView() : It is called by the system for drawing User Interface for Fragment. For drawing UI for fragment , you need to return a View that is the root of fragment’s layout.

  1. onActivityCreated() : It is called after onCreateView() method when the host activity is created.

5.onStart() : It makes fragment visible.

  1. onResume() : It makes fragment active.

7.onPause() : The system calls this method when fragment is no longer active. First indication of this method is that user is leaving the fragment it does not mean that fragment is being destroyed.

8.onStop() : It is called when the fragment is no longer visible.

9.onDestroyView() : this method allows the fragment to clean up resources.

10.onDestroy() : this method allows the fragment to do final clean up of fragment state.

  1. onDetach() : It is called when the fragment is no longer associate with host activity.

Types of Fragment : Single Frame Fragment , List Fragment, Fragment Transaction.

In below code you will get information about Fragment creation.

frag

Android UI Controls/Widgets

As we discussed in Basic Building Block Page that View are drawn on screen. View occupies rectangle area on screen.View is a BaseClass for widgets.

There are lot off UI Controller/Widgets provided by Android ,such as Button,TextView, EditText , Checkbox, DatePicker, TimePicker, ProgressBar etc. These all allow you to build GUI for Android App.

  1. Button: It’s an User Interface Element from that user can tap and perform Action. To display a button on screen you have to add it on layout xml file of Activity.

2. TextView : It’s an user interface element which display text to user. Following code sample will help you to display TextView on Screen.

  1. EditText : Its’s an UI element which is used for enter and modify text . Using below code you can display EditText Widgets.

4.CheckBox : Checkbox is UI element which allow user to select multiple options . Using below code you can display CheckBox.

5.DatePicker : The Datepicker allow users to select a date of the day.

6.TimePicker : The TimePicker view allow users to select a time of the day.

7.ProgressBar: This view is useful when you want to display that some task is going on, It gives visual feedback.

8.RadioButton : it has two state either checked or unchecked, when it is checked ,the user can press it to unchecked it. Radio buttons are mainly used in RadioGroup. In Radio group when you checked any radio button so rest automatically becomes unchecked.

  1. ToggleButton : ToggleButton is a button which have two condition i.e. On/Off with light indicator with the text “ON” or “OFF”.

Android Hello World Application

Android Hello World Application

Here you will learn how to create an android project using Android Studio. Lets start our first Android Project ,Before Creation Android Project you have to make sure that you are done with complete setup of Android Studio.
Create An Android Application
First step for creation an App is Simply click on Android Studio Icon. Below Screen Will Appear, Click on Start a new Android Studio Project

five

On Next Screen you need to configure your project , Here you need to fill some details like Write Application name ,Company Domain, Project Location. Please check below screen.

seven


Click on next and Select the form factors of your app Like Minimum SDK and for which device you want to create this Application.

Screenshot_2

Next step is Selection of an Activity for Device

Screenshot_4

Next Level for creation Android App is Customize the Activity like below Image:

Screenshot_5

And finally click on finish for ends up with Basic Steps. You are done with project creation , now its time to do work on it. In below Image Activity is appeared ,An Activity is a class for Android App. this is a main entry point for an App.

Screenshot_6

On Second Screen you will get Xml file from which you can create UI for Android App.
You can modify this file according to requirements for change the Layout of your App.

xml


For “Hello World” Application the Layout xml will have following content

Here Relative Layout is a view group which display child view in relative position and TextView display text to the user and it also allow them to edit programmatically.

Now lets run this project on AVD (Android Virtual Device),I hope you have created AVD at the time of installation. If not no need to worry,You can create your AVD by using some easy steps:

avd1

Click on tools ->Android->AVD Manager. Android Virtual Device Manager Popup will appear click on Create Virtual Device.

avd2

Select Hardware and click on Next.

avd3

avd4

avd5

Click on Finish and your AVD is ready to Use. Now Run your project on your Android Virtual Device.

run1

runfinal

Congratulations! You have developed your first Android Application. Just follow All above steps for creation of your new poject.