Category Archives: Android Tutorial

Android Tutorial

Android Activity Lifecycle

Activity is the single screen like java frame or window, The Activity class provides sequence of callback methods: onCreate(), onStart(), onResume(), onPause(), onStop(), onRestart(), onDestroy().Each Callback Method invoke when Activity enters in new state.

Like main() method in C/C++ or Java Activity need onCreate() method for initiating its programming. As we discussed in above point that Activity Provides 7 callback methods but it doesn’t mean that you need to implement all callback methods.
Lets clarify these callback methods by below diagram:

android-activity-lifecycel

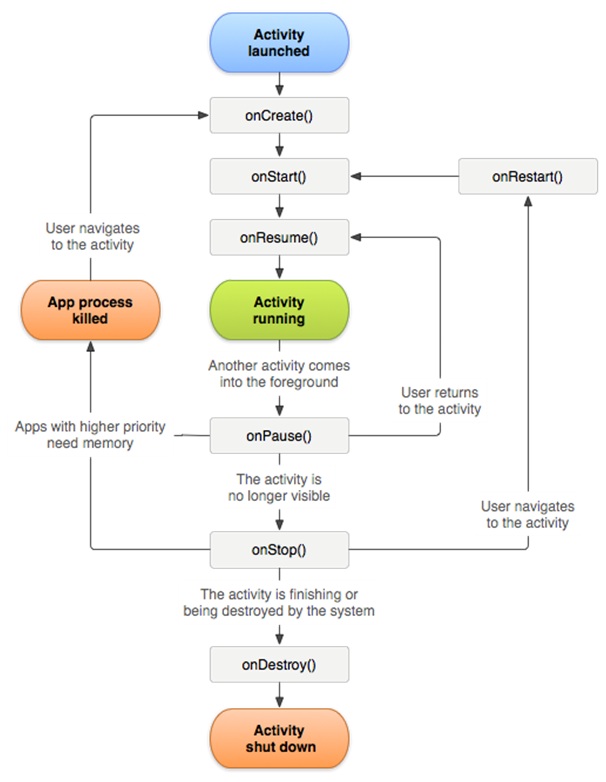
1.onCreate() : This callback method called when the activity is first created.

  1. onStart() : This method called when the activity becomes visible to user.
  2. onResume() : This method called When the user start interaction with App.
  3. onPause() : This method called when current activity is not visible to user and user is unable to send input and can not execute any code. In this method Current Activity will be on Pause condition and Previous Activity will be in OnResume() condition.
  4. onStop() : This callback method called when Activity is no longer visible to the user.
  5. onDestroy() : This method called before the activity destroyed by System. This method invoked if someone’s calling finish(), else system destroy temporarily the process to save space.
  6. onRestart() : This callback method called when the activity restart after stopping.


Lets Understand Android Activity Lifecycle with the help of below Example. Follow the following steps for modifying the “Hello World” App. I hope you remember all the steps which we have done in “Hello World” Android Application, Here we have to do some modification for understanding Lifecycle of Activity.

Let’s run this modified code on AVD, We are done with coding. Follow the same steps as you have done in “Hello World” Application.

After Running your Application you need to check your LogCat. If you are unable to find logcat screen then just click alt+6 and check LogCat with “Android:” Message.


Android Application Components

Android Application Components

Core Building Blocks of Android

Application components are very important part or Core Building Blocks of an Android Application. Its an entry Point for System or Users from which they can enter in App.
There are four main Important Components for an APP

  1. Activity
  2. Services
  3. Broadcast receivers.
  4. Content Provider.

  1. Activity: An Activity is a class, Its represent single screen. Parent class for Any Activity is Activity, Means You need to implement an Activity as a subclass of Activity, like

    public class DemoActivity extends Activity {

}


If you created an activity so you must declare it Manifest.xml file, Later on we will discuss about this.


2.Services: It’s a long running background Process which perform operations in background. Service does not provide User Interface. For Creation of Service we need to create Subclass of Service or we can also use existing Subclasses of Services.


  1. Broadcast Receivers: Broadcast Receiver respond on broadcast message of other applications or it can be system message. Suppose you clicked on any file for download and after download it will inform you that file is ready to use.
    A Broadcast Receiver is implemented as a subclass of Broadcast Receiver and each broadcast message received as a intent.


It Override OnReceive() method where each message will be received. Example for Broadcast Receiver is Alarm Manager. There is no need to run that app till alarm goes off, Once you schedule am alarm it will inform you about upcoming event .


4.Content Provider : Using Content Provider we can share data between Application. So basically Content Provider are used to share data between Applications. Content Providers use different ways to store data like Database, Files etc.


Additional Components
1. Fragment :
Fragment is a Sub Activity or parts of Activity.

  1. Intents : It Facilitate communication between components, It is Used to invoke components. Uses of Intent are: Starting an Activity, Starting a Service ,Delivering a Broadcast etc.
    Types of Intent : Explicit Intents, Implicit Intents .

3.Views : Views are basic building block for UI Components .Views are drawn on Screen ,It includes Buttons, Widgets, etc.
4.Layouts: Layout is a visual structure for UI. It is associate with Activity, Fragment, Dialogs, etc.
You can create Layouts in two ways:
1. Using XML
2. At Runtime.

5.Resource: It is an very useful component for An App. Using Resource you can import Pictures, Strings, Constant .

6.Manifest : Manifest.xml file is used to provide essential information about App. Its content information about your package .

Android Architecture

Android Architecture

Android is open source Linux based OS. This Linux-based software stack divided into five sections and four Layers as shown in the below Image.

scr_archi

1.Linux Kernel :Linux kernel exists at the root of android architecture. It manage all device drivers(like Audio,Binder,Display,Keypad,Bluetooth,Camera,USB,WIFI etc.) ,
Power Management ,Device management, Memory Management etc. Linux kernel is bottom layer in android Architecture.

2.Libraries :On the top of Linux kernel there are native libraries which includes SQLite, Libc, OpenGL, Webkit , Media etc.
SQLite is a light weight database for Android, Webkit is for browser support, Media is for audio video support.
3.Android Runtime: This section is available on Second Layer and third Section of Android Architecture. This section provides very important component i.e. DVM(Dalvik Virtual Machine)
Its like JVM(Java Virtual Machine) . DVM is designed and optimized for Android. It consume less memory and light weighted.

4. Android Framework: Third Layer and fourth section of Android Architecture is Android Framework. The Android Framework includes thefollowing Building Blocks of Android Application which are required for develop an App : Activity Manager, Content Providers , Resource Manager, Notification Manager, View System.

5.Applications: Last Layer of Android Architecture is Application, You will find all Applications at this Layer. Android Comes with core Apps like Contacts, SMS Messaging , Calendars, Browser, Email etc.


Android Environment Setup

Android Studio Overview

1.Android Studio Introduction:

Android Studio is an IDE(Integrated Development Environment) for development of Android Application, Its an Official IDE for Android. We can develop any type of application for Android Devices like Watch,Mobile,TV , etc. It works on IntelliJ IDEA.
2.Requirements:
All Required Tools are Open Source , We do not need to pay for these tools.
Required tools are listed below.
1.Java Development Kit(JDK)
2.Java Runtime Environment(JRE)
3. Android Studio

Before Installation of Android Studio We need to download JDK from this Official Web URL: http://www.oracle.com/technetwork/java/javase/downloads/jdk8-downloads-2133151.html .
After Download We have to Install and setup it into Environment variable of system

path

3.Installation

You Can Download Latest Version Of Android Studio From below URL

https://developer.android.com/studio/index.html

After installation Let’s launch Android Studio .exe file ,As I mentioned above that we need JDK before Installation of Android Studio, I hope you are done with that.

studio_first

Let’s Click on Next, If you did not set JDK path in environment variable so no need to worry android studio will give you an option for set your JDK path like below Image

android-setup-2

After Selecting Path of JDK click on Next. Here Android Studio will provide you some option that are using for App Development. Below Image has checked Android SDK, Android Virtual Device and Performance these options are required for Develop an APP.

setup_second

Specify path for Android Studio and Android SDK Wherever you want to keep this setup

third

At the Last It would extract Android SDK Package in our system, It will take time to finish.


After extracting Click on Next and then Finish setup, Now you are done with Installation, Project Creation Screen will appear like below Image

five

Now let’s start a new project with Android Studio. Write your first Application Name then Company
Domain, Project Location where you want to keep your Project(Warning: Please do not select C drive for storing your project)

Screenshot_1

After feeling all information you need to select the form factors where your app will run on ,Here you need to select Minimum SDK ,As mentioned in below image that Lower API level target more device so select Lower API Level.Screenshot_2

Click on Next, You will get below screen from where you have to Add an Activity to Mobile.
I select Empty Activity, you can as your requirement.

Screenshot_4

Finally at last you need to Customize the Activity, Here you can change name of Activity and Layout which is associated with this activity. Click On Finish for check in your first project

Screenshot_6


So here is your first Android Project.