Category Archives: Flutter Tutorial

flutter tutorial

Flutter Application Architecture

In this chapter, we will discuss the flutter application architecture. In this tutorial you will learn about flutter application architecture. We will cover flutter widgets, fluter gesture, flutter design specific widgets, flutter state management and fluter layers.

Flutter Widgets

In Flutter, Everything is a widget. Flutter application is itself a widget that contains many sub widgets. If we look at flutter application it is a top level widget is again created using one or more children widgets which may further includes sub child widgets.

Flutter Widget is basically a user interface component that is used to create interface of the app. It represents an immutable part of the user interface that can be any graphics, text, shapes, and animations are created using widgets. Lets understand the widget hierarchy of the hello world application as specified in the following diagram –

flutter-application-architecture

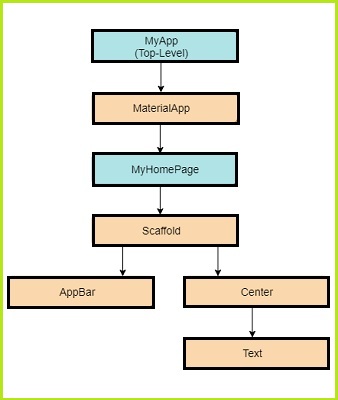
In the above example we have widget hierarchy. Here each of the widget contain child widget(s) in it. Here,

MyApp :- It is a custom widget. It is created using Flutter native widget “MaterialApp”.

MaterialApp:- It is used to define user interface of the home page. It has a custom widget ” MyHomePage”.

MyHomePage:-  The MyHomePage is created using a flutter native widget “Scaffold”.

Scaffold:- The scaffold widget includes body and appBar widget in it. The body widget is used to define main user interface of the application. While the appBar is used to defined the header ui of the application.

AppBar:- The AppBar is used to define header user interface of the application. The appBar is created using flutter native widget.

Body:- The body widget is used to define main user interface of the application.Body UI is created using Center widget.

Center:- The Center widget refers the actual content and it is created using a Text widget

Design Specific Widgets

In Flutter, we have two different sets of widgets for creating application. The Material Design for Android specific applications and Cupertino Style for IOS specific applications.

Gestures

In Flutter, there is a GestureDector widget that means to capture user’s interactions such as tapping, dragging, and scaling interaction. The GestureDector widget is an invisible widget that captures user’s action and responds accordingly. The Gesture widget adds the interactivity to flutter applications.

State Management

In Flutter, there is StatefulWidget Widget that means to maintain application state. The StatefulWidget widget is reactive and it is auto rendered whenever its internal state is changed.
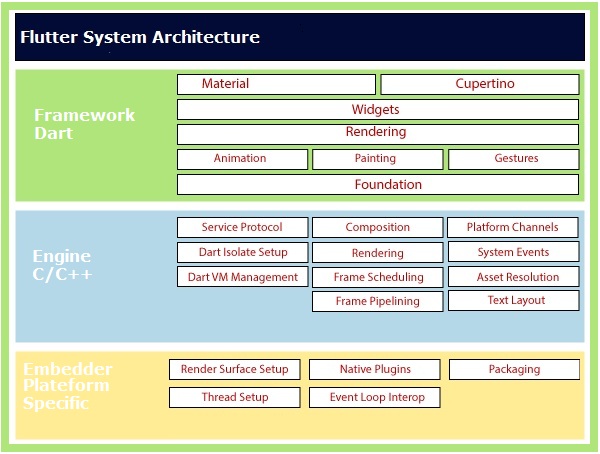
Layers

The flutter application architecture is grouped into multiple layers of complexity. Each of the layer is build upon its immediate layer. The top most layer is for widget specific to Android and iOS. The next layer is for all of the native flutter widgets. The next layer is Rendering layer, it performs the rendering of the flutter application and its components.

Flutter System Architecture

In this chapter, we are going to look into the the Flutter system architecture. The Flutter system mainly comprises of following key components.

  • Flutter Framework
  • Flutter Engine
  • Embedder Plateform Specific

flutter-architecture

Here, we will discuss flutter system architecture in bottom-up approach –

Embedder Platform Specific

Flutter applications are packaged in the same way as any other native application for the target platforms. Flutter provides a number of platform specific embedder for target platforms that coordinates a flutter application with the underlying operating system for accessing of services like rendering surfaces, accessibility, input and managing the message event loop.The embedder typically written in a best appropriate language for target platform.The embedder for android is written in C++ and Java, Objective C/Objective C++ for iOS and macOS, and C++ for Windows and Linux. With the use of embedder, Flutter code can also be integrated into an existing application as a module.

Flutter Engine

Primarily written in C++ flutter engine provides highly portable runtime environment for all flutter applications. It is mainly responsible for rendering of a composited screen whenever a new frame needs to be painted. It mainly provides the low-level implementation of Flutter’s core libraries for animation, graphics, file input/output, network input/output, plugin architecture, accessibility support, and a dart runtime for developing, compiling, and running Flutter applications.

Flutter Framework

Typically, developers uses the Flutter framework for developing flutter applications. Written in Dart it is a modern, reactive framework comes with a rich set of platform, layout, and libraries.

Flutter Hello World Application

The Flutter “Hello world!” application is a simplest flutter application that will display some text on the screen. The flutter “Hello world!” application is a simple yet complete application for beginners that guide you through the process of creating simple flutter application . The “Hello world!” application gives you a way to test flutter installation and development environment setup on you local system.

Prerequisites

Before starting with this tutorial we assume that you already done with flutter installation (If you do not have flutter installed then install it before you get started) as well as a local programming environment set up on your computer. We also assume that you are best aware of dart programming.

Creating Simple Flutter Application in Android Studio

In this tutorial, we will create a simple Flutter application to guide you through the basics of creating a flutter application in the Android Studio.

Step 1:- Open the Android Studio.

Step 2:- Let’s create a flutter project. Go to File-> New->New Flutter Project. The following screen will help you to understand.

flutter_hello_world_application

Step 3:- This will open you following wizard, select Flutter Application-> click Next.

flutter_hello_world_application_2

Configuring Flutter Application

Step 4:- Now, we will configure the application providing details as below and click Next button.

  • Project name: hello_app
  • Flutter SDK Path: <path_to_flutter_sdk>
  • Project Location: <path_to_project_folder>
  • Description: Flutter hello world application

flutter_hello_world_application

Step 5:- Next, you need to set the company domain name and click the Finish button. Here we have used flutterapp.w3adda.com as company domain name.

flutter_hello_world_application

Clicking on the Finish button will create a fully working flutter application with minimal functionality. Below is image provided to show you the directory structure of the flutter application created.

Flutter Application’s Directory Structure

flutter_hello_world_application_project_structure

In the image you can see the various folders and components of a flutter application structure. Lets understand structure and various components of the application.

.idea :- This is the folder at the very top of the project structure, it holds the Android studio configuration.

.android :- This folder holds auto generated source code for complete android project while creating flutter application for android. When the Flutter project is compiled into the native code, this will be injected into this Android project to generate native Android application.

.ios :- This folder holds auto generated source code for complete iOS project while creating flutter application for iOS. When the Flutter project is compiled into the native code, this will be injected into this iOS project to generate native iOS application.

.lib :- The lib stands for the library. It is the main working directory where we will do our project work. This folder mainly holds all of our Dart files written using flutter framework  while creating our flutter application. By default, it contains a main.dart file for our flutter application.

lib/main.dart − By default lib folder contains a main.dart file which works as entry point for our flutter application.

.test :- This folder contains Dart code to perform automated testing of our flutter application.

test/widget_test.dart :- This file contains sample code.

.gitignore :- A git file containing a list of files and folders that should be ignored by Git version control.

.metadata :- It is an auto generated file by the flutter tools, typically holds metadata or properties of our flutter application. You do not need to edit this file manually at any time.

.packages :- It is an auto generated file contain a list of packages for tracking dependencies of our Flutter project.

hello_app.iml :- It is always named as your Flutter project’s name. It is a project file contains additional settings of the project used by Android studio.

pubspec.yaml :- It is a project configuration file that is used by Pub, Flutter package manager.

pubspec.lock :- It is an auto generated file by Pub, Flutter package manager  based on the .yaml file.

README.md :- It is an auto generated file that holds project description.

Step 6:- Now open the lib/main.dart file and replace the code with the following code.

Now, we will understand the above code snippet line by line –

  • First line in the code snippet is an import statement to import the Flutter package material. Now, we have imported the flutter Material package in the application. Material is a flutter package used to create user interface of the application as per the Material design guidelines specified by Android.
  • The second line in the code snippet specifies the entry point of our Flutter application. It invokes the runApp method and pass it an object of MyApp. The runApp function is primarily used to attach the given widget to the screen.
  • Next is a widget method used for creating UI in the Flutter framework. Here, MyApp extends a StatelessWidget that overrides its build, the build method is used for creating a part of the UI of the application. The build method return MaterialApp widget that creates the root level UI of the application and contains typically three properties as listed below.
    1. Title: It specifies the title of the Flutter application.
    2. Theme: It specifies the theme of the widget. Here, we have set blue as the primary color of the application using ThemeData class and its property primarySwatch.
    3. Home: It specifies the the inner UI of the application, which further sets another widget (MyHomePage) for the application.
  • Next, the MyHomePage is similar to MyApp, except it returns a Scaffold widget. The Scaffold widget is a top-level widget after the MaterialApp widget for creating the user interface as per the Material design specification. This widget contains two important properties of the application appBar and body. The appBar displays the header of the application while body displays the actual content of the application. Here, AppBar render the header of the application, Center widget is used to center the child widget, and Text is the final widget used to show the text content and displays in the center of the screen.

Running Flutter Application

Step 7:- Now, we will run the application. Go to Run -> Run main.dart as shown in the screen below.

running_flutter_hello_world_application

Step 8:- Finally, you will see the output in the screen as below –

flutter_hello_world_application_output

Flutter Installation

In this chapter, we will guide you through the flutter installation process to set up flutter development environment on your local system.

Flutter Installation in Windows

In this section, we are going to show you how to install flutter in windows and setup development environment for flutter application development.

System requirements

You are required to meet following requirements to install and setup flutter development environment in windows system.

Operating System Windows 7 SP1 64-bit, Windows 8.1 64-bit, Windows 10 64-bit
Disk Space 1.65 GB (does not include disk space for IDE/tools).
Tools 1. Windows PowerShell 5.0 or newer
2. Git for Windows 2.x.
SDK Flutter SDK for Windows
IDE Android Studio (Official)

Note:- If Git for Windows is already installed, make sure by running the command git or git — version command.

Get the flutter SDK

Step 1:- Download the installation bundle of the latest Flutter SDK for windows. Go to following link and download the latest Flutter SDK for windows.

Step 2:- When download is complete, extract the flutter SDK zip file and place the contained flutter directory in the desired installation location of your choice, for example C:\src (C:\src\flutter).

Update your path

Step 3: Now, you need to update the system path to include the flutter bin directory.

Step 3.1:- Go to My Computer properties > advanced tab > environment variables. You will get the following screen –

flutter_installation_1

Step 3.2:- Now, select path > click on edit and append the full path to flutter\bin directory use ; as a separator from existing values.

flutter_installation_2

Step 4:- Now, run the following command to check that all the requirement of flutter development is met.

Step 5:- Running the above command will check your development environment and displays a report of the status of your Flutter installation.

flutter_installation_3

This report displays the status of your flutter installation, check the output carefully for other software, tools or dependencies you might need to install or further tasks to perform.

Note:- Once you have installed any missing dependencies, you can run flutter doctor command again to verify that you have set everything correctly.

Step 6:- Install the latest Android SDK, if reported missing by flutter doctor

Step 7:- Install the latest Android Studio, if reported missing by flutter doctor

Step 8:- Start an android emulator or connect a real android device to the system.

Step 9:- Install Flutter and Dart plugins in Android Studio. It provides startup template to create Flutter application, it allows to run and debug Flutter application in the Android Studio.

  • Start Android Studio
  • Open plugin preferences (File > Settings > Plugins )
  • Select Browse repositories, select the Flutter plugin and click Install.
  • Click Yes when prompted to install the Dart plugin.
  • Restart Android studio.

Flutter Installation in MacOS

In this section, we are going to show you how to install flutter in macOS and setup development environment for flutter application development.

System requirements

You are required to meet following requirements to install and setup flutter development environment in macOS system.

Operating System macOS (64-bit)
Disk Space 2.8 GB (It does not include disk space for IDE/tools).
Tools bash
curl
git 2.x
mkdir
rm
unzip
which
IDE Xcode (Official)

Get the flutter SDK

Step 1:- Download the installation bundle of the latest Flutter SDK for macOS. Go to following link and download the latest Flutter SDK for macOS.

Step 2:- When download is complete, extract the flutter SDK zip file and place the contained flutter directory in the desired installation location of your choice.

Update your path

Step 3:- Now, you need to update the system path to include the flutter bin directory.

Step 4:- Next, enable the updated path in the current terminal window use the following command and then verify it also.

Step 5:- Now, run the following command to check that all the requirement of flutter development is met.

Step 6:- Running the above command will check your development environment and displays a report of the status of your Flutter installation.

flutter_installation_3_macos

This report displays the status of your flutter installation, check the output carefully for other software, tools or dependencies you might need to install or further tasks to perform.

Note:- Once you have installed any missing dependencies, you can run flutter doctor command again to verify that you have set everything correctly.

Step 7:- Install the latest Xcode tools if reported missing by the Flutter doctor.

Step 8:- Install the latest Android Studio and SDK, if reported missing by the Flutter doctor.

Step 9:- Next, you need to set up an iOS simulator or connect an iPhone device to the system for developing an iOS application.

Step 10:- Install Flutter and Dart plugins in Android Studio. It provides startup template to create Flutter application, it allows to run and debug Flutter application in the Android Studio.

  • Start Android Studio
  • Open plugin preferences (File > Settings > Plugins )
  • Select Browse repositories, select the Flutter plugin and click Install.
  • Click Yes when prompted to install the Dart plugin.
  • Restart Android studio.

Flutter Introduction

What Is Flutter?

Flutter is a cross-platform mobile application development framework that lets you build high performance native apps for iOS, Android and Web in a single codebase. As a cross-platform mobile application development framework, Flutter much like React Native, as Flutter follows reactive and declarative style of programming. Unlike React Native, Flutter apps are entirely written in Dart programming language that avoids performance problems caused by the need for a JavaScript bridge.

Flutter Features

Here are some essential features of Flutter are listed below:

Open-Source:- Both Flutter and Dart are open-source and free to use mobile application development framework that lets you build high performance native apps for iOS, Android. It provides extensive documentation and community support to help out with any issues you may encounter.

Cross-platform development:- Flutter supports cross-platform application development framework that lets you build apps for iOS, Android and Web in a single codebase which makes it easy to write, maintain, and run applications on different platforms. This saves lot time, effort, and money.

Single Codebase :- This is one of the most appealing feature of Flutter which lets you write a cross-platform mobile application in a single codebase for both Android and iOS.

Hot Reloading :- One of the biggest frustrations as mobile application developer you have probably faced is constant recompiling of project. Whenever you make a small change you need to recompile the project completely to check your changes in effect. Flutter fixed this problem by taking the advantage of Hot Reload feature that allows developers to view changes instantaneously .

Accessible Native Features:- Flutter offers the support for native code, third-party integration, and platform APIs. Thus, we can easily access the SDKs on both platforms.

Minimal code:- Flutter app is developed by Dart programming language, which uses JIT and AOT compilation to improve the overall start-up time, functioning and accelerates the performance. JIT enhances the development system and refreshes the UI without putting extra effort into building a new one.

Widgets:- The Flutter framework offers widgets, which are capable of developing customizable specific designs. Most importantly, Flutter has two sets of widgets: Material Design and Cupertino widgets that help to provide a glitch-free experience on all platforms.

Benefits of Flutter

High productivity:- Since Flutter is cross-platform, you can use the same code base for your iOS and Android app. This can definitely save you both time and resources.

Great performance:- Dart compiles into native code and there is no need to access OEM widgets as Flutter has its own.This results in fast app startup times and less performance issues.

Fast development:- Taking the advantage of Hot Reload feature developers view changes made in the code on emulators, simulators and hardware instantaneously. This makes application development and debugging much faster as there is no need to restart app to view changes.

Simple :- Flutter is so easy to learn that no prior programming knowledge is required. “Experience with object-oriented languages is definitely helpful, but even non-programmers have made Flutter apps!”.

Compatibility:- Since widgets are part of the app and not the platform, you’ll likely experience less or no compatibility issues on different OS versions.

Free:- Both Flutter and Dart are open-source and free to use.

Support:- Extensive documentation and community support to help out with any issues you may encounter.