Dart HTML DOM
Dart HTML DOM
Leave a reply

Dart HTML DOM
Unit Testing is a software development process where individual units/components of an application are tested. The purpose is to validate each of the individual units of an application performs as designed. Basically we can think of a unit as smallest testable parts of an application that can be logically isolated in a system. In most programming languages it can an individual program, a function, a subroutine, a method, property or a class.
1.) Unit testing makes it easy to maintain code.
2.) It makes code are more reusable.
3.) It helps to faster the development
4.) It makes code more reliable
5.) It makes debugging is easy
6.) It reduces cost of testing and fixing of defects, as they are captured in very early stage.
In Dart, we need to incorporate external library named “test”, which provides a standard way of writing and running individual unit tests. In Dart, unit testing can be done in following steps –
Installing “test” package :- To incorporate unit testing in your project, you need to install a third-party packages “test” in the your project. Lets open pubspec.yaml in your project and make the following entry in it.
|
1 2 |
dependencies: test: |
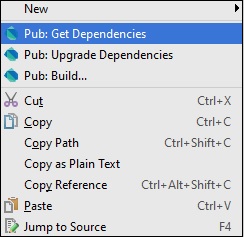
Now, right-click on pubspec.yaml file and click get dependencies. This will install the “test” package in your project.
It can also be installed from command line using following command –
|
1 |
pub get |
Importing “test” package :- Add the following line of in your test file.
|
1 |
import "package:test/test.dart"; |
Writing Test Cases :- Test cases are added using a top-level function test(), while test assertions are made using the expect() function.
Syntax:-
|
1 2 3 |
test("Test Description", () { expect(actualValue , matchingValue) }); |
Multiple test cases can be grouped together using the group() function. It helps grouping of test cases based on some criteria.
Syntax:-
|
1 2 3 4 5 6 7 8 |
group("Tests_Group_Name", () { test("test_case_1", () { expect(actual, equals(expected)); }); test("test_case_2", () { expect(actual, equals(expected)); }); }) |
Example (Passing Test) :-
The following example we have defined a method Add(), which takes two integer values and returns an integer representing the sum of the number. Lets run some test on add() method –
|
1 2 3 4 5 6 7 8 9 10 11 12 13 14 15 16 17 18 19 20 |
import 'package:test/test.dart'; // Import the test package int Add(int n1,int n2) // Function to be tested { return n1+n2; } void main() { // Define the test test("test to check add method",(){ // Arrange var expected = 50; // Act var actual = Add(20,30); // Asset expect(actual,expected); }); } |
When we run the above dart program, we will see following output.
Output:-
![]()
Concurrency is the ability to run multiple programs or multiple parts of a program in parallel. If a time consuming task can be performed asynchronously or in parallel, this improve the throughput and the interactivity of the program. Concurrency enable a program to achieve high performance and throughput by utilizing the untapped capabilities of underlying operating system and machine hardware.
Dart uses isolates in order to achieve concurrency. Isolates are independent workers that do not share memory, but instead communicate by passing messages over channels, isolates are similar to actors in Erlang or web workers in JavaScript. Since isolates are communicating via passing messages thus it needs a way to serialize a message. This is done using a snapshot, which is generated from a given object, and then this is transferred to another isolate for deserializing. Dart uses Isolates for Concurrent programming. It is as a tool for doing works in parallel. The dart:isolate package is a set of classes required achieve concurrency using Isolates.
Example:-
|
1 2 3 4 5 6 7 8 9 10 11 12 13 |
import 'dart:isolate'; void sayHello(var msg){ print("Hello From :${msg}"); } void main(){ Isolate.spawn(sayHello,'John!!'); Isolate.spawn(sayHello,'Steve!!'); Isolate.spawn(sayHello,'Keith!!'); print('Hello from main1'); print('Hello from main2'); print('Hello from main3'); } |
Here, the spawn method of the Isolate class facilitates running a function sayHello in parallel with the rest of our code. The spawn function takes following two parameters –
1.) The function to be spawned.
2.) An object that will be passed to the spawned function.
If no object is pass to the spawned function, it will be provided with a NULL value.
The two functions (sayHello and main) not necessarily run in the same order each time program executed. There is no guarantee when sayHello will be executing and when main() will be executing. The output will be different each time you run program.
Output:-
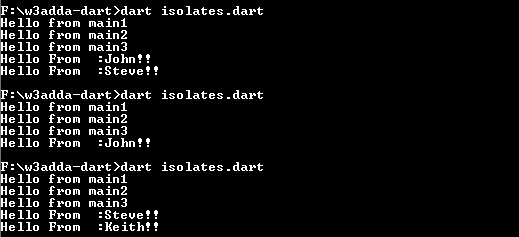
Note:- The output of the above program will be different for different hardware and operating system configurations.
Dart is a single threaded programming language that helps the developer ensure that critical functions to be executed till completion, without preemption. In Dart, one operation is executed at a time, thereafter after the other operation; that mean as long as one operation is executing, it cannot be interrupted by any other part of the program. Let’s take an example to understand this concept.
Example:-
|
1 2 3 4 5 6 7 8 9 10 11 |
import 'dart:io'; void main() { // prompt for user input print("Enter your favourite color :"); // this is a synchronous method that waits to read user input String color = stdin.readLineSync(); print("Your favourite color Is : ${color}"); print("End of main"); } |
Here, we are using the “dart:io” library to accepts the user input. In the above program, the readLineSync() method is a synchronous method. Since it is a synchronous method, this will block the execution of all instructions after the readLineSync() function till it completes its task. In the above program the stdin.readLineSync function waits for the user input; it block the program execution and hold the execution until it receives the user’s input.
To help keep the application responsive, Dart uses an asynchronous programming model, which let your program run without getting blocked. In asynchronous programming, when program calls a method to perform an operation asynchronously, the program continue executing while the asynchronous method performs its task. An asynchronous operation is executed in a separate thread from the main application thread. In Dart, the dart:async package facilitates implementing asynchronous programming.
Dart uses Future objects (futures) to facilitate the asynchronous programming. A Future objects (Future<T>) represents an asynchronous operations that will produces a result of type T. To work with futures, you can use either async and await or the Future API.
In Dart, the async and await keywords facilitate the asynchronous programming without using the Future API. When you want a function to run asynchronously, you need to have the async keyword added before its body. This async keyword comes right after the function signature.
Syntax:-
|
1 2 3 |
func_name() async { // function body } |
When an async function is invoked, a Future object is immediately returned and the function is executed later. As the body of the async function is executed, the Future object returned by the function call will be completed along with its result.
Example:-
|
1 2 3 |
void hello() async { print("Hello Dart"); } |
The await keyword executes a function asynchronously, and then suspends the currently running function until the result is ready, after that continue on to the next line of code. The await keyword only works in async functions.
Syntax:-
|
1 |
await e |
Here, e is an asynchronous expression and is expected to evaluate to a Future. The await expressions evaluate e, and then suspends the currently running function until the result is ready.
Example:-
|
1 2 3 4 5 6 7 |
void hello() async { print("Hello Dart"); } void main() async { await hello(); print('All done'); } |
Output:-
|
1 2 |
Hello Dart All done |
Here, we have used the async keyword with main method because we are going to call the hello() function asynchronously. Then, we have used await modifier directly in front of the hello() function that we want to run asynchronously.
Note :- When you are using await, make sure caller function and the function called must use the async modifier.
Dart supports asynchronous programming which let your program run without getting blocked. Dart uses isolates in order to achieve concurrency. We can think of an Isolate corresponds to the Dart version of the Thread. However, there is a major difference with the usual implementation of “Threads” and “Isolates”. The Isolates are independent workers that do not share memory, but instead communicate by passing messages over channels, isolates are similar to actors in Erlang or web workers in JavaScript. Since isolates are communicating via passing messages thus it needs a way to serialize a message.
An Isolate can be created using the spawn() method. The spawn method must be provided with an ‘entry point’ method with a single parameter. This parameter represents a port which isolate will use to send back notification messages.
Example:-
|
1 2 3 4 5 6 7 8 9 10 11 12 13 14 15 16 17 |
void start() async { ReceivePort receivePort= ReceivePort(); //port for isolate to receive messages. isolate = await Isolate.spawn(runTimer, receivePort.sendPort); receivePort.listen((data) { stdout.write('Receiving: ' + data + ', '); }); } void runTimer(SendPort sendPort) { int counter = 0; Timer.periodic(new Duration(seconds: 1), (Timer t) { counter++; String msg = 'notification ' + counter.toString(); stdout.write('Sending: ' + msg + ' -'); sendPort.send(msg); }); } |
Here, we have a start() method which creates a port and spawns an isolate. The start() method is marked as async so that we can await the response from the spawning of the isolate and to store a reference to the new isolate (Which is important when we want to kill a running isolate). The spawn() method provided with two parameters that is a callback function to execute runTimer(), and a port sendPort which the callback function will use to send messages back to the caller. The, start() method begin listening the receivePort for messages from the isolate. As this will receive a message, it will send it to the console output. The runTimer() method starts a Timer that fires every second in order to update a counter and send out a notification message via the port which it received when the isolate was spawned.
The kill() method is used to stop a running isolate.
Example:-
|
1 2 3 4 5 6 7 |
void stop() { if (isolate != null) { stdout.writeln('Stopping Isolate...'); isolate.kill(priority: Isolate.immediate); isolate = null; } } |
Here, we have created a stop() method that will kill the running isolate and sets its reference to null. The priority of Isolate.immediate will terminate the isolate at earliest.
Example:-
|
1 2 3 4 5 6 7 8 9 10 11 12 13 14 15 16 17 18 19 20 21 22 23 24 25 26 27 28 29 30 31 32 33 34 35 36 37 38 39 40 41 |
import 'dart:io'; import 'dart:async'; import 'dart:isolate'; Isolate isolate; void start() async { ReceivePort receivePort= ReceivePort(); //port for isolate to receive messages. isolate = await Isolate.spawn(runTimer, receivePort.sendPort); receivePort.listen((data) { stdout.write('Receiving: ' + data + ', '); }); } void runTimer(SendPort sendPort) { int counter = 0; Timer.periodic(new Duration(seconds: 1), (Timer t) { counter++; String msg = 'notification ' + counter.toString(); stdout.write('Sending: ' + msg + ' -'); sendPort.send(msg); }); } void stop() { if (isolate != null) { stdout.writeln('Stopping Isolate...'); isolate.kill(priority: Isolate.immediate); isolate = null; } } void main() async { stdout.writeln('Starting Isolate...'); await start(); stdout.writeln('Press enter key to quit'); await stdin.first; stop(); stdout.writeln('Bye!'); exit(0); } |
Output-

In Dart, the callable class allows its instances to be called like a function. To make a class callable class you are required to implement a call() method in it. Lets understand it by example –
Example:-
|
1 2 3 4 5 6 7 8 9 10 11 12 13 |
class Employee{ String call(String name, int age){ return "Employee name is $name and Age Is $age"; } } void main(){ Employee emp = new Employee(); var msg = emp("John", 30); print("W3Adda - Dart Callable Class Example"); print(msg); } |
In the above example, the Employee class defines a call() function that takes two parameters String name and Integer age and return a message with this information.We have created an object emp of Employee class and called it like this –
|
1 |
var msg = emp("John", 30); |
Generator is function allows you to lazily produce a sequence of values. Dart comes with built-in support for two type of generator functions –
Synchronous generator:- It returns an Iterable object, which delivers values synchronously. A synchronous generator function can be implemented by marking the function body as sync* along with a yield statements to generate values.
Example:-
|
1 2 3 4 5 6 7 8 9 10 11 12 13 14 15 |
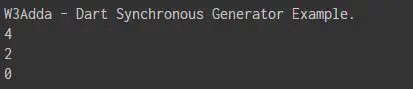
main() { print("W3Adda - Dart Synchronous Generator Example."); evenNumbersDownFrom(5).forEach(print); } // sync* functions return an iterable Iterable<int> evenNumbersDownFrom(int n) sync* { int k = n; while (k >= 0) { if (k % 2 == 0) { // 'yield' suspends the function yield k; } k--; } } |
Output:-
Asynchronous generator:- It returns a Stream object, which delivers values asynchronously. An asynchronous generator function can be implemented by marking the function body as async*, and use yield statements to generate values.
Example:-
|
1 2 3 4 5 6 7 8 9 10 |
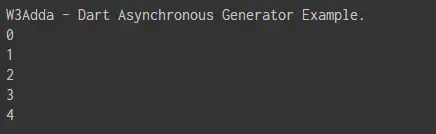
main() { print("W3Adda - Dart Asynchronous Generator Example."); asyncNaturalsTo(5).forEach(print); } // sync* functions return an stream Stream<int> asyncNaturalsTo(int n) async* { int k = 0; while (k < n) yield k++; } |
Output:-
Dart Libraries
Package is simply a set of dart program organized in an independent, reusable unit. It usually contains set of functions and classes for a specific purpose or utility along with the complied code and sample data. Dart comes with a rich set of default packages, loaded automatically when Dart console is started. However, any other package other than the default need to be installed and loaded explicitly first in order to use it. Once a packages is loaded, it can be used throughout the Dart environment.
Dart comes with an inbuilt Package Manager known as pub package manager. It is used to install, organize and manage third-party libraries, tools and dependencies. Every Dart application has a pubspec.yaml file that keeps track of all the third-party libraries and application dependencies along with the metadata of applications like application name, author, version, and description. Most of the Dart IDEs offer in-built support for using pub that includes creating, downloading, updating, and publishing packages. Otherwise, you can use pub on the command line. Below is a list of the important pub commands –
| Sr.No | Description |
|---|---|
| pub get | This will get all packages your application is dependent upon. |
| pub upgrade | This will upgrade all your application dependencies to latest version. |
| pub build | This is used to create a built of your web application and it will create a build folder, with all related scripts in it. |
| pub help | This command is used to know about all different pub commands. |
Step 1:- Add the package name in dependencies section of your project’s pubspec.yaml file. Then, you can run following command from the your application directory to get package installed in your project.
|
1 |
pub get |
This will download the packages under the packages folder in your application directory.
Example:-
|
1 2 3 4 5 |
name: DemoApp version: 0.0.1 description: A simple dart application. dependencies: xml: |
Here, we have added xml: to the project dependencies. This will install Dart XML package in the project.
Step 2:- Once the package is installed in our project, we need to import the required libraries from the package in our program as follows –
Example:-
|
1 |
import 'package:xml/xml.dart' as xml; |
Dart Generics
Collection is a group of multiple objects represented as a single unit. In Dart, the “dart:collection” library encompasses classes and utilities that supplement the collection support in dart:core. The “dart:collection” library is a collection of interfaces and classes which helps in storing and processing the data efficiently.
In Dart, metadata is used to provide additional information about your dart program. A metadata annotation usually begins with @ character, followed by either a reference to a compile-time constant or a call to a constant constructor.
Note:- The @deprecated and @override are available for all Dart Program.
In Dart, you are allowed to define your own metadata annotations.
Example:-
Here’s an example of defining a @employee annotation that takes two arguments –
|
1 2 3 4 5 6 7 8 |
library employee; class Employee{ final String department; final String code; const Employee(this.department, this.code); } |
And here’s an example of using that @employee annotation –
|
1 2 3 4 5 6 |
import 'employee.dart'; @Employee('Admin', 'ADM') void sayHello() { print("Hello World!'); } |
In Dart, metadata usually appear before a library, class, typedef, type parameter, constructor, factory, function, field, parameter, or variable declaration and before an import or export directive. Metadata can be retrieved using reflection in runtime.