Laravel 5.8 Autocomplete Search Using Typeahead JS
In this article, I will show you how to create a dynamic database driven ajax jquery autocomplete using typeahead js in Laravel. In this tutorial we will create a dynamic search dropdown autocomplete which will fetch options from database table using bootstrap typeahead js.
The Typeahead JS is a jquery plugin, it is used to create dynamic autocomplete input with several options. In this example you will learn how to implement typeahead autocomplete in laravel.
Before starting with example I assume that you already have fresh laravel 5.8 installation ready, if you have not installed it yet you can follow laravel 5 installation instruction here.
Install Laravel 5.8
First of all we need to create a fresh laravel project, download and install Laravel 5.8 using the below command
|
1 |
composer create-project --prefer-dist laravel/laravel larablog |
Configure Database In .env file
Now, lets create a MySQL database and connect it with laravel application. After creating database we need to set database credential in application’s .env file.
.env
|
1 2 3 4 5 6 |
DB_CONNECTION=mysql DB_HOST=127.0.0.1 DB_PORT=3306 DB_DATABASE=larablog DB_USERNAME=root DB_PASSWORD= |
Create Model and Migration
Now, we have to define table schema for contact table. Open terminal and let’s run the following command to generate a Contact model along with a migration file to create contact table in our database.
|
1 |
php artisan make:model Contact -m |
Once this command is executed you will find a migration file created under “database/migrations”. Lets open migration file created and put following code in it –
|
1 2 3 4 5 6 7 8 9 10 11 12 13 14 15 16 17 18 19 20 21 22 23 24 25 26 27 28 29 30 31 32 33 34 |
<?php use Illuminate\Support\Facades\Schema; use Illuminate\Database\Schema\Blueprint; use Illuminate\Database\Migrations\Migration; class CreateContactsTable extends Migration { /** * Run the migrations. * * @return void */ public function up() { Schema::create('contacts', function (Blueprint $table) { $table->bigIncrements('id'); $table->string('name'); $table->string('email'); $table->string('phone'); $table->timestamps(); }); } /** * Reverse the migrations. * * @return void */ public function down() { Schema::dropIfExists('contacts'); } } |
Run Laravel Migration
Now, run following command to migrate database schema.
|
1 |
php artisan migrate |
After, the migration executed successfully the contact table will be created in database.
Create AutoComplete Controller
Next, we have to create a controller for AutoComplete suggestion. Create a controller named AutoCompleteController using command given below –
|
1 |
php artisan make:controller AutoCompleteController |
Once the above command executed, it will create a controller file AutoCompleteController.php in app/Http/Controllers directory. Open the AutoCompleteController.php file and put the following code in it.
app/Http/Controllers/AutoCompleteController.php
|
1 2 3 4 5 6 7 8 9 10 11 12 13 14 15 16 17 18 19 20 21 22 23 24 25 |
<?php namespace App\Http\Controllers; use Illuminate\Http\Request; use App\Contact; class AutoCompleteController extends Controller { // public function index() { return view('TypeaheadAutocomplete.search'); } public function search(Request $request) { $search = $request->get('term'); $result = Contact::where('name', 'LIKE', '%'. $search. '%')->get(); return response()->json($result); } } |
Create Blade / View Files
In this step, we will create view/blade file to perform autocomplete Search Using Typeahead JS. Lets create a blade file “search.blade.php” in “resources/views/TypeaheadAutocomplete/” directory and put the following code in it respectively.
resources/views/TypeaheadAutocomplete/search.blade.php
|
1 2 3 4 5 6 7 8 9 10 11 12 13 14 15 16 17 18 19 20 21 22 23 24 25 26 27 28 29 30 31 32 33 34 35 36 37 38 39 40 41 42 43 44 45 46 |
<!DOCTYPE html> <html> <head> <meta charset="UTF-8"> <meta name="viewport" content="width=device-width, initial-scale=1.0"> <meta http-equiv="X-UA-Compatible" content="ie=edge"> <meta name="csrf-token" content="{{ csrf_token() }}"> <title>Laravel 5.8 Autocomplete Search Using Typeahead JS</title> <link rel="stylesheet" href="https://cdnjs.cloudflare.com/ajax/libs/twitter-bootstrap/4.1.3/css/bootstrap.min.css" /> <script src="http://ajax.googleapis.com/ajax/libs/jquery/1.9.1/jquery.js"></script> <script src="https://cdnjs.cloudflare.com/ajax/libs/bootstrap-3-typeahead/4.0.1/bootstrap3-typeahead.min.js"></script> <style> .container{ padding: 10%; text-align: center; } </style> </head> <body> <div class="container"> <div class="row"> <div class="col-12"><h2>Laravel 5.8 Autocomplete Search Using Typeahead JS - W3Adda</h2></div> <div class="col-12"> <div id="custom-search-input"> <div class="input-group"> <input id="search" name="search" type="text" class="form-control" placeholder="Search" /> </div> </div> </div> </div> </div> <script type="text/javascript"> var route = "{{ url('autocomplete') }}"; $('#search').typeahead({ source: function (term, process) { return $.get(route, { term: term }, function (data) { return process(data); }); } }); </script> </body> </html> |
Create Routes
After this, we need to add following routes in “routes/web.php” file. Lets open “routes/web.php” file and add following route.
routes/web.php
|
1 2 |
Route::get('search', 'AutoCompleteController@index'); Route::get('autocomplete', 'AutoCompleteController@search'); |
Now we are ready to run our example so lets start the development server using following artisan command –
|
1 |
php artisan serve |
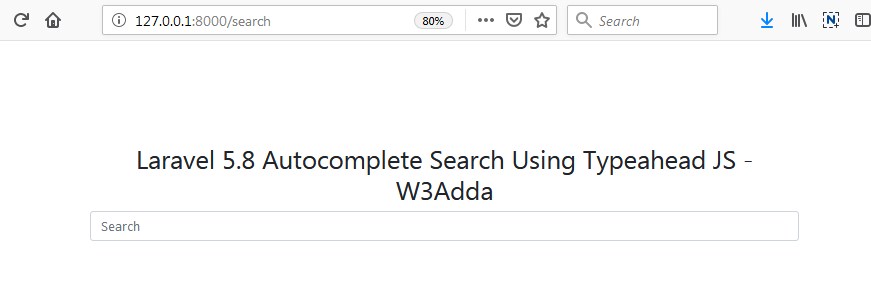
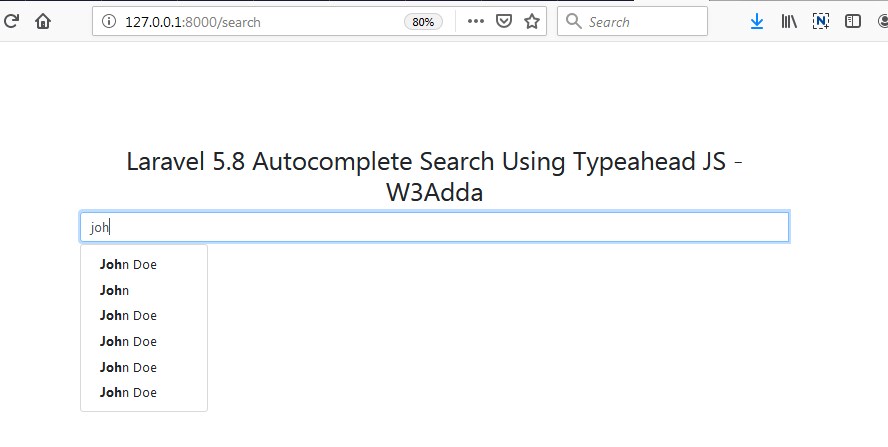
Now, open the following URL in browser to see the output –
http://localhost:8000/search
Output 1:-
Output 2:-

 Test Laravel 5.8 Facebook Login